This tool is used to facilitate the creation of Modules with Extreme PBR standard group nodes. Note well, the Groups of nodes present in this small library, are the ones with which Extreme PBR was made, so you will find it useful if you are looking for some useful group nodes, for example “Linear Animation” is a nude that has an animable output, this is the most striking example.

Here are some Group Nodes ready to be imported and used:
Animation Linear:
This node is pre-animated
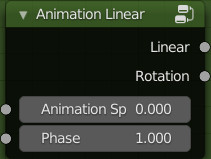
Inputs:
- Animation Speed: Adjust the speed of the animation
- Phase: Move the stage of the animation, useful if you use the same node over and over again.
Outputs:
- Linear: Normal Speed
- Rotation: Reduced speed
Bump:
This node group hooks perfectly to the outputs of the Extreme PBR standard modules
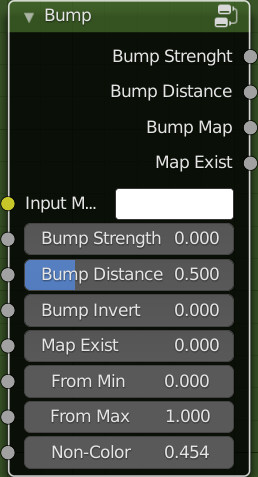
Inputs:
- Bump Strengh: Strength of the bump mapping effect, interpolating between no bump mapping and full bump mapping.
- Bump Distance: Multiplier for the height value to control the overall distance for bump mapping.
- Bump Invert: Produces a negative of the input
- Map Exist: This is recognized by Extreme PBR, so it will be handled automatically by it. Do not connect this input
- From Min: The lower bound of the range to remap from.
- From Max: The higher bound of the range to remap from.
- Non-Color: Non-Color, exactly simulates the color space of the texture image. This is to prevent some images with different color spaces from being replaced and confused. The color space will be simulated automatically. With this criterion: Non-Color Image, the button will switch to standard mode. sRGB image or other types, the button will simulate Non-Color.
Outputs:
- Bump Strength/Bump Distance/Bump Map/Map Exist: To be connected to the Extreme PBR module outputs, the addon takes care of the rest to connect the module to the mixer.
- Map Exist: It is not necessary to use it, but if needed, it gives exactly the result 0-1 depending directly on the input of the same name
Combine AO
This group is used to blend and simulate an ambient occlusion.
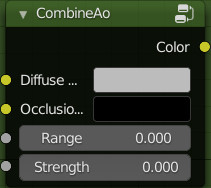
Inputs:
- Diffuse: This input is for the Diffuse / Albedo map
- Occlusion: This input is for a pre-computed ambient occlusion map.
- Range: Adjusts the range of ambient occlusion
- Strength: Adjusts the intensity of the ambient occlusion map
Outputs:
- Color: Result obtained
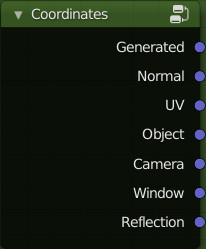
Coordinates:
This group is the exact reproduction of the Coordinates node present in Blender, but it is recognized by Extreme PBR for the Mapping Editor tool
Map Ctrl:
This group is used to adjust the Black & White type map immediately after. It is recognized by Extreme PBR and provides automatisms from the Extreme PBR panel interface.
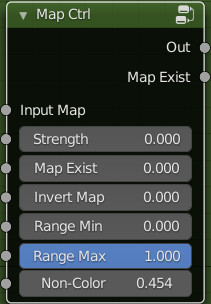
Inputs:
- Input Map: Input of a grayscale map
- Strength: Adjust the intensity of the map
- Map Exist: This is recognized by Extreme PBR, so it will be handled automatically by it. Do not connect this input
- Invert Map: Invert the map, this happens automatically via the button if this node will be tagged with the “Node Tag Type” system
- Range Min: The lower bound of the range to remap from.
- Range Max: The higher bound of the range to remap from.
- Non-Color: Non-Color, exactly simulates the color space of the texture image. This is to prevent some images with different color spaces from being replaced and confused. The color space will be simulated automatically. With this criterion: Non-Color Image, the button will switch to standard mode. sRGB image or other types, the button will simulate Non-Color.
Outputs:
- Out: Output of the result
- Map Exist: It is not necessary to use it, but if needed, it gives exactly the result 0-1 depending directly on the input of the same name
Mapping:
This group is very similar to Blender’s Standard Mapping node. With the difference that the 3 sockets of
the X / Y / Z vectors have been separated, and the scale has an input to scale uniformly.
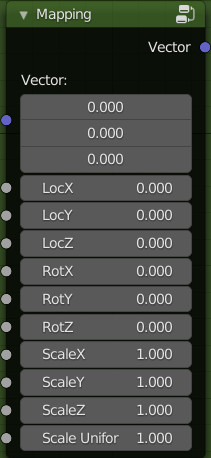
Inputs:
- Vector: Coordinate input
- Loc X, Y, Z: Adjust the locations
- Rot X, Y, Z: Adjust the ratations
- Scale X, Y, Z: Adjust the scales
- Scale Uniform: Adjust the uniform scale
Outputs:
- Vector: The input vector after transformation.
Normal:
This node connects directly to the Extreme PBR module outputs, it is used to connect the Normal maps.
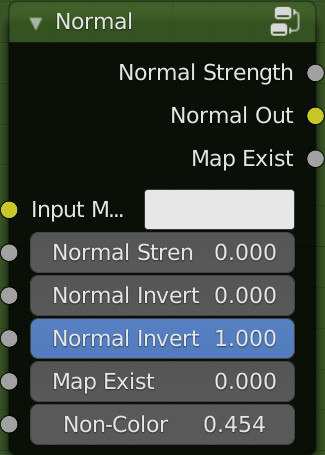
Inputs:
- Input Map: RGB color that encodes the normal map in the specified space.
- Normal Strength: Strength of the normal mapping effect.
- Normal Invert X: Invert the Red channel of the normal map
- Normal Invert Y: Invert the Green channel of the normal map
- Map Exist: This is recognized by Extreme PBR, so it will be handled automatically by it. Do not connect this input
- Non-Color: Non-Color, exactly simulates the color space of the texture image. This is to prevent some images with different color spaces from being replaced and confused. The color space will be simulated automatically. With this criterion: Non-Color Image, the button will switch to standard mode. sRGB image or other types, the button will simulate Non-Color.
Outputs:
- Normal Strength / Normal Out: Connect directly to the socket of the same name in the outputs of the Extreme PBR module
- Map Exist: It is not necessary to use it, but if needed, it gives exactly the result 0-1 depending directly on the input of the same name
Procedural Coordinates:
This node is similar to the Coordinates node of Blender, with a big difference, it basically serves to create the Coordinates, in a procedural way, therefore very useful to use for the creation of procedural materials. This node, if used correctly, will be able to change the links dynamically with the use directly in the Extreme PBR panel of the functions present in the Mapping Editor
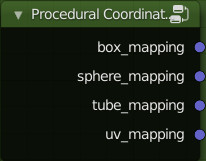
Outputs:
- box_mapping: Produces a Box-type mapping
- sphere_mapping: Produces a Sphere-type mapping
- tube_mapping: Produces a Tube-type mapping
- uv_mapping: Produces a UV-type mapping (Requires active UV mapping on the object)
Rgb:
This Group is useful for controlling the Diffuse, some inputs are controllable through the Extreme PBR “Texture Manager” panel.
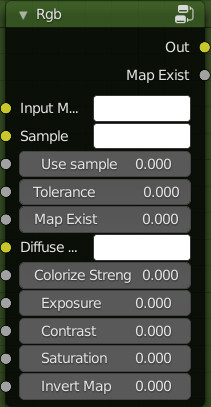
Inputs:
- Input Map: Here you can connect your Diffuse surface color
- Sample: This is the sample color to decide which color to “Colorize”, it works as a sampler, and makes only the chosen color be colorized. (Needs to use Colorize Strength to see a result)
- Use Sample: If 0 will have no effect, if 1 Use Sample will be active, it is recommended to create a Boolean as an input.
- Tollerance: Based on the adjustment, it is decided how much shade of the sampled color should be Colorized.
- Map Exist: This is recognized by Extreme PBR, so it will be handled automatically by it. Do not connect this input
- Diffuse Color: In this case Diffuse color, it is used for colorization, so the chosen color will be used for colorization (Use colorize strength to see the effect)
- Colorize Strength: Adjust the colorization strength.
- Exposure: Adjust the Exposure (Leave unplugged for use with “Texture Manager” button)
- Contrast: Adjust the contrast (Leave unplugged for use with “Texture Manager” button)
- Saturation: Adjust the Saturation (Leave unplugged for use with “Texture Manager” button)
- Invert Map: Invert the Input Map colors (Leave unplugged for use with “Texture Manager” button)
Outputs:
- Out: Result
- Map Exist: It is not necessary to use it, but if needed, it gives exactly the result 0-1 depending directly on the input of the same name
Vector Pre:
This Group is almost identical to the Mapping group, but with the difference that it can be connected directly behind a Texture Image node, making it possible through the Extreme PBR panel to show / activate / adjust the Mapping of each individual Texture Image node.
Remember to Use the “Tag Node Type” on it and on the Texture Image node to make this active in the Extreme PBR panel
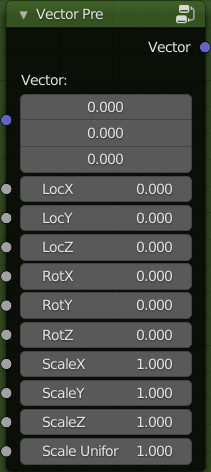
Inputs:
- Vector: Coordinate input
- Loc X, Y, Z: Adjust the locations
- Rot X, Y, Z: Adjust the ratations
- Scale X, Y, Z: Adjust the scales
- Scale Uniform: Adjust the uniform scale
Outputs:
- Vector: The input vector after transformation.
Translate / Combine Translation:
These 2 Groups are to be used in pairs to produce a simulated Normal map, it needs 4 Texture image nodes (Dupplicati linked) with the same image inside. Remember to tag the “Texture Image” node with the tag “NORMAL_GENERATOR” to make the switch between Normal & Normal Generated usable directly from the Extreme PBR panel
Connection example with 4 Texture image nodes with the same Image inside:
