Manual: Extreme PBR
This manual can also be consulted from Extreme PBR via the “Show Helps” button.
1.0 Installation – Unistall Old Version
How to install the Extreme PBR Nexus (Only from version 4.0.200):
How to install the Extreme PBR Nexus (Only from version 4.0.100 up to version 4.0.131):
If you have previously installed a version of Extreme PBR prior to the Nexus edition (Extreme PBR / Extreme PBR Combo / Extreme PBR Evo)
You have to uninstall, if you have projects that reference those material libraries, we recommend that you keep them on your computer.
Unistall:
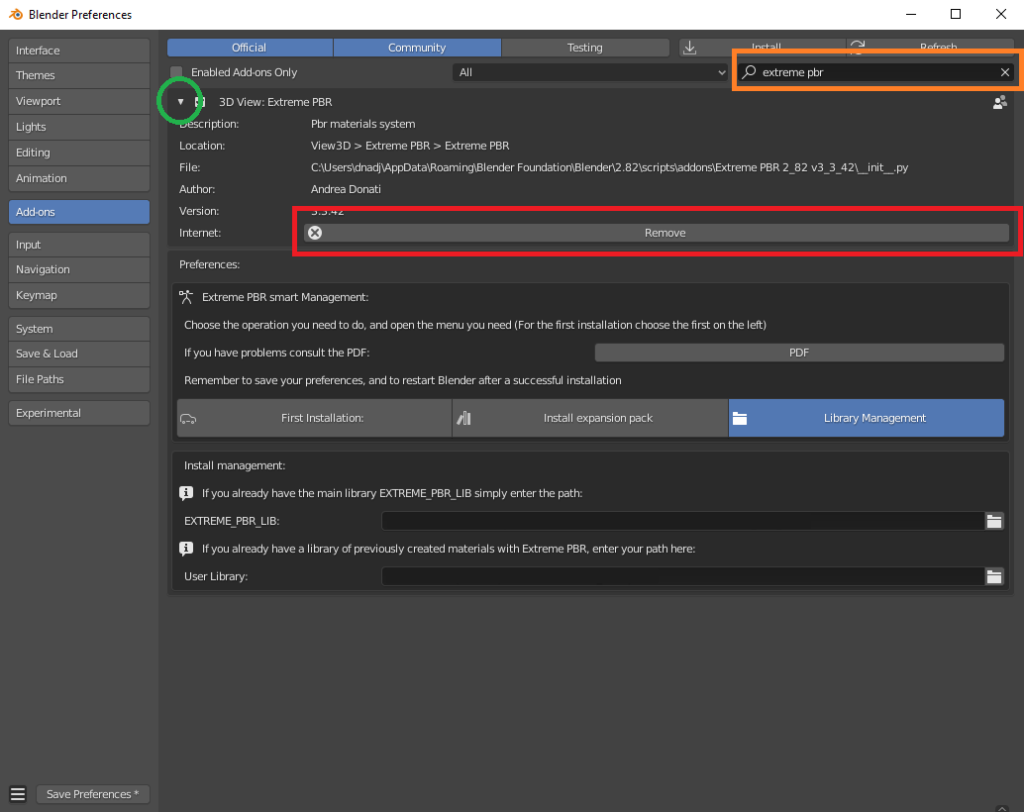
To unistall, go to Edit–> Preferences–> Add-Ons
- Search your Old Extreme PBR
- Expand The Extreme PBR Preferences Menu
- Press Remove
- Restart Blender
1.1 Installation – Preference
Once you have purchased Extreme PBR from Gumroad or Blendermarket download the addon (From orderpage) “extreme_pbr.zip” don’t unzip it!
Attention! Make sure you have downloaded the file in “.zip” format If you are a Macintosh user and are using Safari, be aware that safari automatically decompresses .zip files So take 1 minute more time, and use Mozilla Firefox, or Google Chrome to download your zip files
- Orderpage:
- BlenderMarket: https://blendermarket.com/account/orders
- Gumroad: https://app.gumroad.com/library
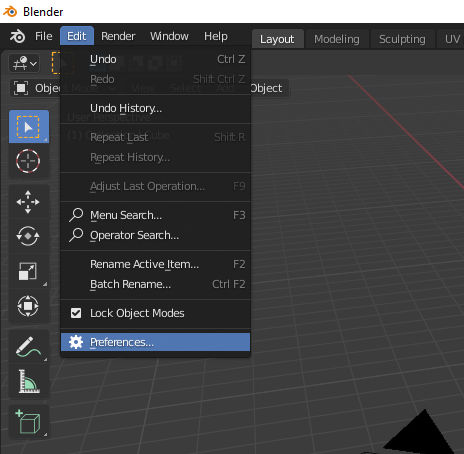
Once downloaded go to: Edit -> Preferences
1.2 Installation – Add-ons
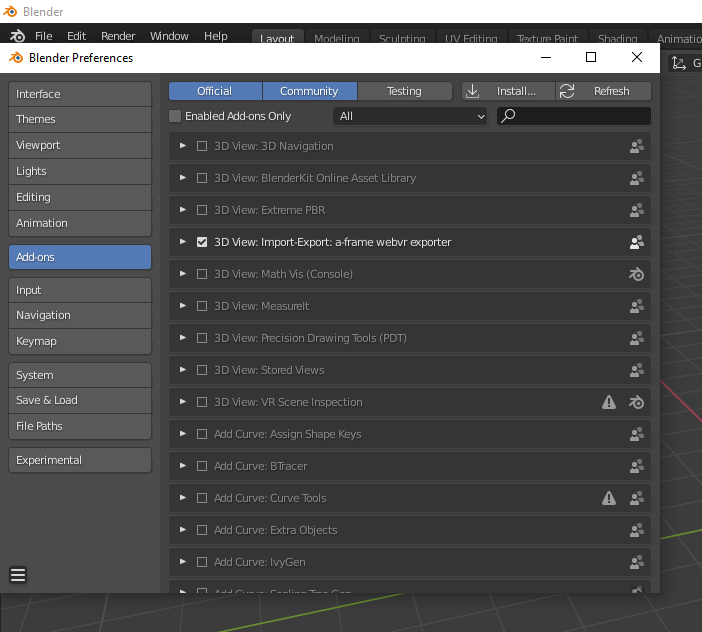
Selecting Preferences will open a window.
On the left click on ADD-ON
1.3 Installation – Install Button
Click on the INSTALL button located on the toolbar at the top.
Select the previously downloaded “extreme_pbr.zip” (Don’t unzip the file!)
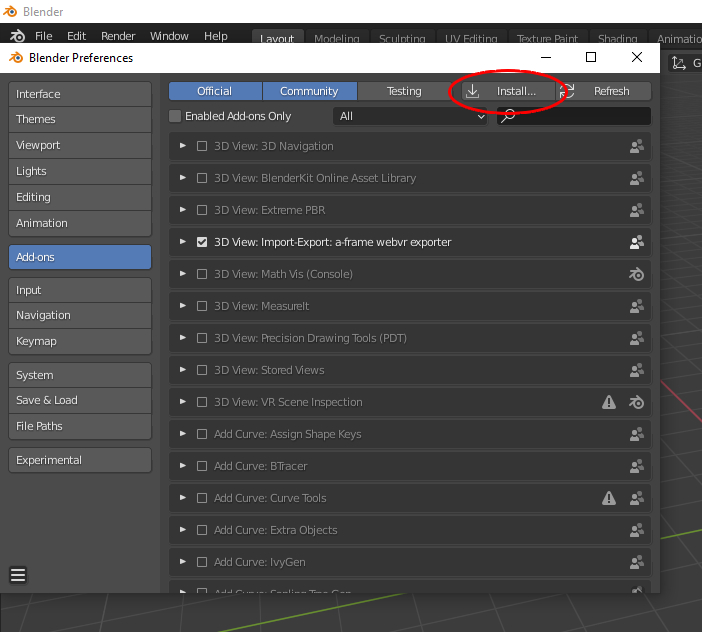
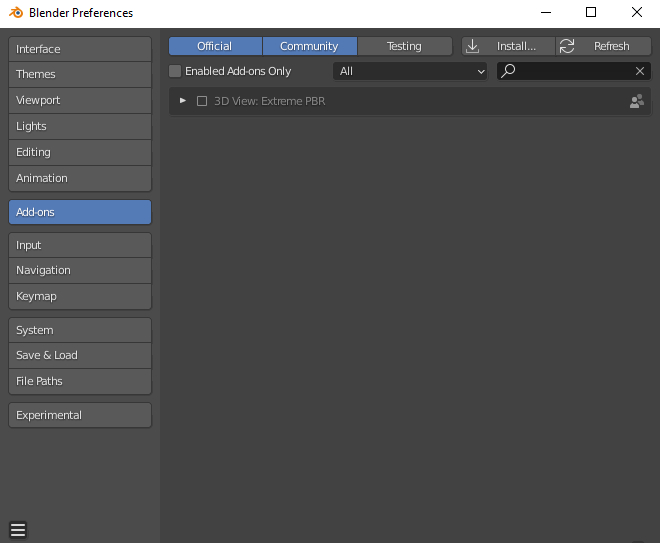
1.4 Installation – Correctly
If all went well, you will find Extreme PBR on the addon list:
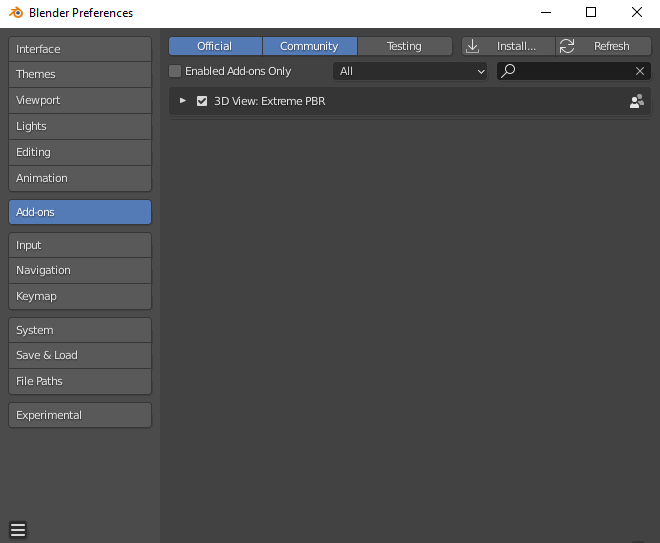
1.5 Installation – Activate
To activate, click on the checkbox to the left of the addon name
1.6 Installation – Configuration
This panel has been updated from Extreme PBR Nexus version 4.0.200, and is slightly different from previous versions, make sure you have installed version 4.0.200 or higher
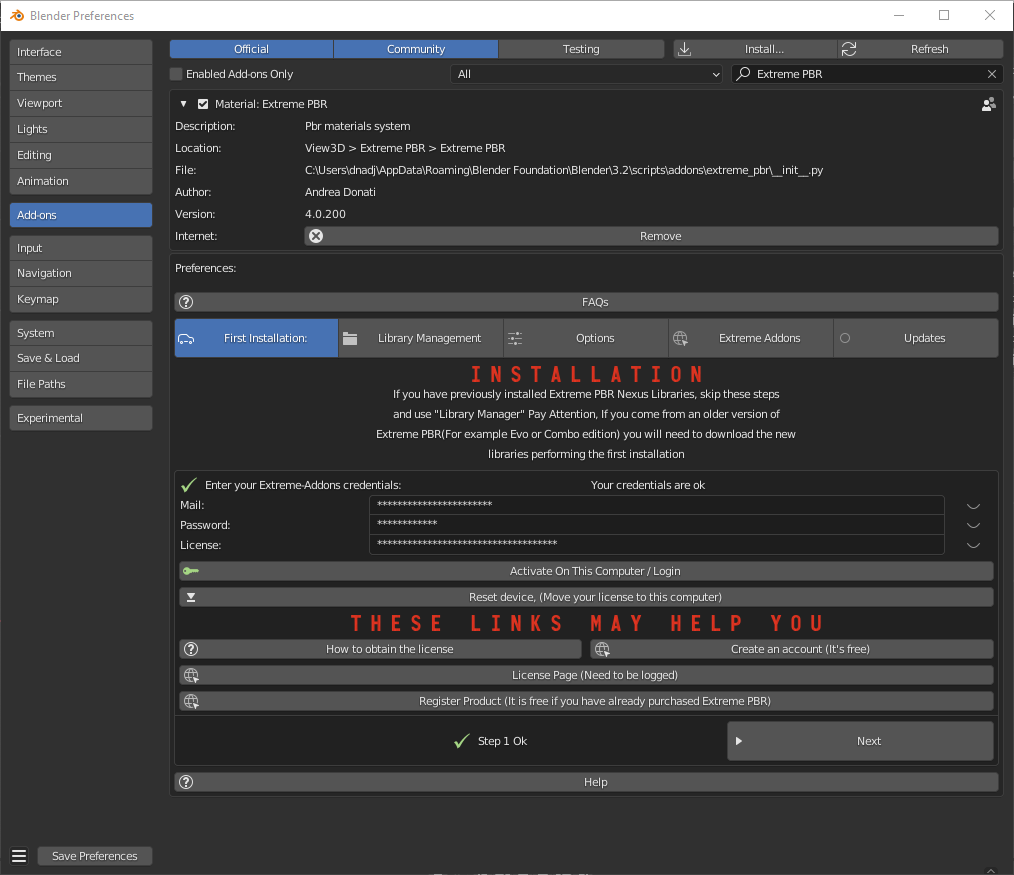
1.71 Installation – Step 1 (Addon Activation)
Pay attention:
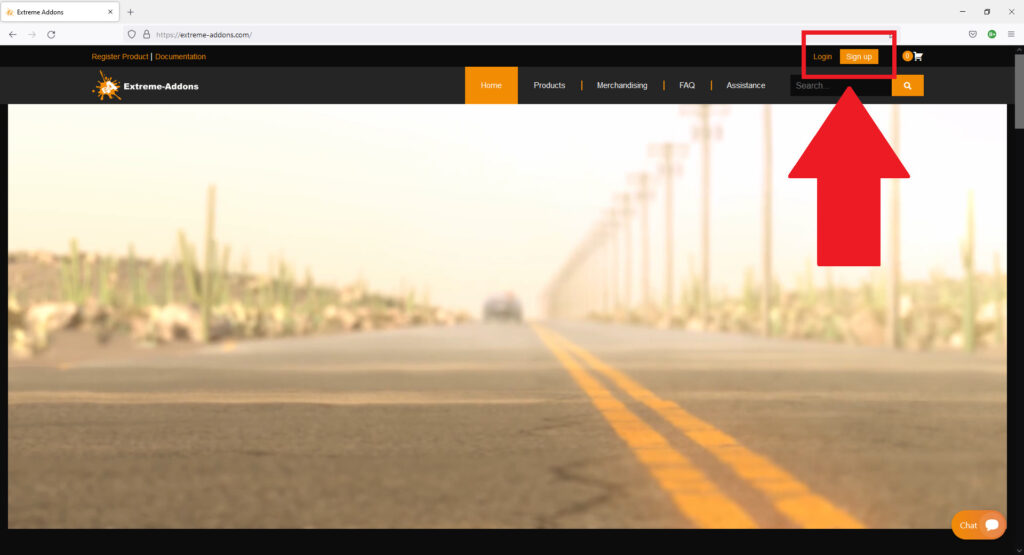
If you have already purchased the product on Blendermarket, or on Gumroad, you will only need to create a new account at https://extreme-addons.com/
If you already have a registered account, you just need to be logged in on the website https://extreme-addons.com/
Now, on step 1, let’s enter credentials to activate the addon.
- *Mail/Password:
- The email and password are those with which you registered on www.Extreme-Addons.com
- License:
- To obtain the product license, check here how: https://docs.extreme-addons.com/manual/how-to-register-your-product-on-extreme-addons/
- If you already have a license, you just need to access extreme-addons website, in this page there is your license, remember that you must be logged in with your credentials to see it:
Your license page: https://extreme-addons.com/my-account/ea-license/

In case of problems, make sure you have not copied and pasted the license with “Whitespace” sometimes it happens that copy paste also copies whitespace.
*Please note that the Mail and Password are the ones you used to login on Extreme-Addons website
Activate On This Computer
You will have to press the “Activate on this computer” button, this also allows you to check if the credentials are correct.
Move your license to this computer
In case you want to move the license to another computer, you will have to press this button.
This takes you to your extreme-addons page to reset the license on your profile: https://extreme-addons.com/my-account/ea-license/
1.72 Installation – Step 2
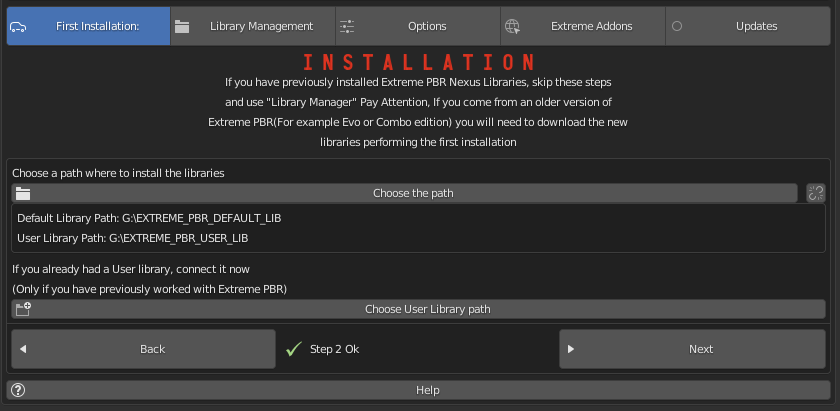
Now click on the Choose the path button and select the folder where we want to install the Extreme PBR Library.
In this step, if (ONLY IF) you already had an Extreme PBR “User Library” / “User Lib” previously installed on your computer. (If you had a previous version of Extreme PBR and saved your materials, you can indicate the path.
Note:
Remember, Extreme PBR libraries are very large, so to fully install the library, it will require almost 100 GiB of free space on the HardDisk you indicated. It is recommended that you install the libraries in a path that is not subject to path changes.
1.73 Installation – Step 3
This step is for obtaining the online material list. This gets a log of all files that can be downloaded.

1.74 Installation – Step 4
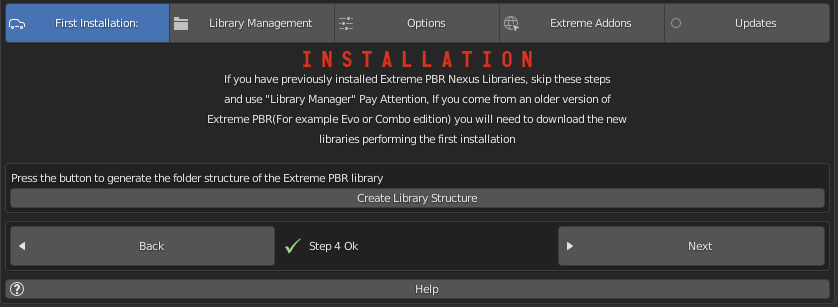
We press the Create Library structure button to create all the information that the addon needs to run on your Hard Disk. This may take some time.
This button essentially creates a “Skeleton” library on your computer. From that skeleton library, materials can be downloaded online, at any time.
This process can take a few minutes.
1.75 Installation – Step 5 (Install Material)
In this Step, you can decide WHAT & IF you want to install.
Personally I suggest installing “ESSENTIAL” first, this downloads all the small packages needed to make the addon work. ESSENTIAL, download the files (Material Previews, Json, Texture 512×512 and all the procedural material)
Remember that many gigs are downloaded at the beginning. And that you can always download in high definition, just the materials you need from the appropriate panel, so you can save time.
Note:
You can postpone this step for later as well. You can also install the materials individually, from the Extreme PBR panel.
- Essential (1GB +/-): Download and Install only necessary files + Texture at 512×512 px + All Procedural Materials
- 1k Button (4GB +/-): Download and Install only the 1k Material (If essential files have not been installed, it will also install essential files)
- 2k Button (14GB +/-): Download and Install only the 2k Material (If essential files have not been installed, it will also install essential files)
- 4k Button (45 GB +/-): Download and Install only the 4k Material (If essential files have not been installed, it will also install essential files)
- 8K button (124GB +/-) : Download and Install the 8k Material + Any materials 5/6/7k (If essential files have not been installed, it will also install essential files)
- All (188GB +/-): Download and Install all the complete library –> (Essential/1k/2k/4k/8k)

Installation Time Issues:
Problems with VPN / Proxy:
If you are using a VPN or Proxy and the download is slow, please Exclude extreme-addons.com from it, or temporarily disable the Proxy or VPN
The installation times:
It vary according to the internet speed and that of the computer in use, so during this step if you will install the libraries, keep in mind that the download time is not a speed test, it would be wrong to think this, as during this process, they are also installed materials. We did this in order to cancel the installation process, and pick up where you left off. So all downloaded materials will remain as such, the installation process can be resumed at a later time.
1.76 Installation – Download single Material
This button is used to proceed with the installation of the single materials.
In the example the material selector is set to 8k, so you can choose whether to shoot only that dimension or all the others (1 / 2k, 2k, 4k)
If you have a similar situation, it means that you have not completed the complete installation process (And you can continue not to)
So if you are interested in installing the material, press “Install Single Material”
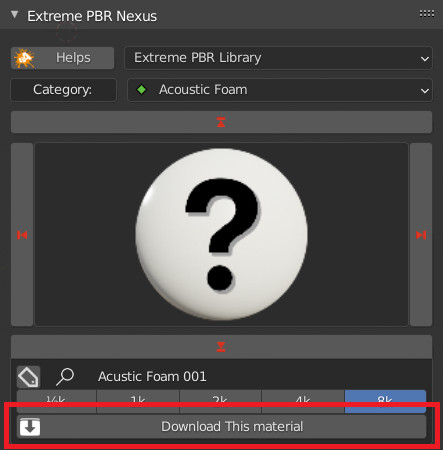
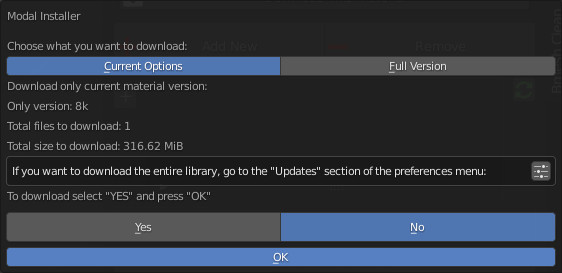
Once “Install single material” is pressed, a popup menu appears:
- Current Options: Download only the material in the current version (8k In this example)
- Full Version: Download all material version (in this case 1/2k, 1k, 2k, 4k, 8k)
- Options ( Bottom right button ): Open the “Install Material” menu (If you want to do the complete installation of the entire library, and not the single material.)
1.77 Installation – Progress
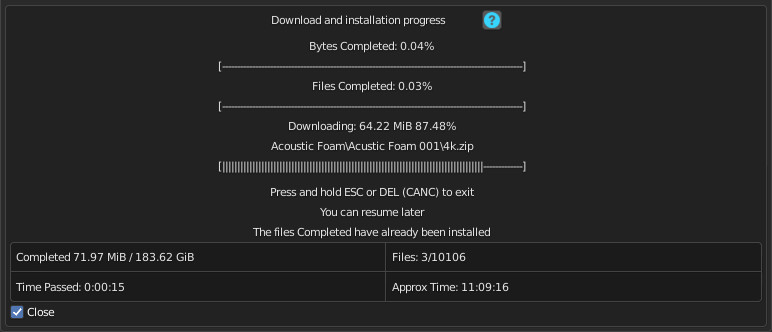
Progress bars will be shown during the installation process.
You will be able to stop the installation when you want,
the material packs already downloaded are installed, so they will remain installed even when you cancel this process.
Installation Time Issues:
Problems with VPN / Proxy:
If you are using a VPN or Proxy and the download is slow, please Exclude extreme-addons.com from it, or temporarily disable the Proxy or VPN
The installation times:
It vary according to the internet speed and that of the computer in use, so during this step if you will install the libraries, keep in mind that the download time is not a speed test, it would be wrong to think this, as during this process, they are also installed materials. We did this in order to cancel the installation process, and pick up where you left off. So all downloaded materials will remain as such, the installation process can be resumed at a later time.
1.78 Move license to another Computer
To Move the license to another computer, do the following steps:
1 – Log in to https://extreme-addons.com/
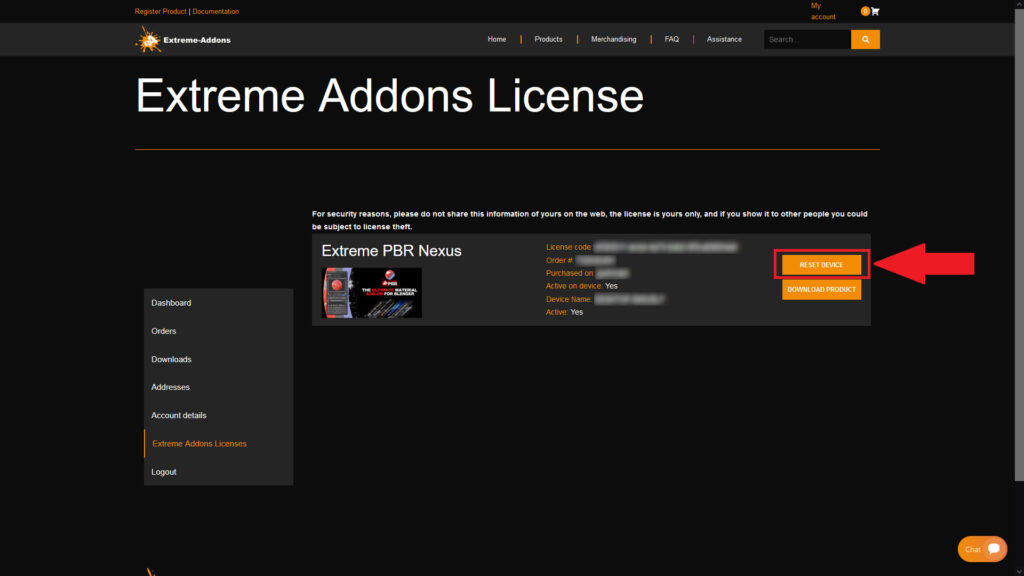
2 – Go to your License Page: https://extreme-addons.com/my-account/ea-license/
3 – Click on “Reset Device” (If “Reset device” is not present, it means that this step is not necessary.)
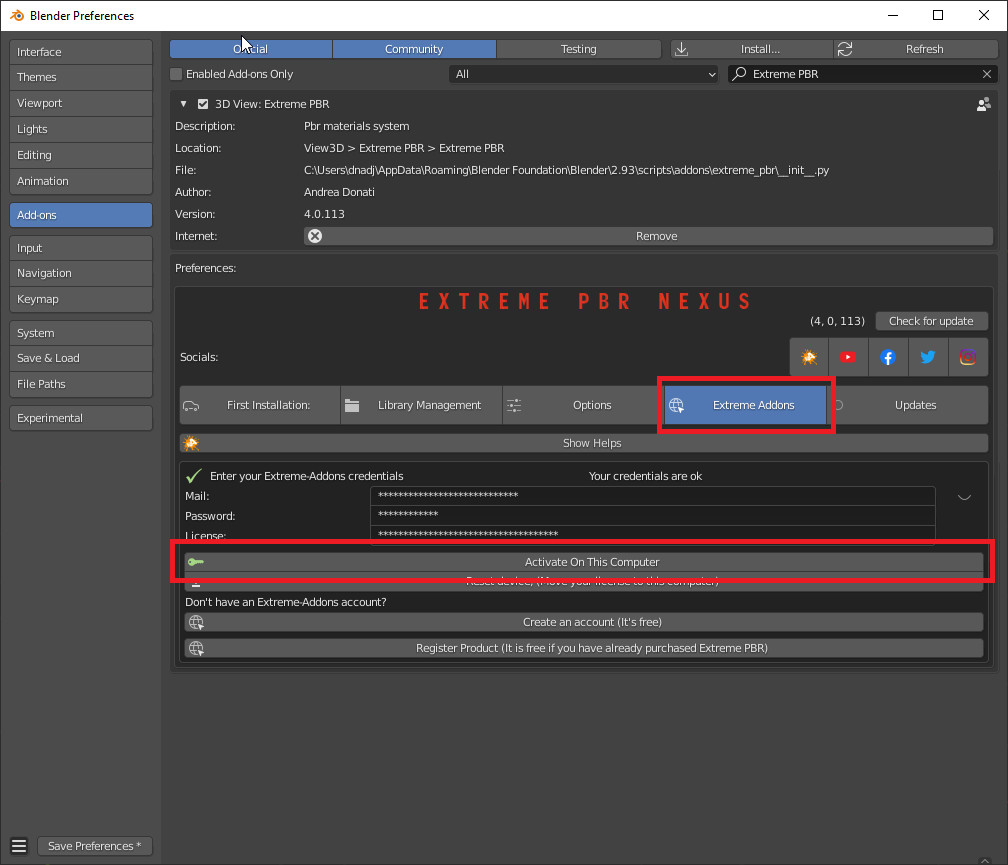
4- Go into Blender and open addon Preferences with “Options” button into addon interface
5- Press “Extreme Addons” Tab Enter your Email / Password that you used to register at Extreme-Addons.com, and enter the license of your addon that you will always find on the License page
and press “Activate on this computer”. If everything is right, the key icon on that button turns green.
1.8 Installation – Library Management
“Library Management”, allows you to link or change paths to Extreme PBR libraries.
You can also add expansion libraries later. If you want to delight in creating libraries to sell, your customer will find the “Add Library” button useful, you can add many libraries, without limit.
Note:
To work, Extreme PBR needs to have linked (Installed) the main library, and the user library (Even if empty)
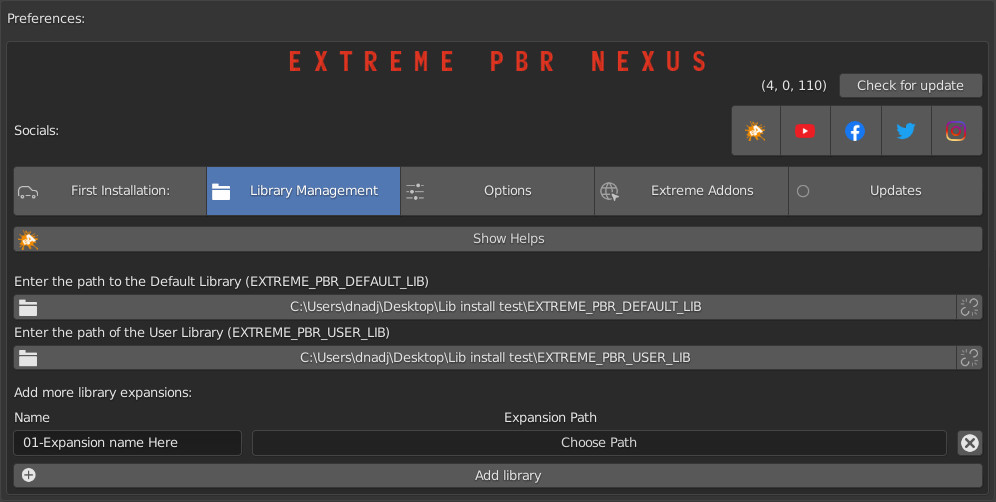
1.9 Installation – Options
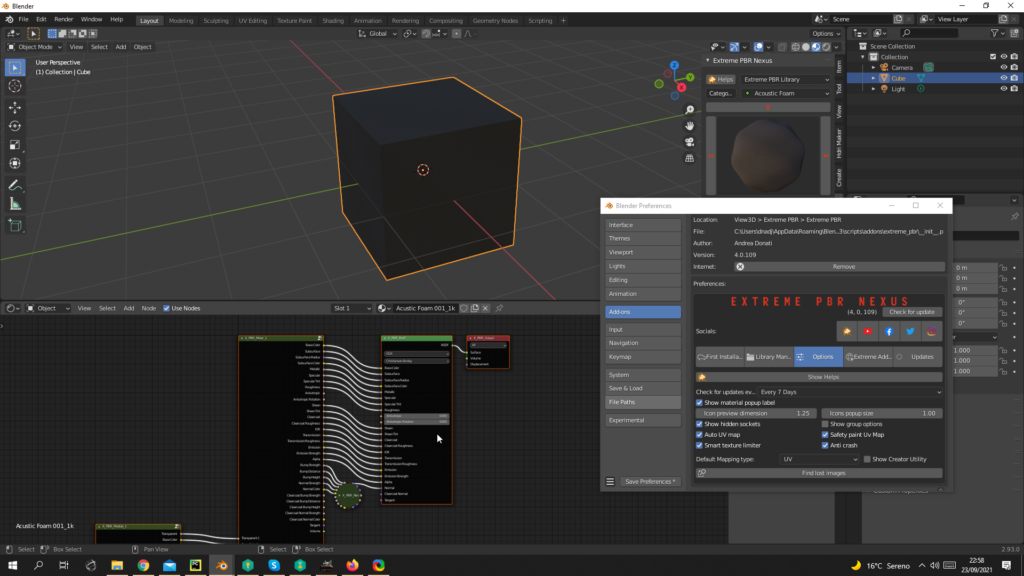
Click the Options tab to customize the Extreme PBR panel.
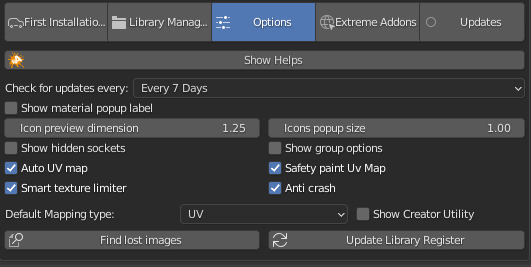
Sets how often the addon should check for new updates.

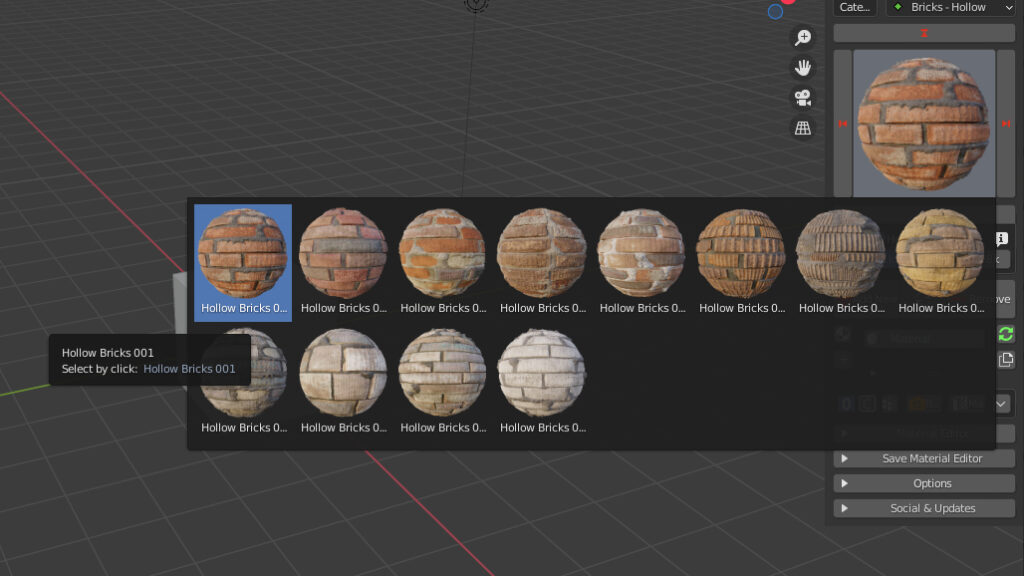
Show name label in preview button


Choose the previews icons dimension. Tips: Correct size = 1

Choose the popup icons dimension. Tips: Correct size = 1

Show hidden sockets on Shader.
1.10 Installation – Options 2

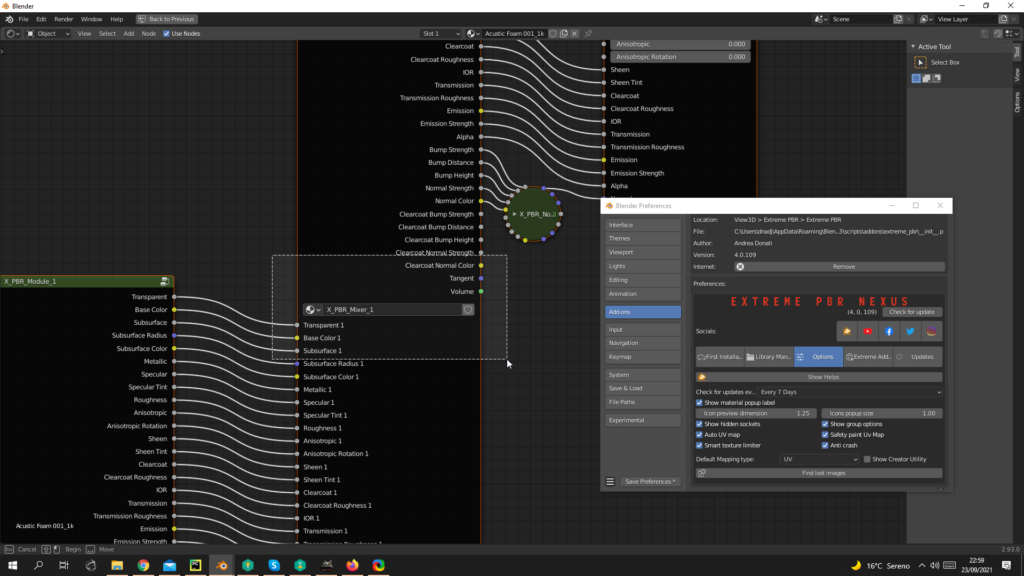
show node options

If the object does not have a Uv Mapping once the material has been added, a default UV mapping will automatically be added. (it is advisable to leave this button active so as to avoid wasting time). Objects that have a UV mapping will not be automatically bypassed

Prevents the uv layer of the texture paint from being selected if you are not in Texture Paint Mode

Due to the maximum texture limit of 24 for Eevee, this feature (Enable by default) attempts to limit the use of textures when a material has many Shaders and Fx layers. Cons: Some maps may be disabled, starting from the Fx Layers Modules, then moving on to the Modules

One some computers, there is an abnormal crash when adding a material. The bug has been reported to the Blender Foundation, until the cause is understood, keep this active if you encounter any abnormal crashes applying the materials.
1.11 Installation – Options 3

Choose the UV Map mode.

Show in the Shader Editor, a panel for material and library creators. If you are not a material creator, please do not use this as it may damage the main library.

Try to find ALL images through targeted research

Create Library Register
1.12 Installation – Update
Note: To use the functions in this menu, you must be logged in with your profile in the “Extreme Addons” Tab menu
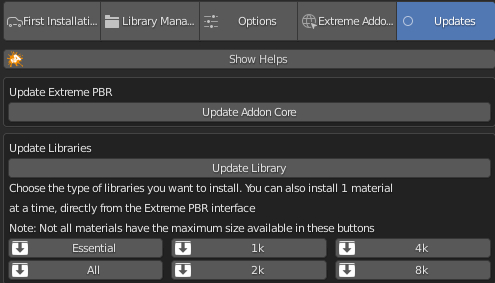
In this Tab menu, you will be able to update the libraries and addon.
- Update core: Update the addon directly, without having to do the classic Blender manual procedure.
- Update Library: If you want to check if there are new materials to install, first press this button, your library will automatically update if there is any new material online.
- Essential/1k/2k/4k/8k/All: They are the same buttons present in Step 5 (Go a few pages up to see)
1.13 Migrate On Other Computer/Blender Version
To migrate to another computer:
Install Extreme PBR on the other computer, Follow this guide from –>step 1<– , you just need to install the single addon without the libraries.
If you had already installed the libraries on computer n1, You can move libraries via an External Hard Drive, It will be sufficient to move the 2 main folders of the Extreme PBR libraries EXTREME_PBR_DEFAULT_LIB and EXTREME_PBR_USER_LIB to computer n2
At this point you will only have to indicate the path in Library Manager:

If you want to activate Extreme PBR on computer n2, you will need to move the license to computer n2:
Below is the section to activate the license on another computer
2.1 Manager Interface
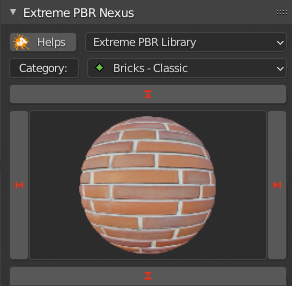
The Manager interface contains all the tools available for searching your favorite material.
You can choose to search by Category, Tags, move quickly between materials, and much more.
2.2 Helps button
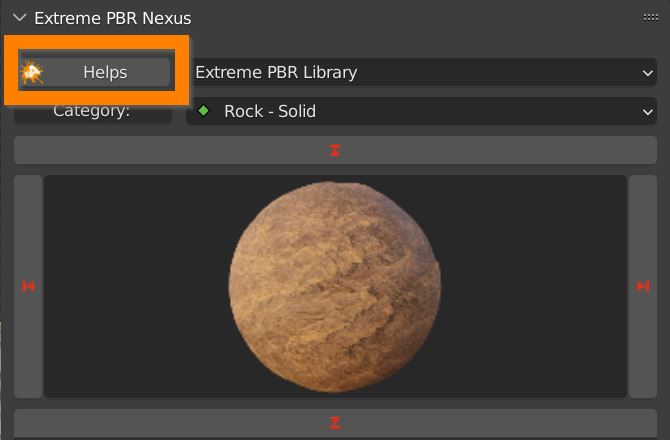
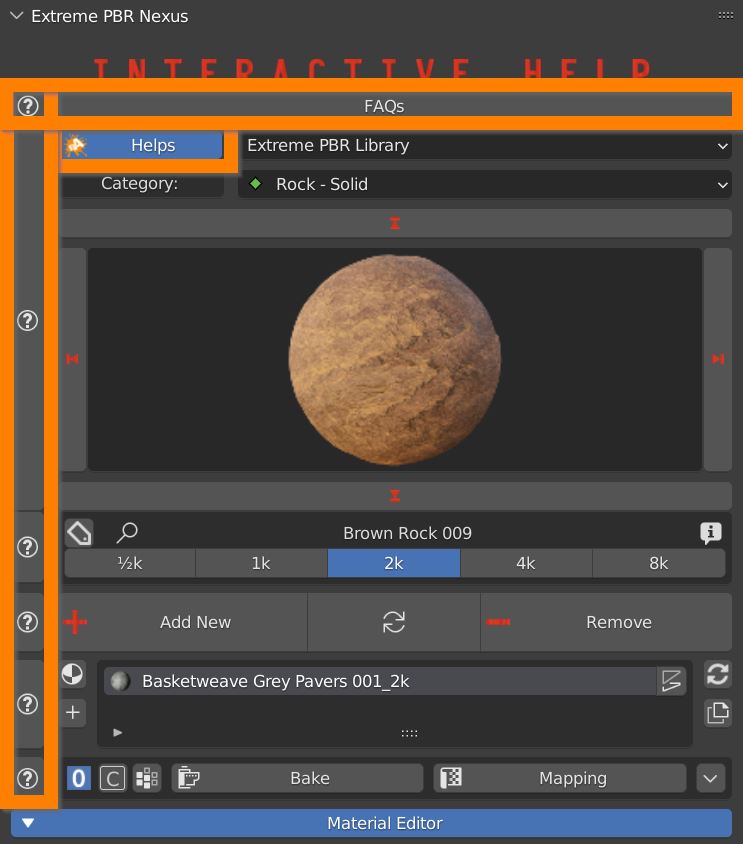
Click the HELPS button to activate interactive help. The Extreme PBR interface will show a question mark button next to every function of the Addon which will link you to the relevant section of this Online Manual
2.3 Library selector
Use this drop-down menu to select which library of materials to consult: Extreme PBR Library (distribuited along with the Addon) and User Library (where you can save your own materials)
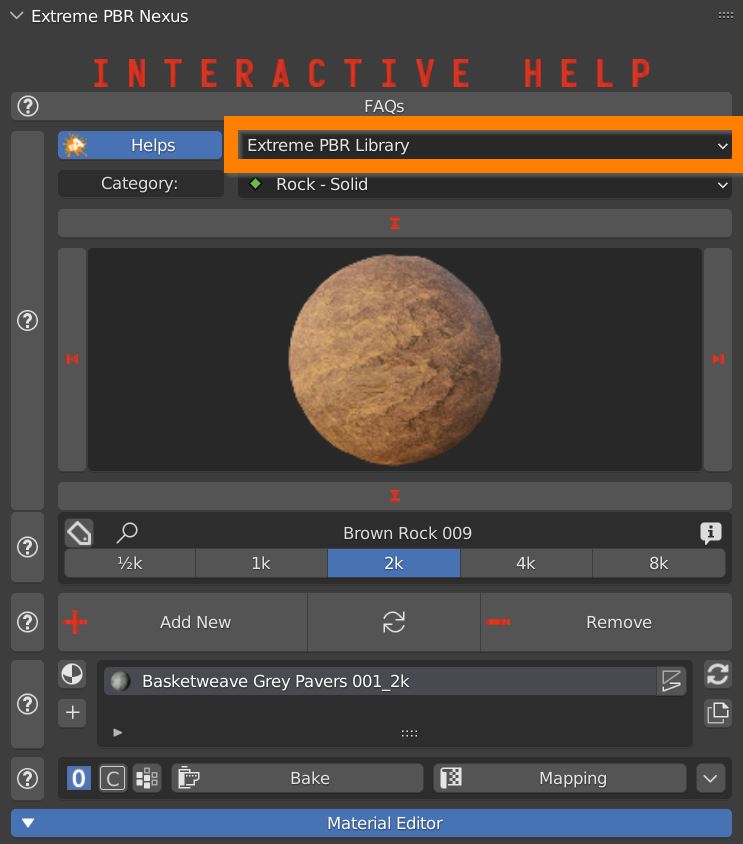
As Libraries have their own data structure, don’t modify them with the PC file explorer, use Addon built in functions for copying, saving, deleting instead.
2.4 Search Category Filter
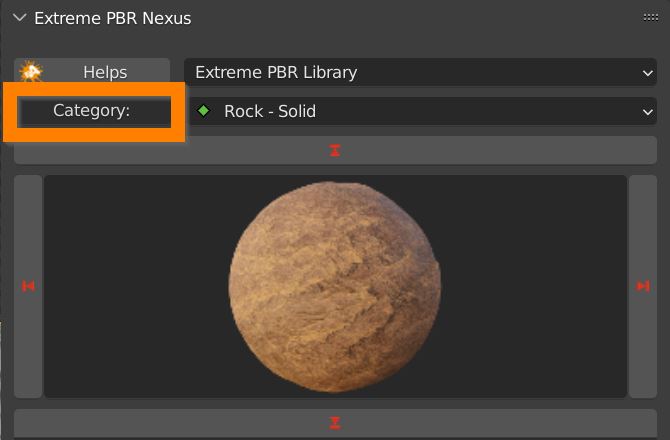
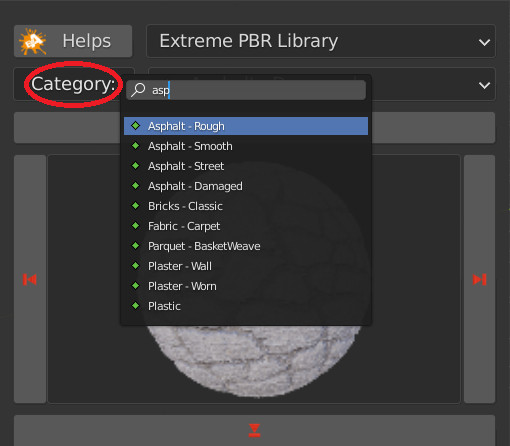
In this dropdown menu you can browse all categories of the library. Type in a keyword to restrict the list.
2.5 List Category
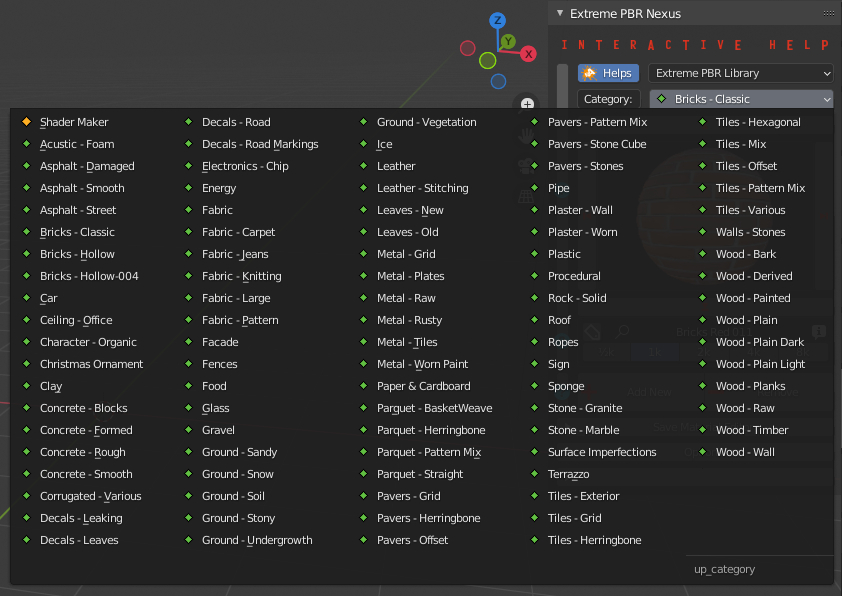
Select the a category from the complete list. Each category contains a list of different materials.
2.6 Material Preview
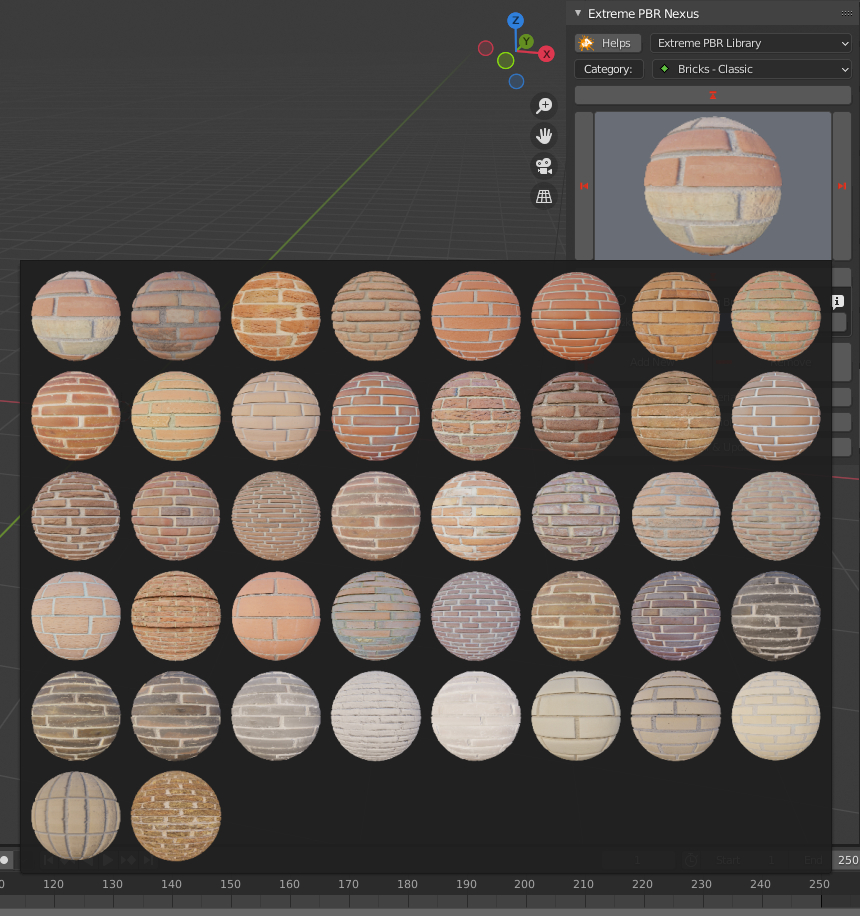
Once you have choosen a category, click on the preview image to reveal all available materials. Click on one of them to select it.
2.7 Switch Arrows
You can use Left – Right arrows to browse the materials.
You can use Up – Down arrows to browse categories.
3.1 Tag and material options Panel
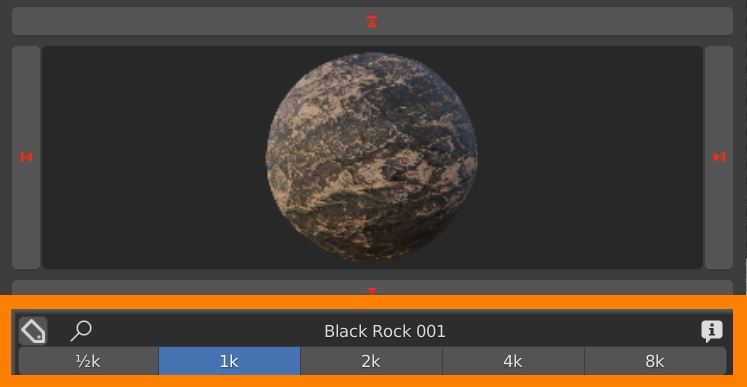
In this section there are some others useful functions to keep your Library well organized and easy to browse.
3.2 Tag Search
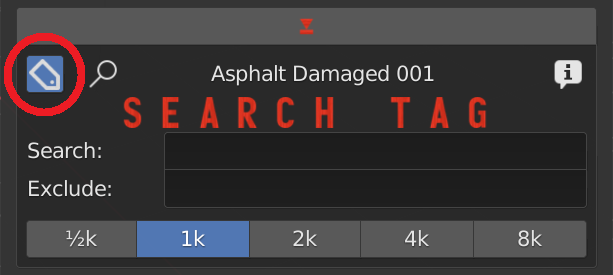
Press the Tag icon to activate the tag search panel.
Use the upper Search field to type in one or more Tags, separtated by a space (i.e. “Brick Red”).
Use the lower Exclude field to type in one or more Tags you want to exclude from the search.
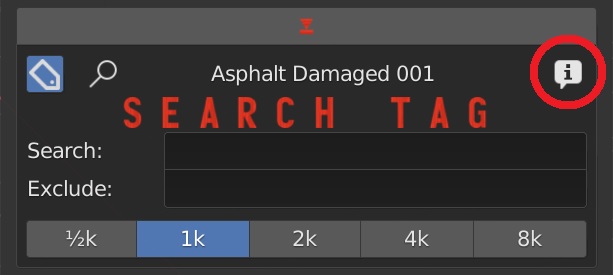
3.3 Material Info/Tag Panel
Press the INFO icon to get all the information about the materials.
Show Info: click the triangle to show material infos and license details.
Edit Tags: Check this in order to unlock Tags editing.
Copy/Paste: Use theese buttons to copy and paste Tags between one material and another.
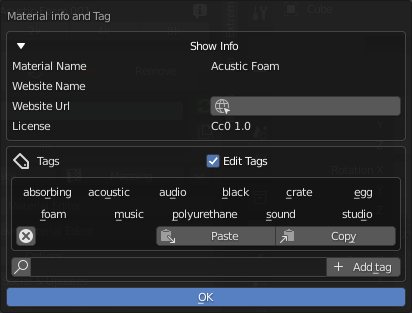
X Icon: select a tag. Press X icon to delete (only with “Edit tag” activated).
Add tag: Add your own tags to easily organize and find your favourite materials.
Search Tag (loupe icon): search for tags and find if a name is already in use.
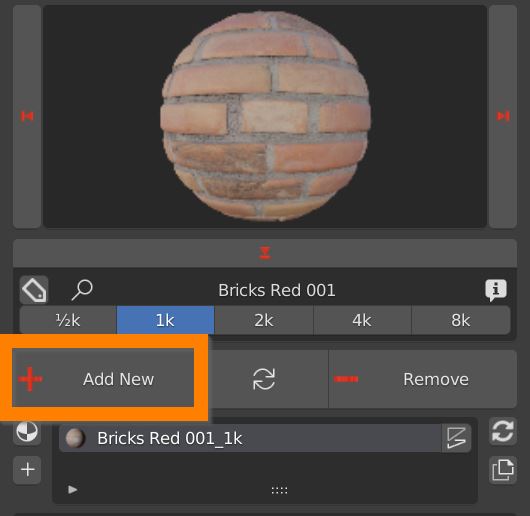
4.1 Add remove replace material – Add Material
Select your model, select a material and click the Add New Button. The material is applied to the object. An UV map is created if missing.
If the object has a previously applied material, the new one is simply added in the material list, and it has to be assigned in edit mode.
4.2 Add remove replace material – Replace Material
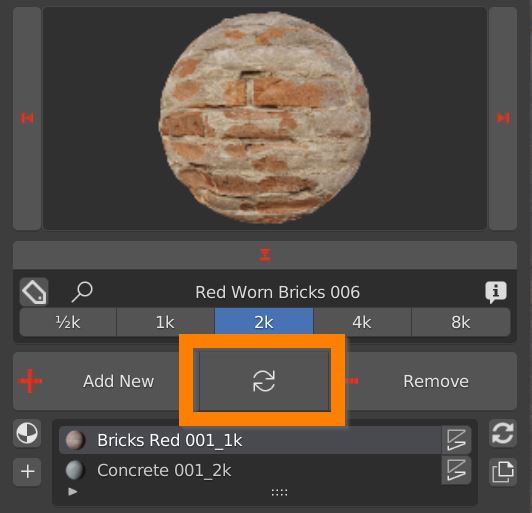
Select one object, select a material from the library, select a material slot if there are more than one. Click the circular arrows button. The material is replaced and applied immediately.
If the blue icon is toggled on, the replace button turns green, and the material will be replaced on every object that uses it, even if unselected.
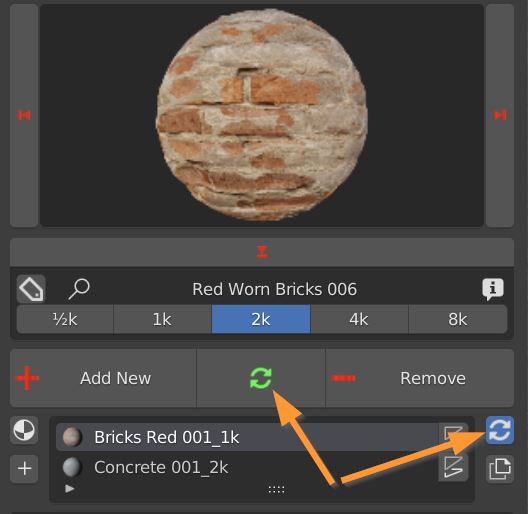
In order for multiple replace to work, materials have to be the same, not one a copy of another. Check their names: if they are different choose the correct material from the material slot dropdown menu.
4.3 Add remove replace material – Delete Material
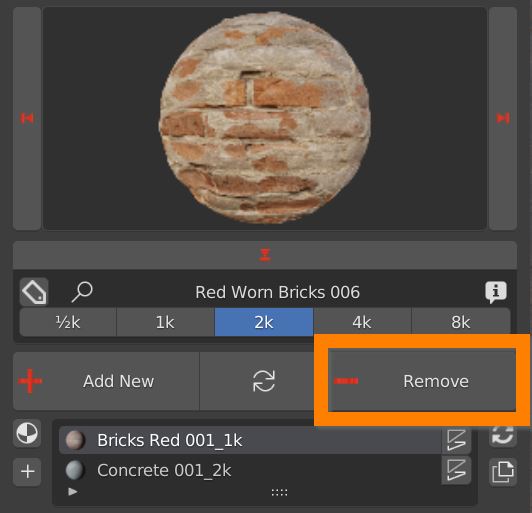
Select a material in the material slot list and press the Remove button. The material will be removed from the object.
4.4 Add remove replace material – Assign Mat / Select By Material
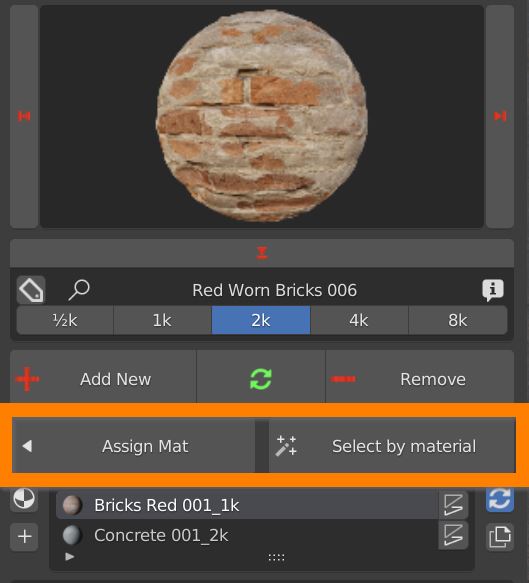
When you switch to Edit Mode Two new buttons show up.
Select some faces and click the Assign Mat button to assign the currently selected material in the material slot.
Select one material slot and click the Select by material button to select all faces on which the selected slot material is applied.
5.0 Material List Selection – Panel
This panel is dedicated to the list of materials present on the object and the possibility of manipulating, editing and modifying them.
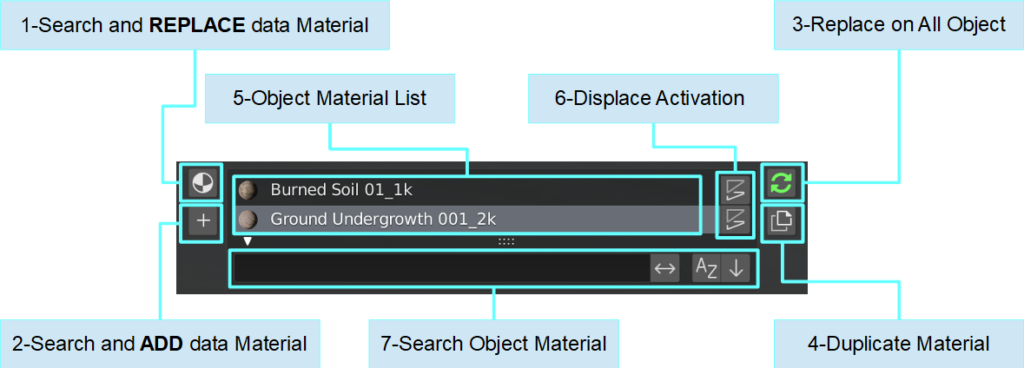
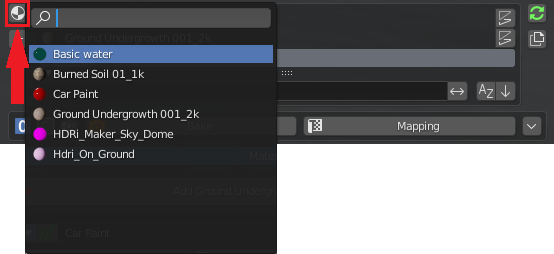
5.1 Search and replace
This button will search for all the materials present in the project.
If the selected object already has materials applied, the material selected in the list will be replaced with the one searched and confirmed by this popup.
In case the object has not applied any material, the material will be directly applied to every face
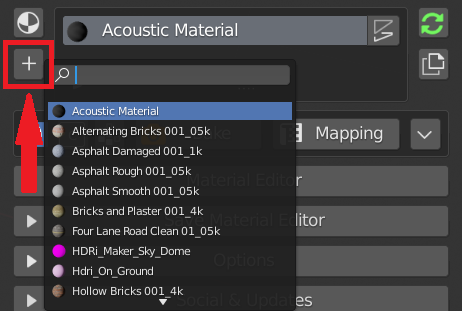
5.2 Search And Add
This button will search for all the materials present in the project data.
If a material is selected from the list, it is added to the object.
If the object has no material, the material is applied to all faces of the object
5.3 Replace on all object
If you activate this button (Blue) and press the green Replace button, all objects in the scene that are using the material selected in the list will update with the material selected from the library.

5.4 Duplicate Material
This button is used to create a copy (Make Unique) of the material selected in the material slot list.
This is useful when the material is used by many objects and you want to make some edits on the selected only.

5.5 Object Material List
Theese are all the material slots containing all materials currently applied to the selected object.
Some of them could be invisible, if they didn’t get assigned to any face of the model.
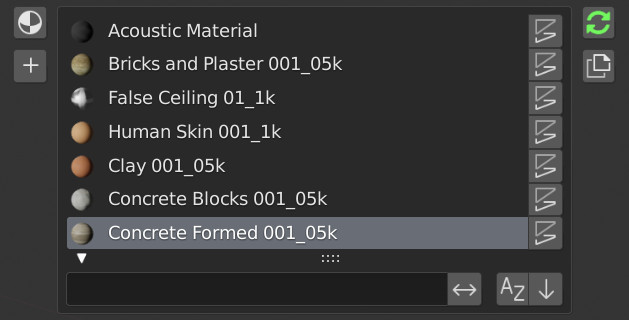
You can browse this list using the Search object Material.
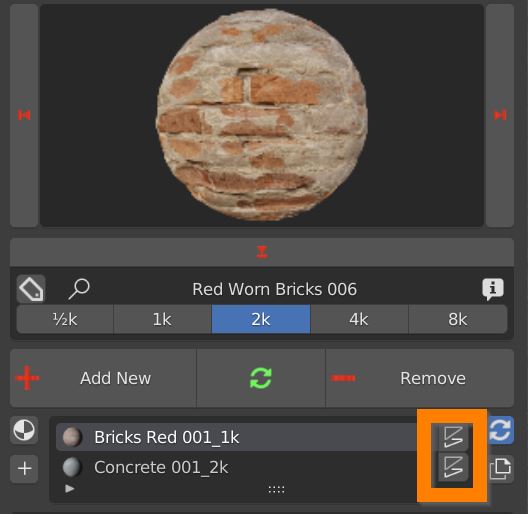
In most cases materials have Displacement maps: the button next to the material can activate displacement on the object.
If the material does not have a displacement map, the button is not shown.
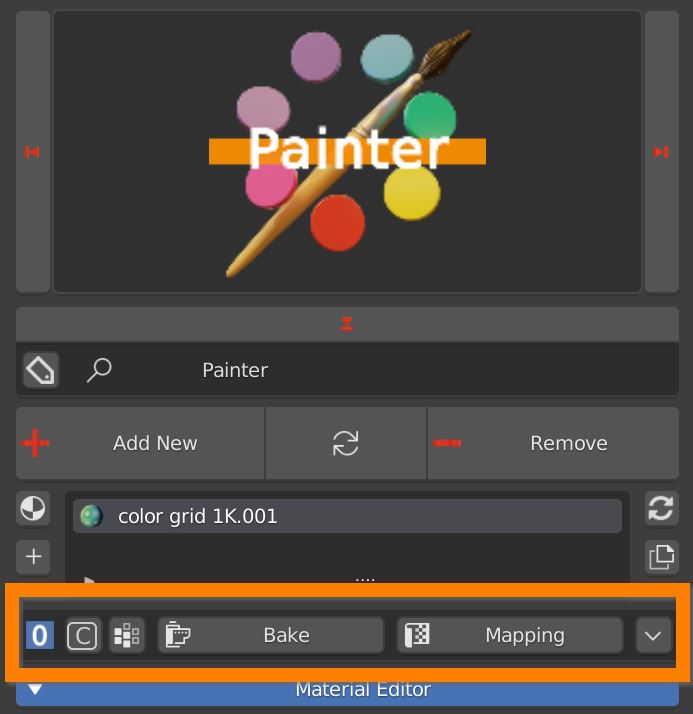
6.1 Box Utility – ToolBar
This toolbar contains some useful tools to speed up shading, copy material, bake, mapping and cleaning
6.2 Box Utility – Shader Option
Use this icon to quickly move through the shading options.
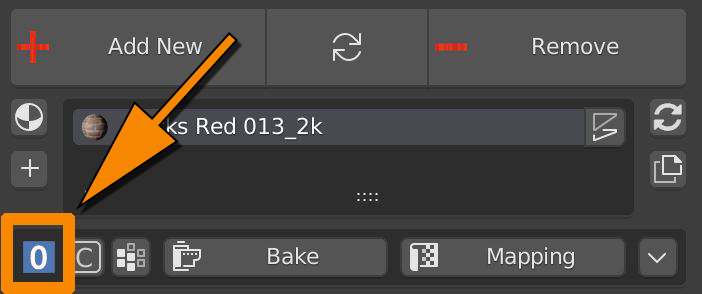
0 sets flat shading

1 sets smooth shading on every edge, except thoose with angles above 45 Degrees

2 sets smooth shading on every edge

Auto smooth can later be tweaked in the properties panel.
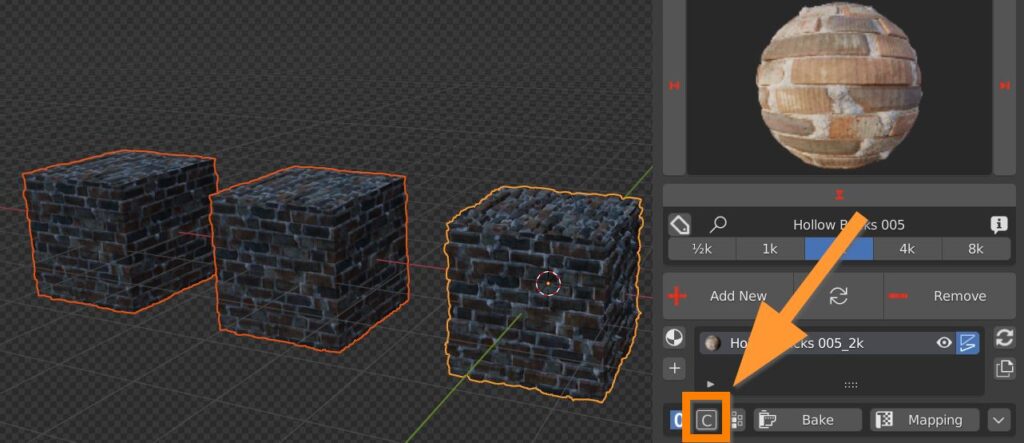
6.3 Box Utility – Copy
C button copies the material from active (last selected, yellow outline) to selected objects (orangy outline).
This copy function extends to fx layers, displace modifiers, and everything related to the Extreme PBR Material, except painted maps, which have to be performed on every object.
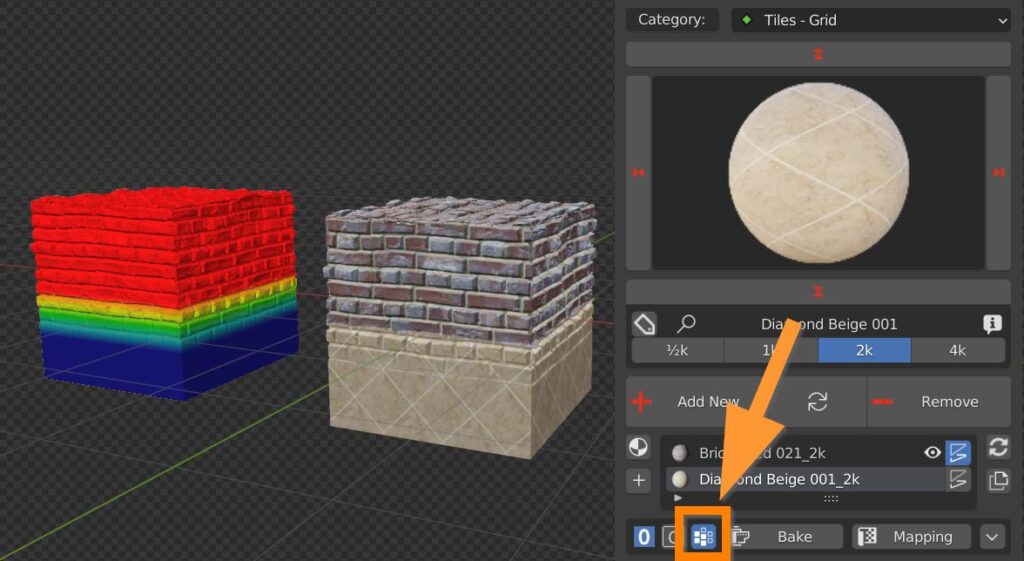
6.4 Box Utility – Create Vertex Groups
When a single object has more than one material, you can press this button to generate a vertex group which identifies the faces the material is assigned to.
This is expecially useful for correctly separate multiple displace modifiers
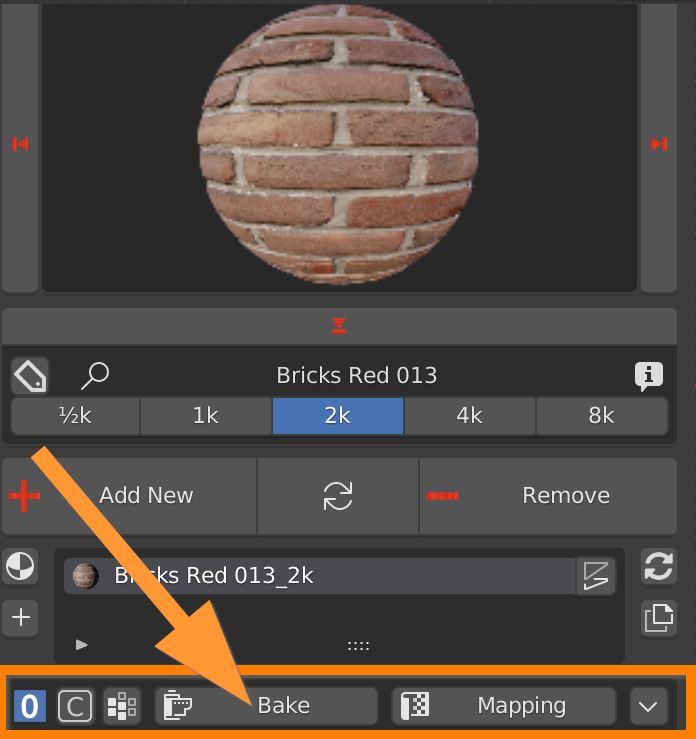
6.5 Box Utility – Bake
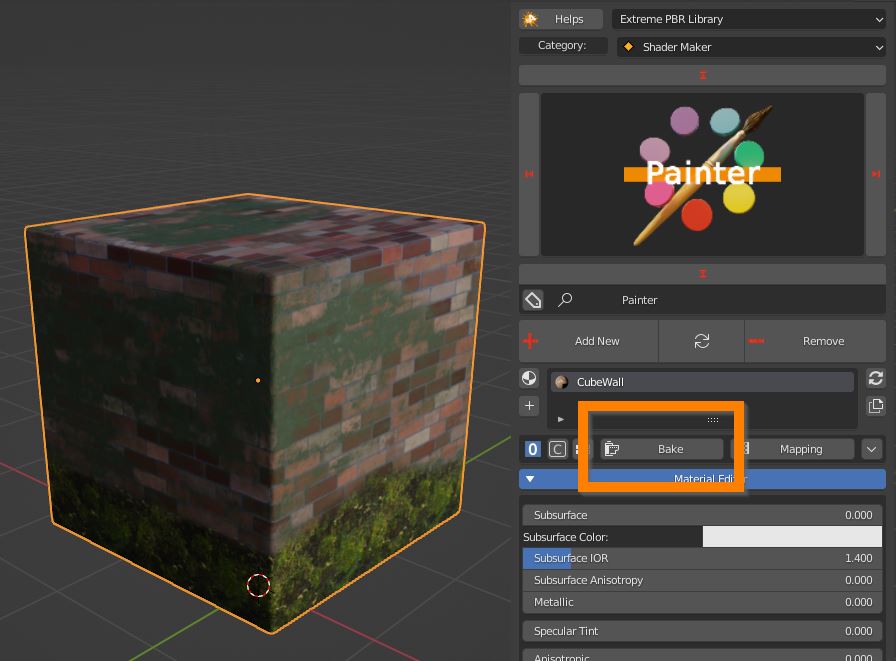
By clicking on this button, a special panel dedicated to the Bake of the material will appear so that it can be exported correctly to others 3d engines.
For more indepth informations:
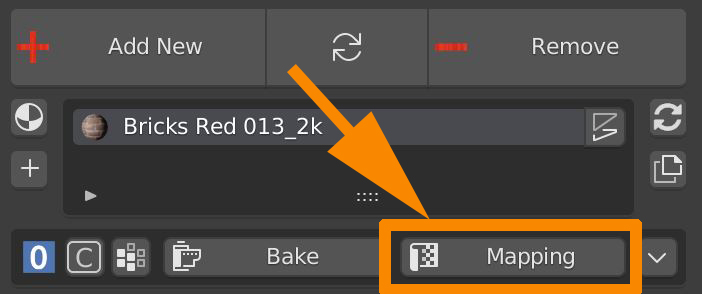
6.6 Box Utility – Mapping
Press this button to set the mapping of the textures
6.6.1 Box Utility – Mapping – General
There are two ways in which you can manipulate mapping.
In this example a texture is placed into the Square Texture space (left), an UV Map of the object lays on top (Center) and a correspondence is set between faces of the object and colors of the texture (right).
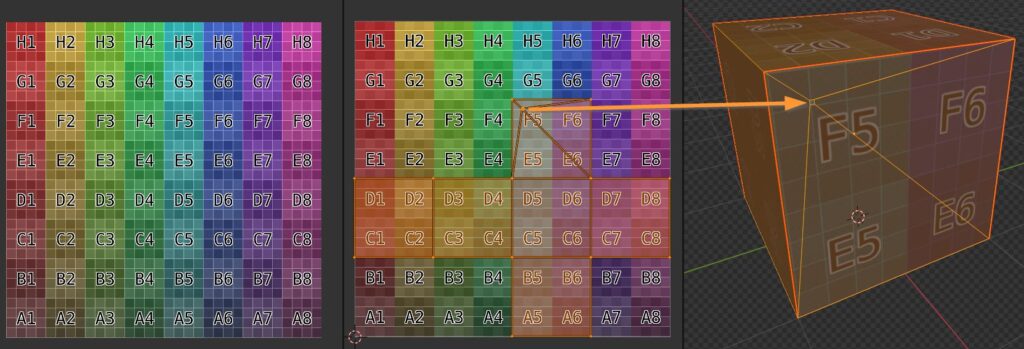
01 – The first method is to move, rotate and scale the Map, so to vary the correspondence between Texture space and Map.
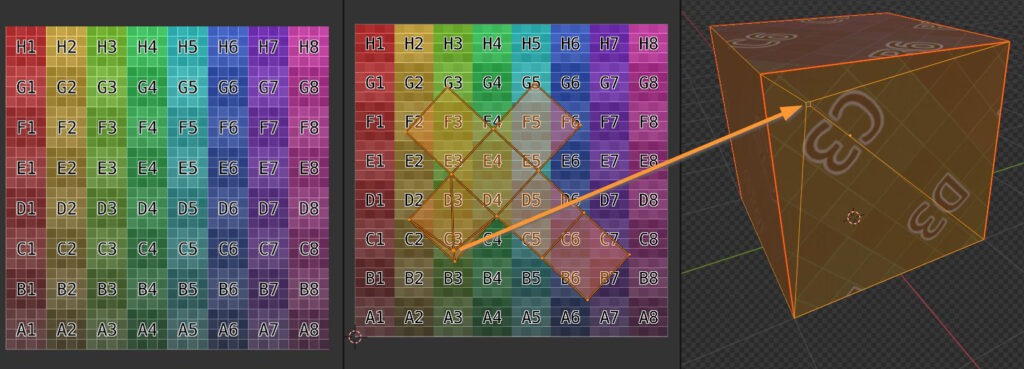
02 – The second method is to move, rotate and scale the Texture: so to vary the correspondence between Texture image and Texture space.
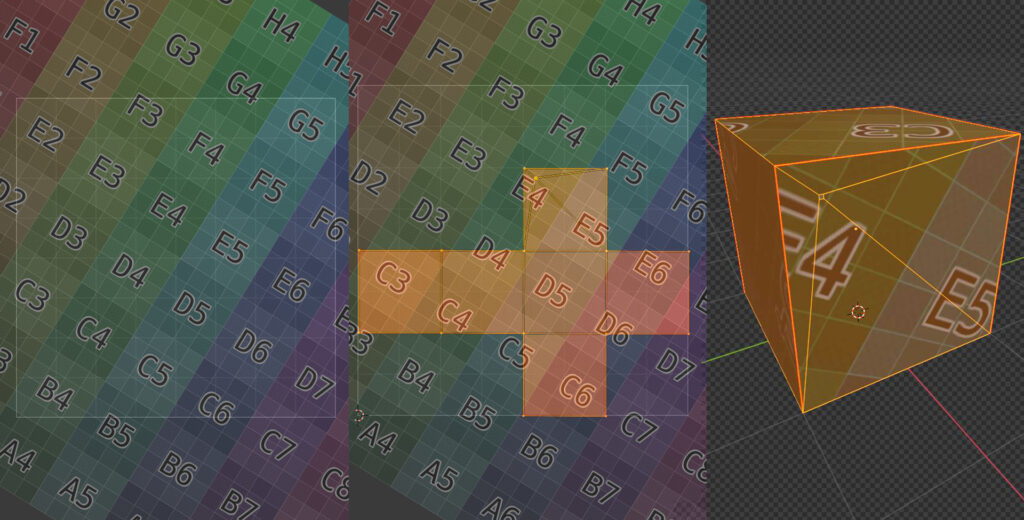
Pressing the Mapping button lets you use the method number 01: manipulating the corrispondence between Texture space and Map.
6.6.2 Box Utility – Mapping – Type of mapping
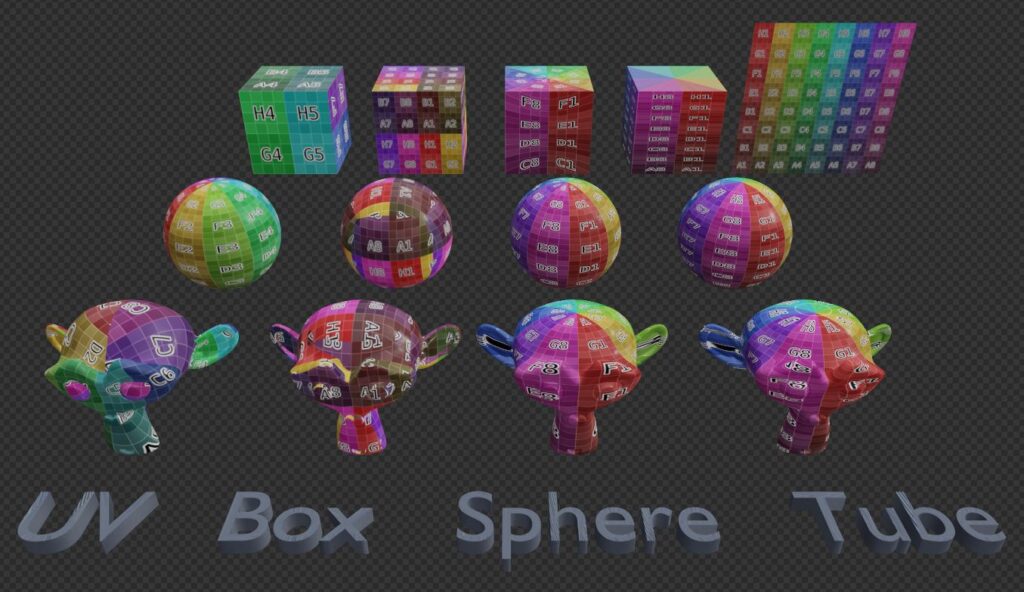
There are 4 ways to map the correspondance between Texture space and mesh: UV, Box, Sphere and Tube.
UV is default, and lets you have maximum control on where to place the textures on your model. If the object doesn’t have an UV Map, the Addon will automatically generate a new one when applying a PBR Material.
Box, Sphere and Tube are sometimes fast shortcuts, useful for simple objects.
6.6.3 Box Utility – Mapping – Move, Rotate, Scale
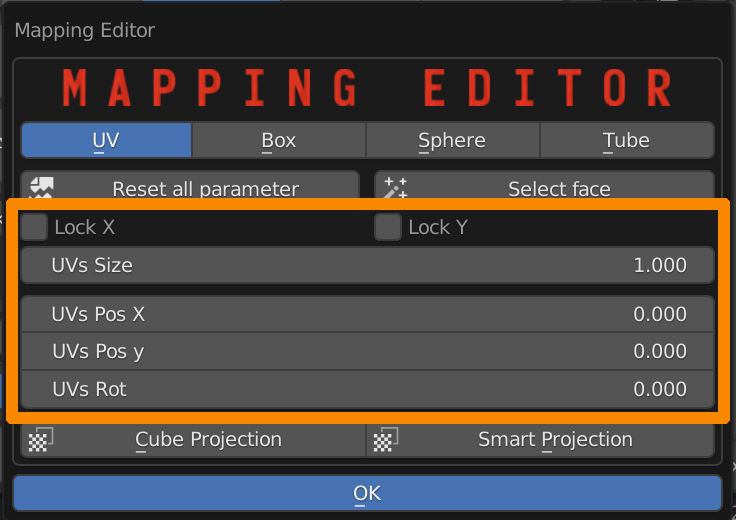
Use UVs Size to scale the UV Map, Lock X or Y for non-uniform scaling.
Use UVs Pos X and Y to move the UV Map.
Use UVs Rot to rotate the UV Map
6.6.4 Box Utility – Mapping – Others options
Reset all parameter button resets Position, Rotation and scale of the UVs, but it doesn’t affect its projection type.
Select Face makes a selection of all faces the selected material is applied to.
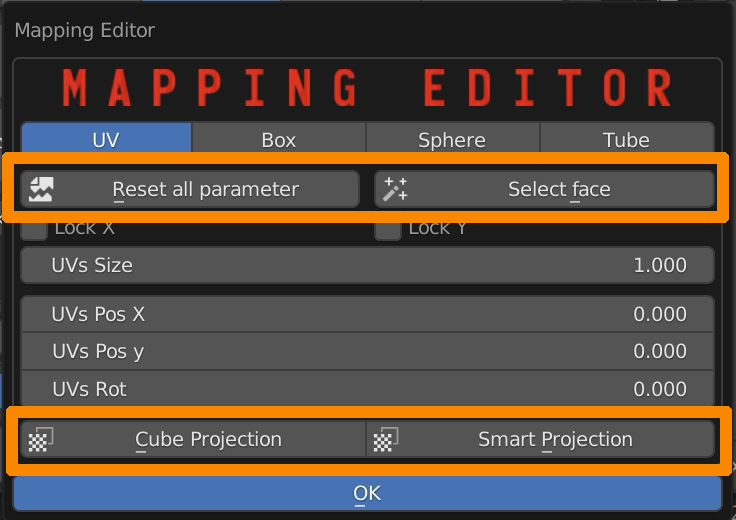
Cube projection button turns the UV Map into a cube projected UV map.
Smart Projection turns the UV Map into an evenly ditribuited group of UV islands.
6.7 Box Utility – Optimize
This dropdown menu shows two useful operators to optimize your .Blend file
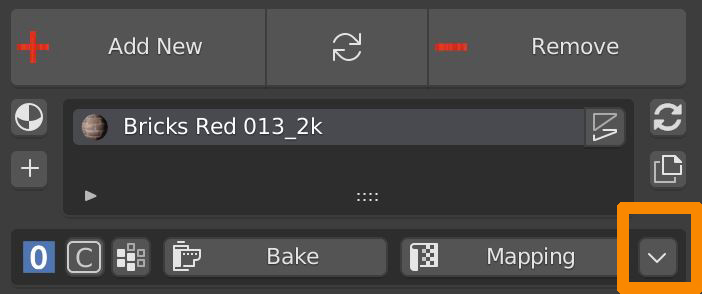
Remove unused slots deletes all empty material slots from all selected objects.
Purge Data removes from the .blend file all datablocks (Materials, Textures, Node groups) that aren’t used by any object of the scenes.

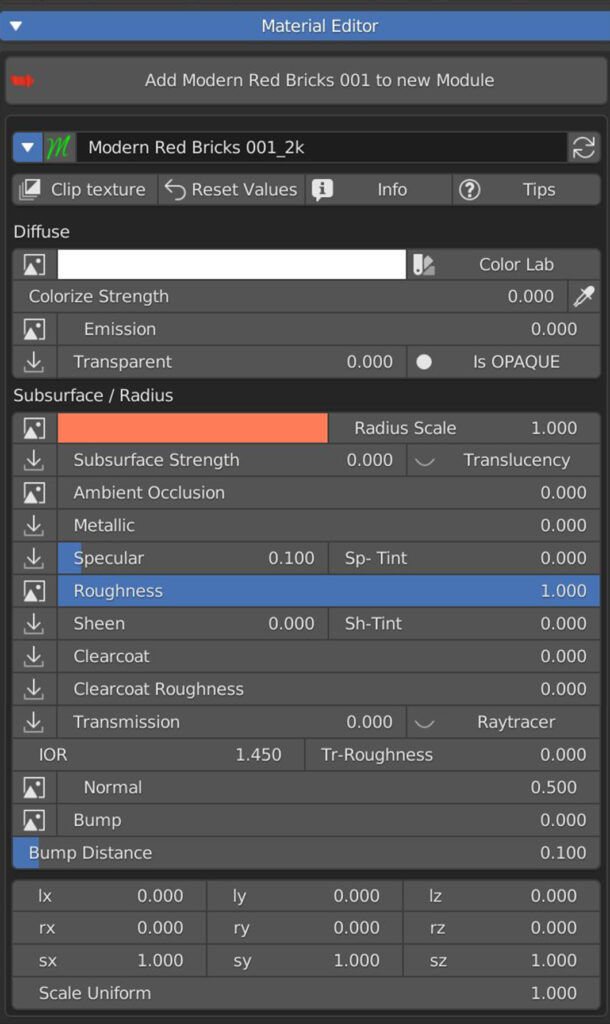
7.0 Material Editor
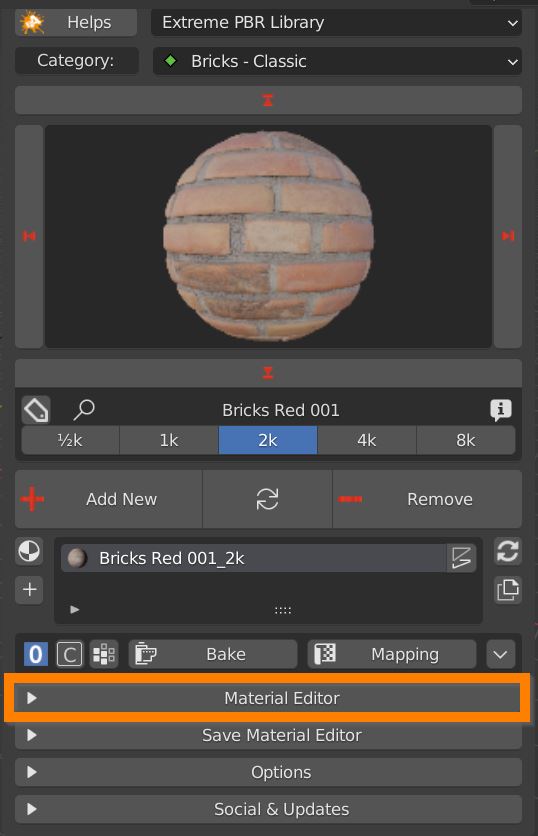
The white triangle arrow reveals all Material editor controls.
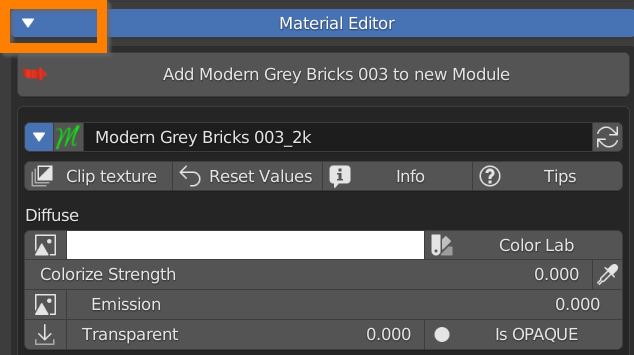
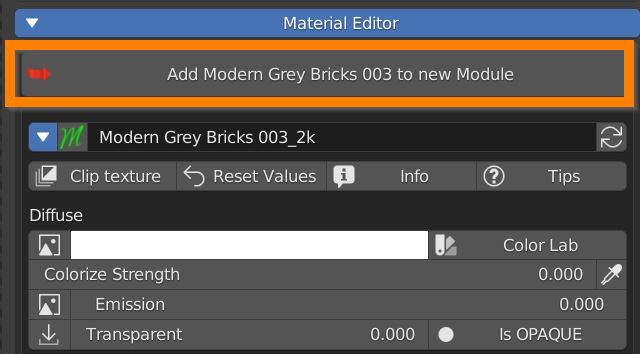
7.1 Modules – Texture Paint
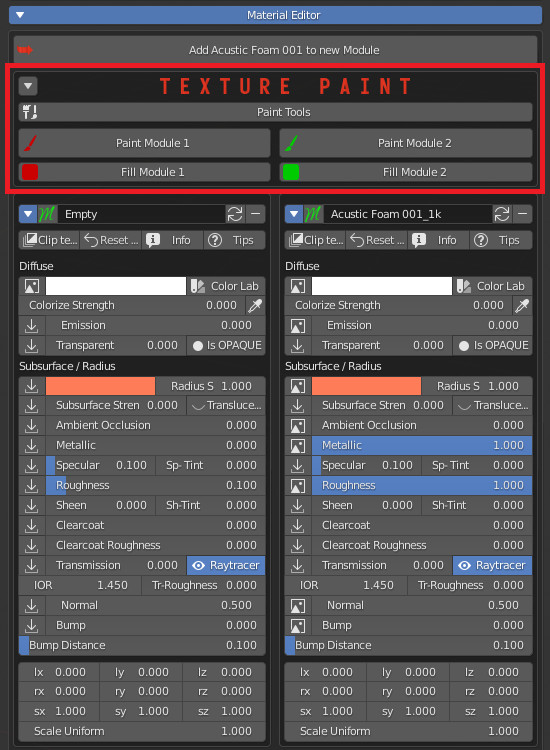
Push the “Add Material to new Module” button to enable texture paint: up to four materials can be loaded as Modules into a single slot, and painted on surfaces.
Press Paint Module # to paint the corrispondent material.
Press Fill Module # to apply the corresponding material to the whole selection.
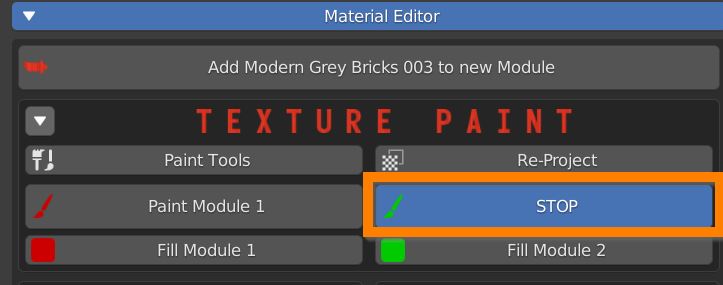
Press Stop to exit Paint mode
7.2 Paint Tools
Press Paint Tools to open the Painter Editor, where you can define the brush settings.
If some strokes appear where they shouldn’t, you have some overlapping Uvs: press Re-Project to fix the problem.
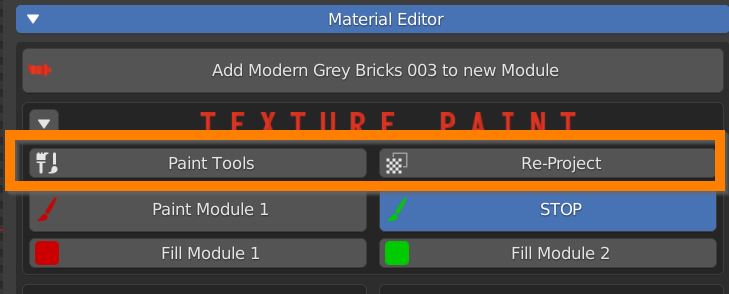
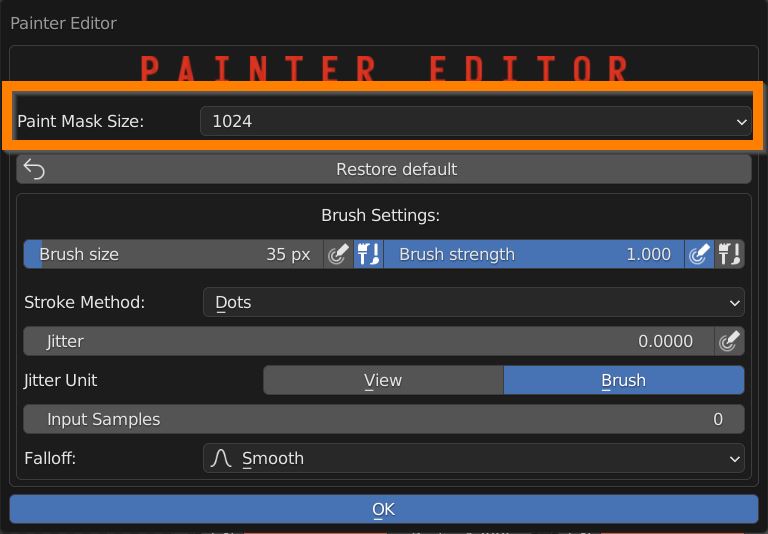
In the Paint Tools panel you can define the size of the texture which acts as a Mask between materials.
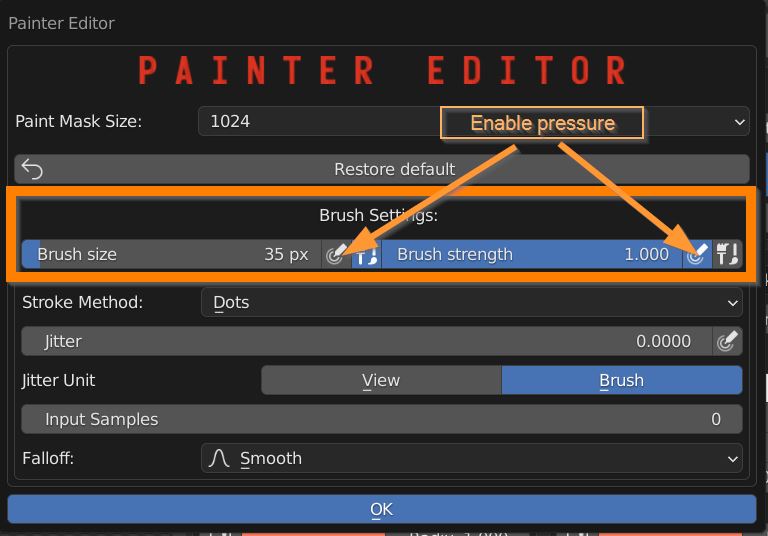
Adjust the size and strenght of the brush, and enable pressure sensitivity when using a graphic tablet.
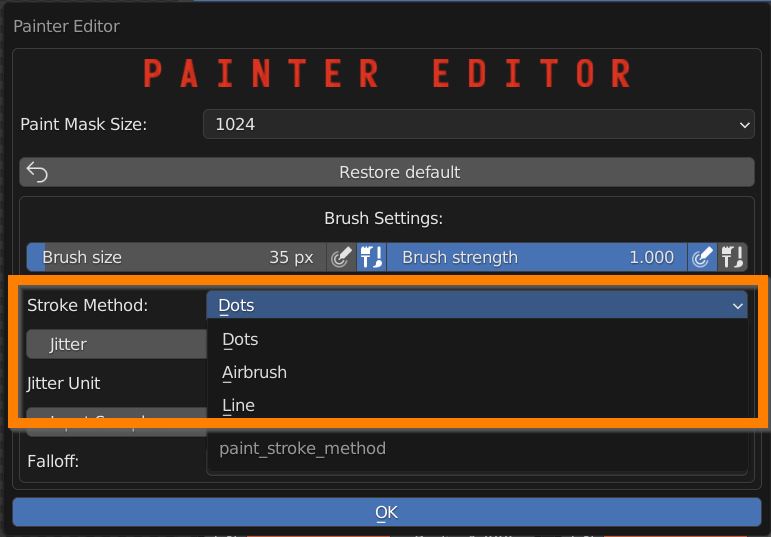
Switch between three Stroke Methods: Dots (default), airbrush and line.
Define the jitter amount, and toggle its pressure sensitivity.
Raise the averaged input samples, to smooth the strokes.
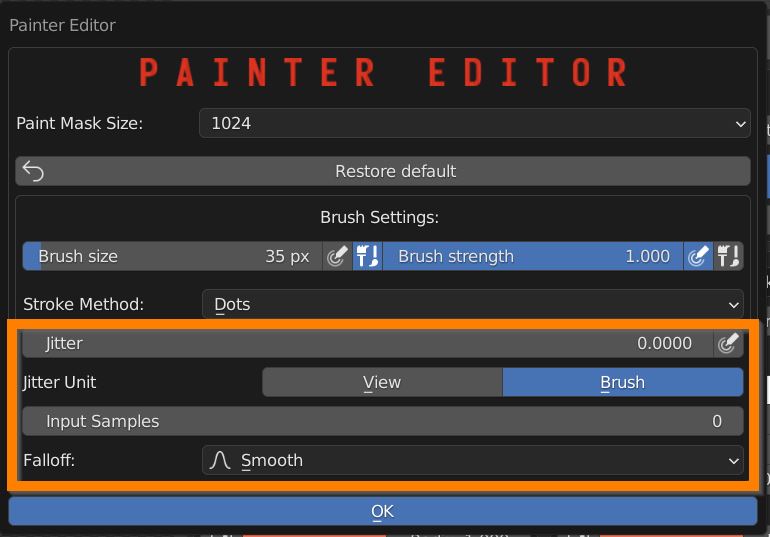
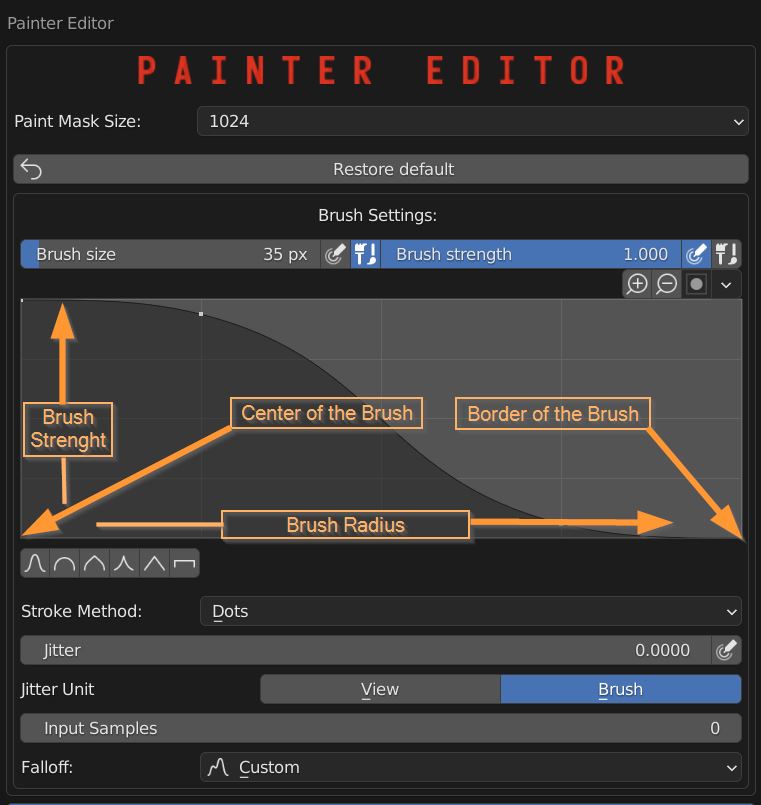
Define a brush falloff, choosing a preset or setting a custom curve.
In the curve editor X represent the brush radius, from the center to the border, while Y represent strenght.
7.3 Material Module Settings
Every module has a list of settings. You can collapse or expand it with the blue triangle icon.
The green Icon lets you swap materials between modules, useful if you want to preserve the painted mask.
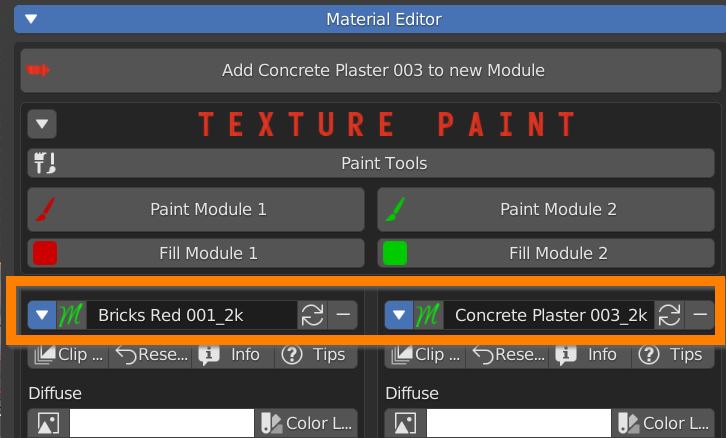
The circular arrows icon replaces the material with the one selected from the library.
With the minus icon you can delete the module.
Clip textures lets you turn off repeating on the margins, useful with decals and logos.
Reset Values brings back the default values for every parameter of the module.
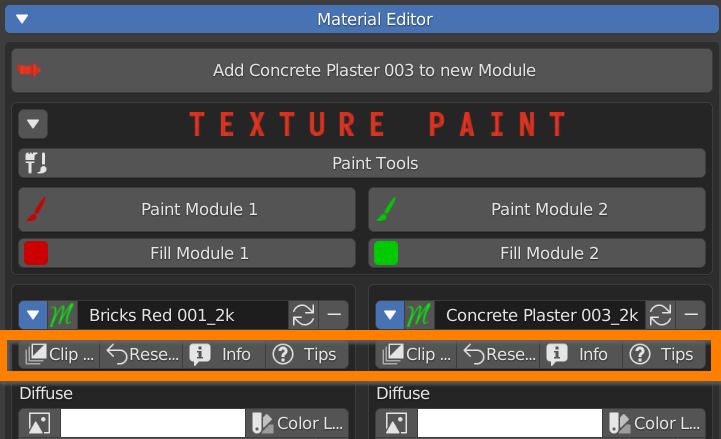
After pressing the Info button, click on the white triangle to show infos on the material, its owners and license permissions (mostly Creative Commons 0).
Tips button reveals some question mark icons, that bring infos on the adjacent parameter.

7.4 Texture Manager
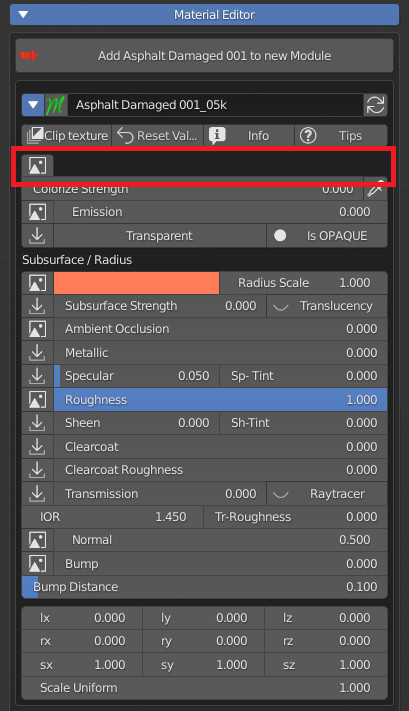
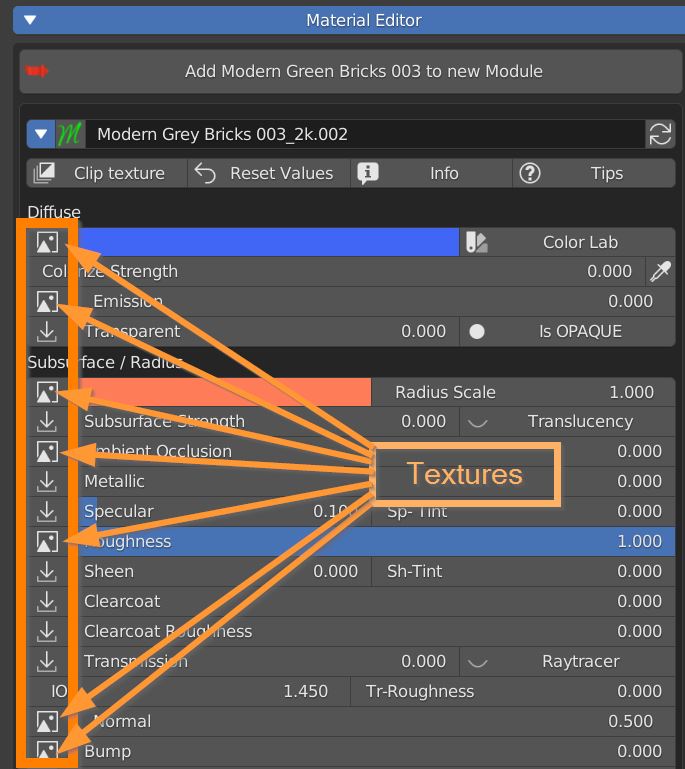
Every time an image icon is next to a slider, it means that there is a texture feeding that input.Click on the icon to open the Texture Manager panel.
Here you can individually manipulate every texture of the material.
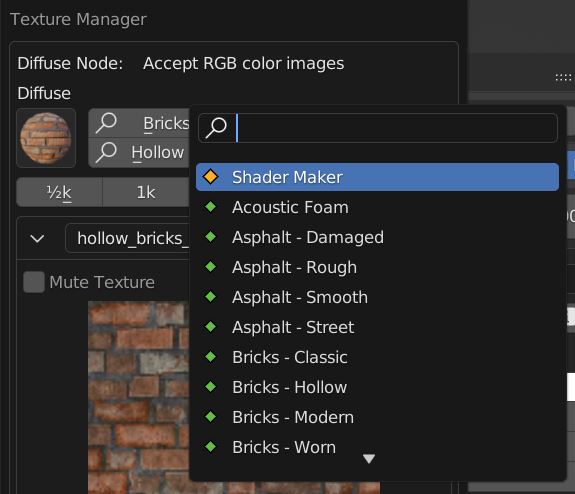
The header contains a library browser, where you can select a category, a material from a list, a material by thumbnails and a texture between thoose of the selected material.
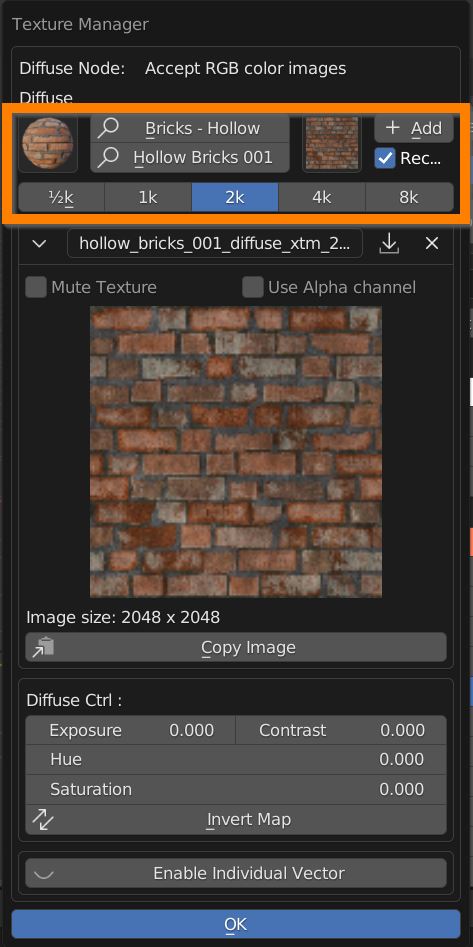
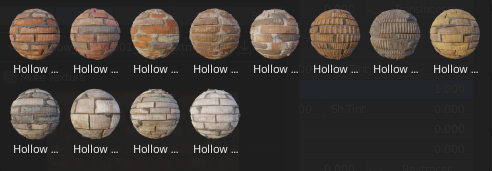
Once an image texture is selected, choose its desired resolution and click on the Add button to replace the image in the slot.

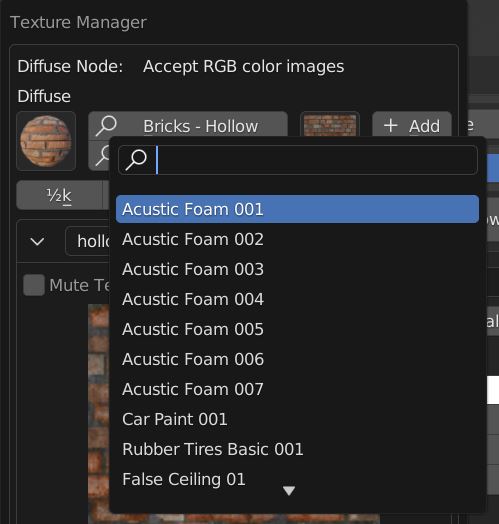

A ticked Rec preference ensures that if a texture is already present it doesn’t get loaded twice.

Click on the dropdown menu button to browse the already loaded textures in the project file.
Click on the file browser arrow to load a new texture from your computer.
The X button disconnect the texture from the slot.
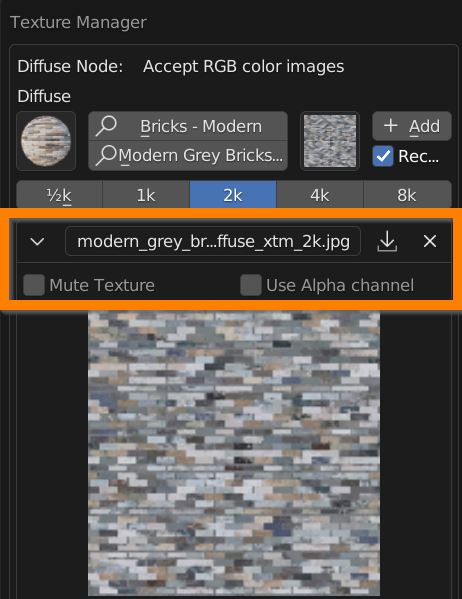
You can Mute the influence of the texture without deleting its connection.
You can use the Alpha channel instead of RGB channels to control the parameter.
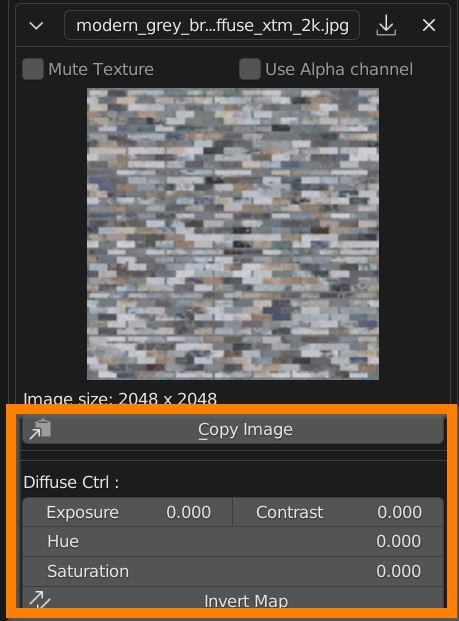
Click on Copy Image button to copy the texture in the clipboard, and paste it into another parameter slot.
You can adjust Exposure, Contrast, Hue and Saturation of an RGB image, and Invert its values with the Invert Map button.
If you click on the Enable Individual Vector, you can adjust Location, Rotation and Scale of the Image independently from the others textures of the material.
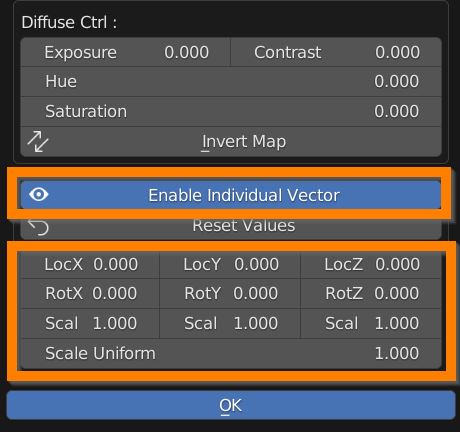
Press OK to confirm the edits.
If the texture manager is called for a single property, a Black and White image is expected, where Black means a value of 0.0, White 1.0, Mid Grey 0.5 and so on.
Non-Color button ensures a linear interpolation between shades of grey and values, if the image has color informations, its color space is turned into “Non-Color” and pixel values are taken into account.
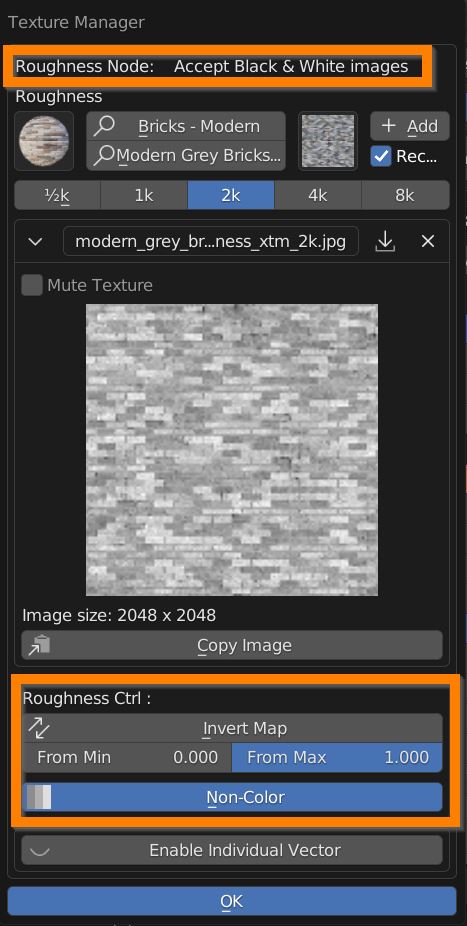
From Min slider crunches Blacks toward Whites.
From Max slider crunches Whites toward Blacks.
In case of Normal Map Texture Manager, you can tick the Use Normal Generated button to derive a normal map from a diffuse or bump texture.
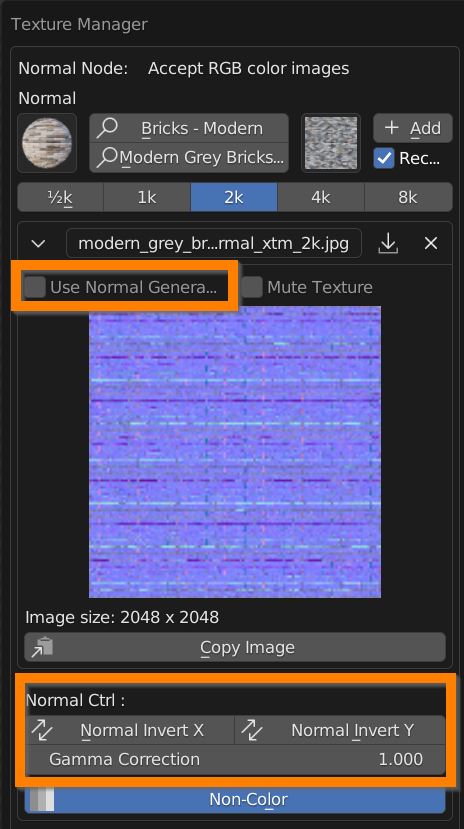
You can Invert X and Y direction and apply a Gamma correction on the Map, to ensure compatibility with different standard generated images.
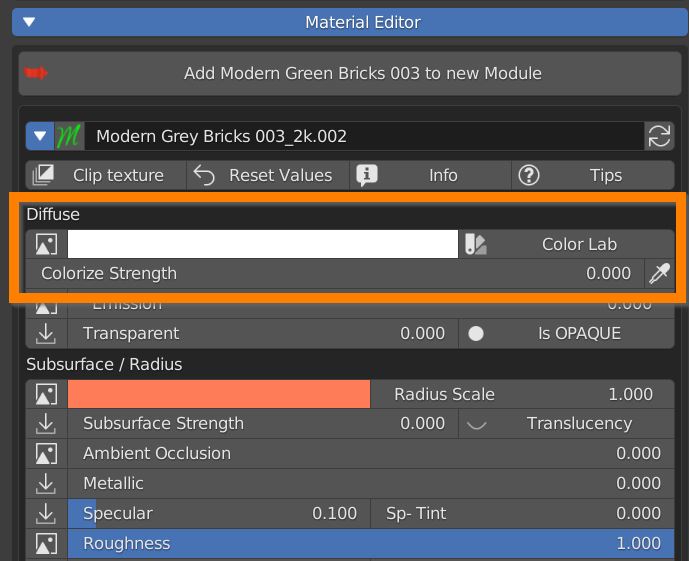
7.5 Diffuse Color
The first zone of material parameters is about Diffuse color.
The Colorize strenght slider lets you mix the diffuse texture with a color that you can choose using the color swatch clicking on the white color area.
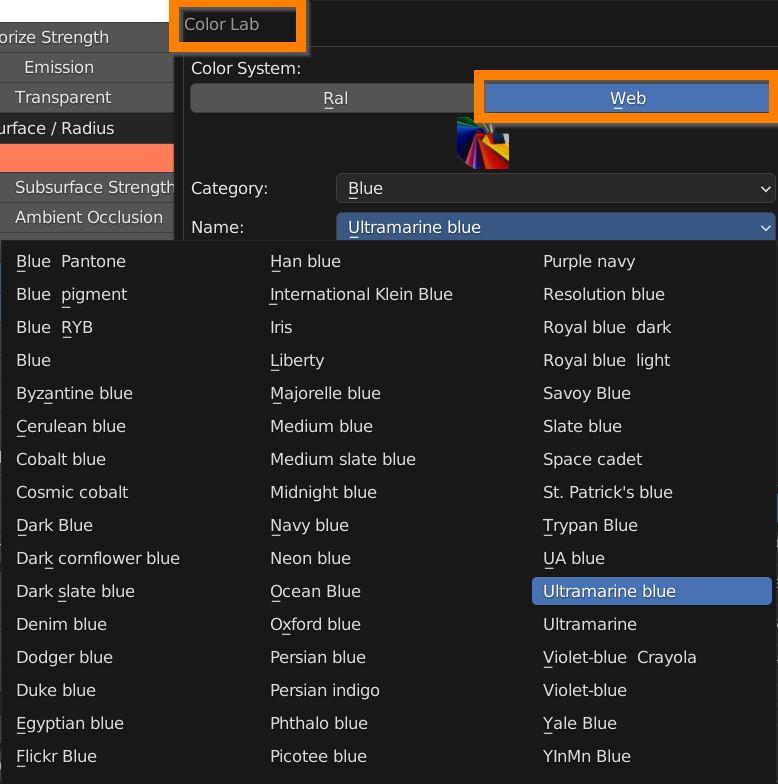
You can even choose a color from a list of RAL and Web coded colors pressing the Color Lab button.
In the Color Lab panel, choose a color library (Ral or Web), choose a category and select a named color from the dropdown list.
Press OK to confirm, and adjust the Colorize Strenght slider to set the influence. If no texture is used, influence is always 100%.
7.6 Emission – Transparency
Many materials share the same texture between Diffuse and Emission. Set the emission power with this slider.
Some transparency can be set with the next slider, open its texture manager to control transparency with Black and white image pixel values.
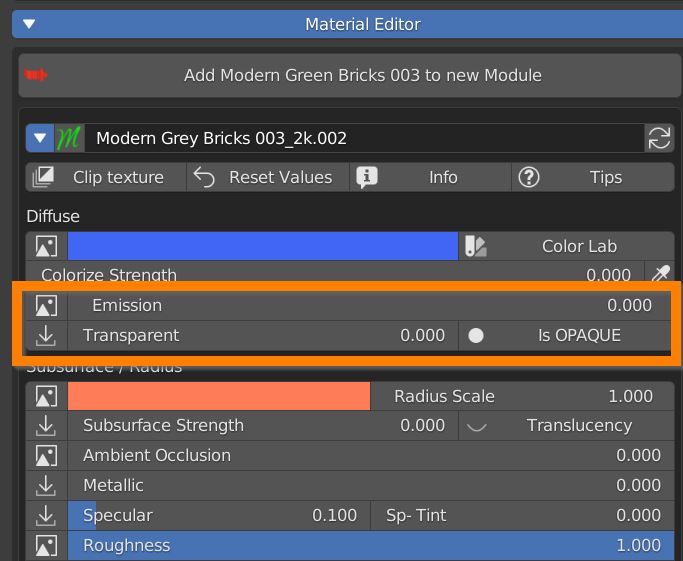
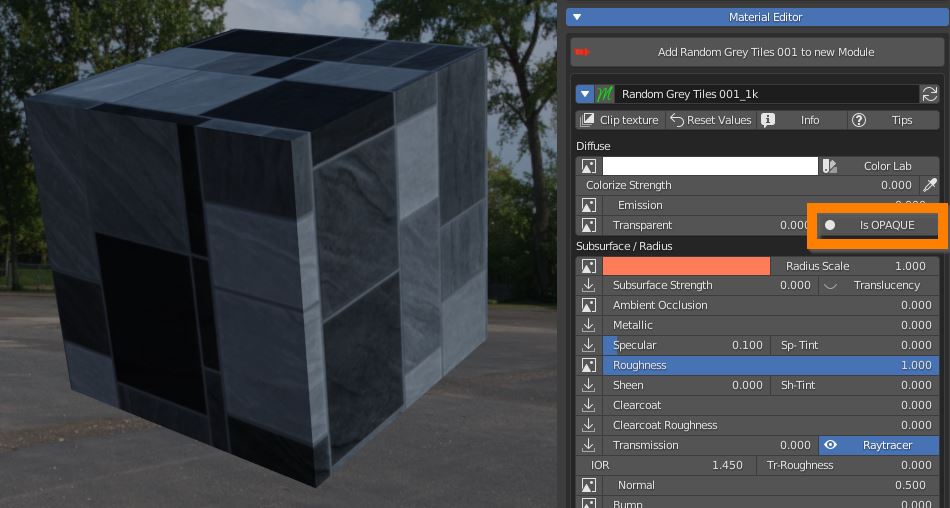
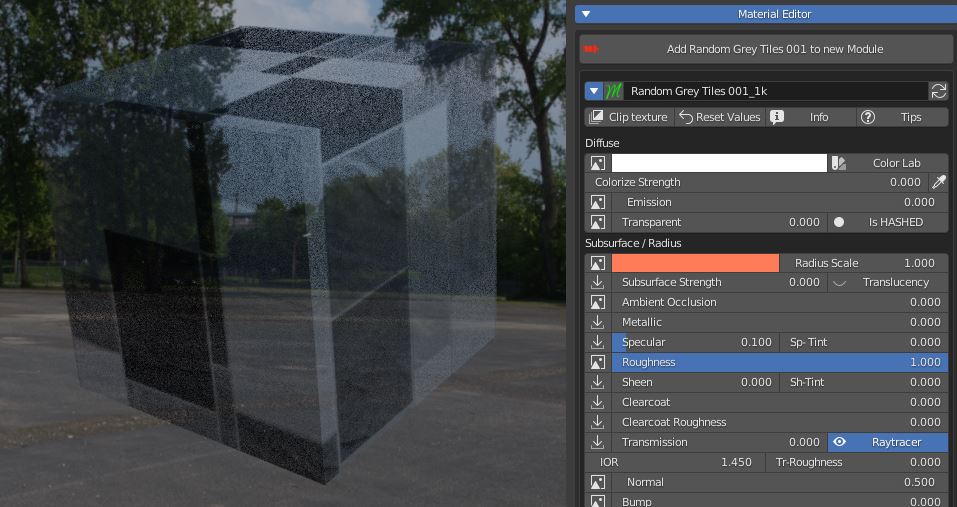
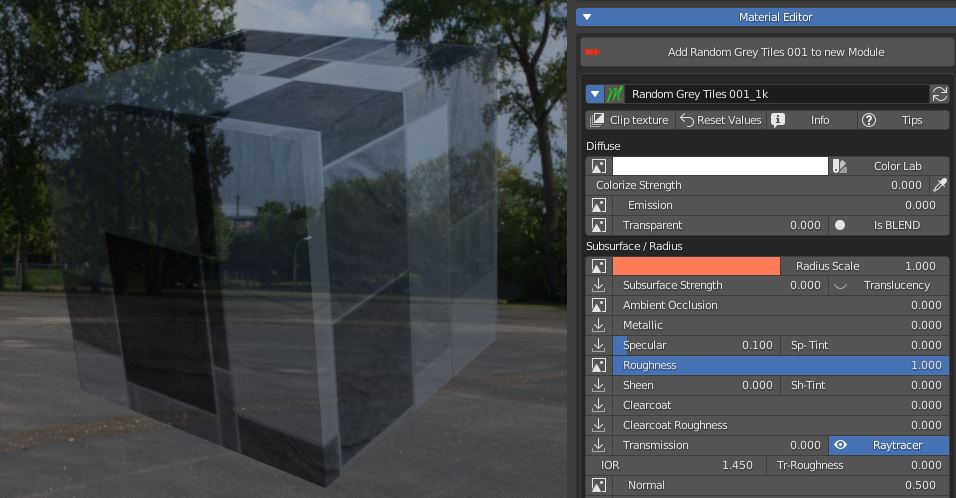
Be aware that if you’re in Eevee or LookDev shading mode you have to click the button to set the material as Is BLEND, Is HASHED or Is CLIP in order to use transparency.
Is BLEND blends every pixel between material and transparency, Is HASHED perfoms the blend in a noisy fashion (faster), Is CLIP sets as transparent only pixels under a threshold value (useful for texture controlled transparency).
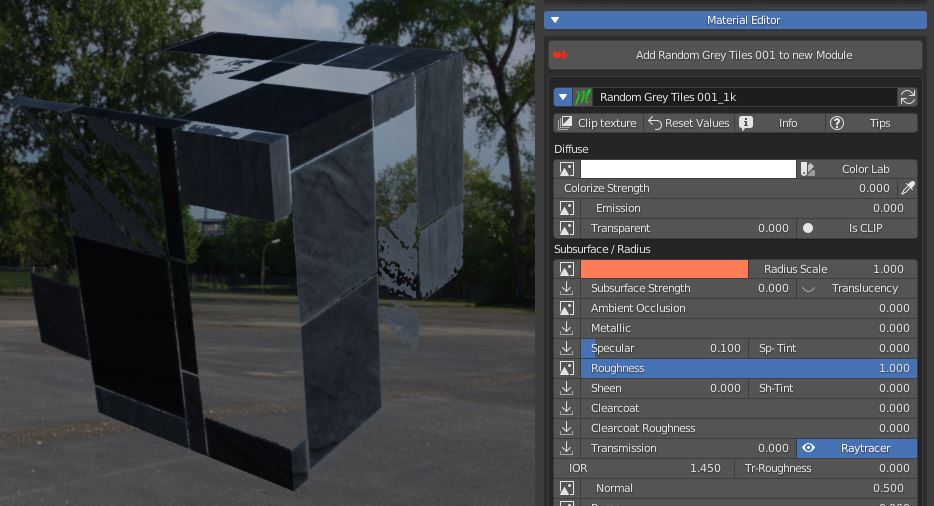
7.7 Subsurface scattering – AO – Metallic – Specular – Roughness
Subsurface scattering (SSS) is used to simulate light which enters the material, scatters inside, and then comes back out (like wax, skin, food).
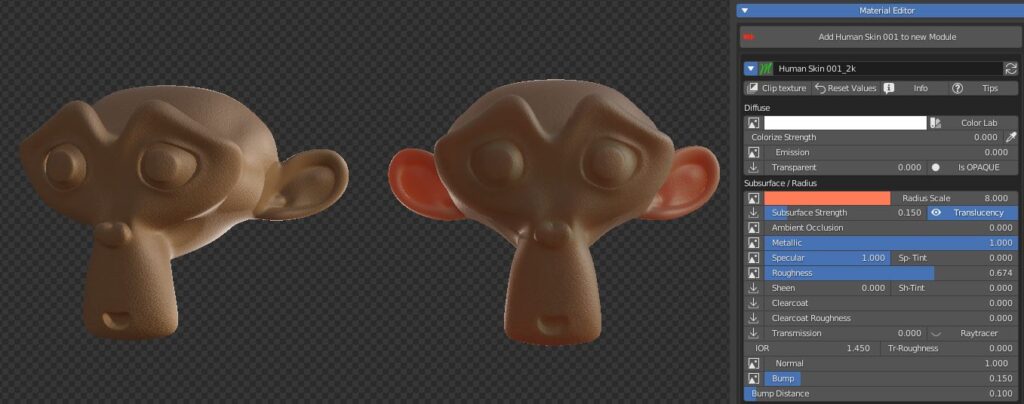
This scattered translucency can be colored by a texture and a color wheel.
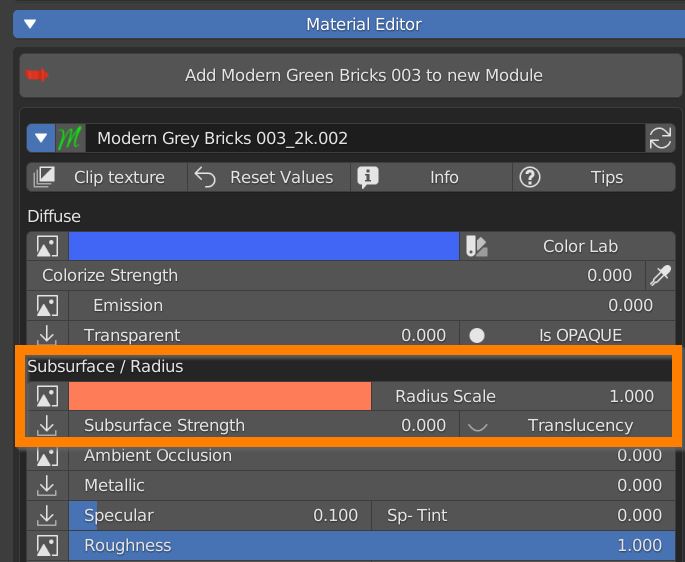
You can set the Radius scale (maximum light path lenght), and a strenght slider.
If using Eevee enable the translucency button.
Ambient Occlusion slider set the amount of the effect if an AO texture is present.
Metallic slider defines wheter the material is Dielectric (Black pixels on the texture) or Metallic (white pixels).
Specular slider sets the intensity of specular reflections. Sp Tint allows coloured reflections.
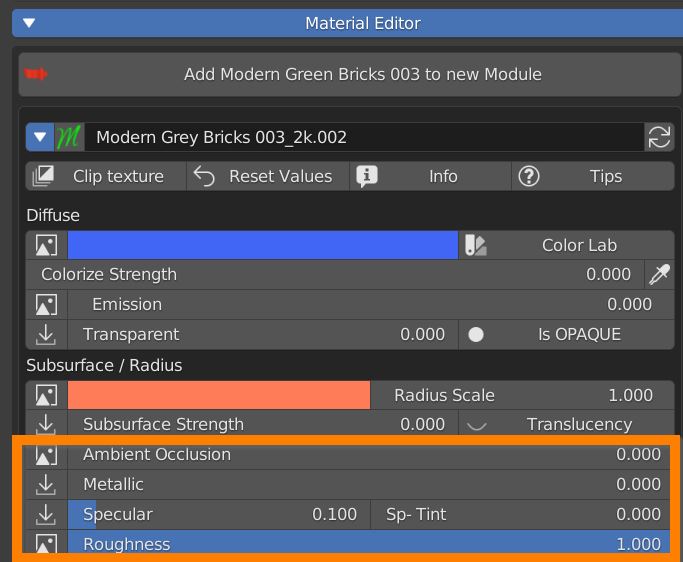
Roughness value controls the radius of reflections blurriness: 0.0 (black) means sharp reflections (mirror-like), 1.0 (white) means totally diffused bounces.
Roughness is one of the main controls that impact on how a material looks.
7.8 Sheen – Clearcoat – Transmission
Sheen slider adds some extra brightness on the edges of the model. There’s a Sheen tint slider too.
Clearcoat adds an extra layer of glossiness, with its own roughness value, useful when simulating car paint, eyes and others materials with a transparent and reflective layer.
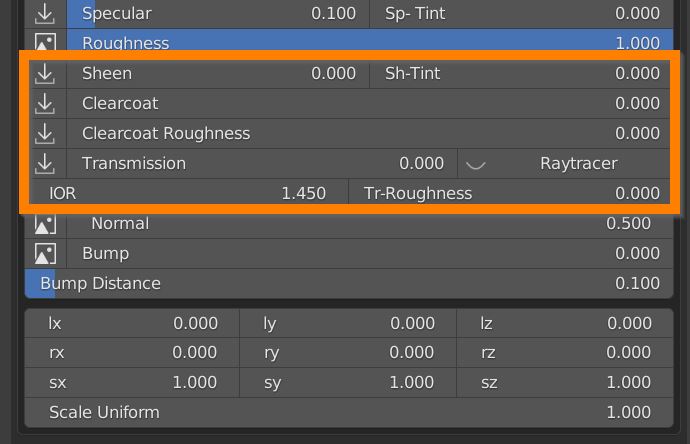
Transmission slider mixes between opaque and glass-like transmission behaviour. A Transmission Roughness can be set.
IOR is the real physiks Index Of Refraction value of the glass-like simulation.
In Eevee and LookDev shading mode turn on Raytracer.
7.9 Normal – Bump
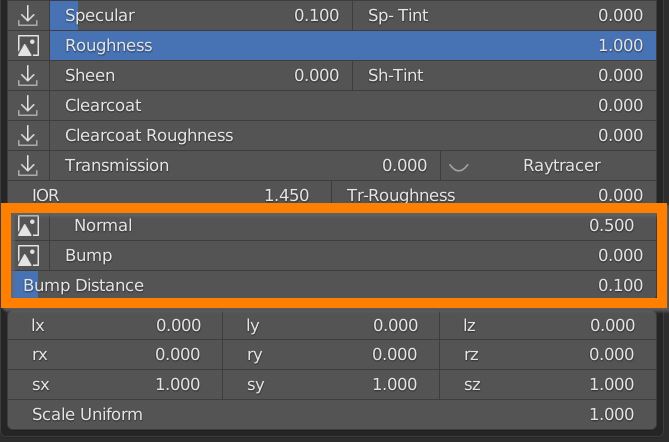
Normal sets the influence of the Normal Map.
Bump controls the output of the Bump map, Bump Distance is a multiplier of its input.
7.10 Textures Location – Rotation – Scale
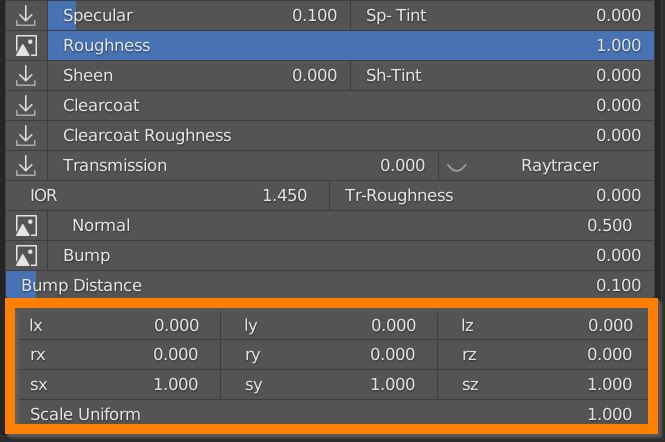
Lastly we have 9 values controlling the transform of the material textures as a whole (loc, rot, scale), plus a Scale Uniform that multiplies the 3 scale values together (see mapping section).
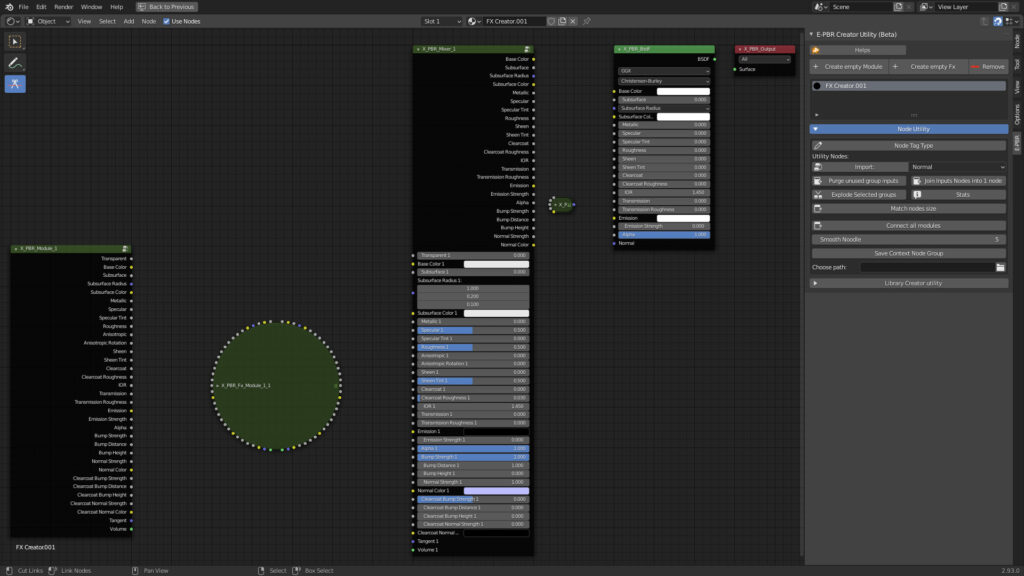
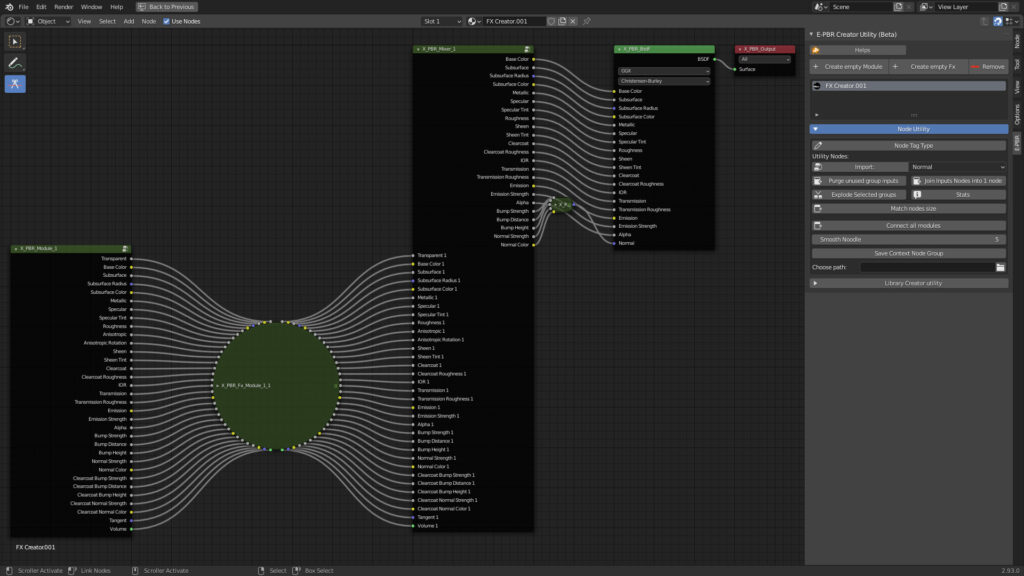
7.11 Adjust Node Tree
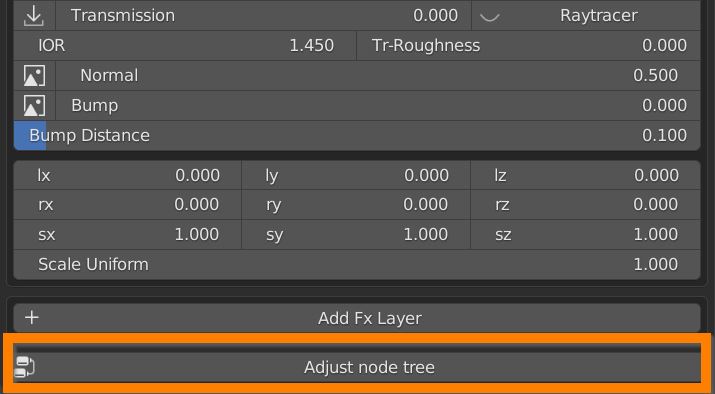
This button, in case there are Nodes problems in the Extreme PBR Nexus node tree, will try to fix and eventually reconnect the disconnected nodes.
Example Before:
Example After:
8.1 Fx Layer – Paint Mask
Almost any library item can be added to a material as an Fx Layer.
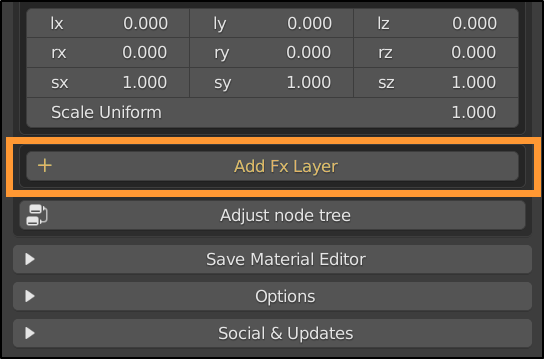
The added material is masked by two textures: a dynamic mask and a static mask, which often equates to diffuse or alpha, if present.
If the effect is not visible enough, lower the “From Max” slider of the static mask. “From Min” slider reduces the fx.
You can Exclude the Static mask and Invert its effect.
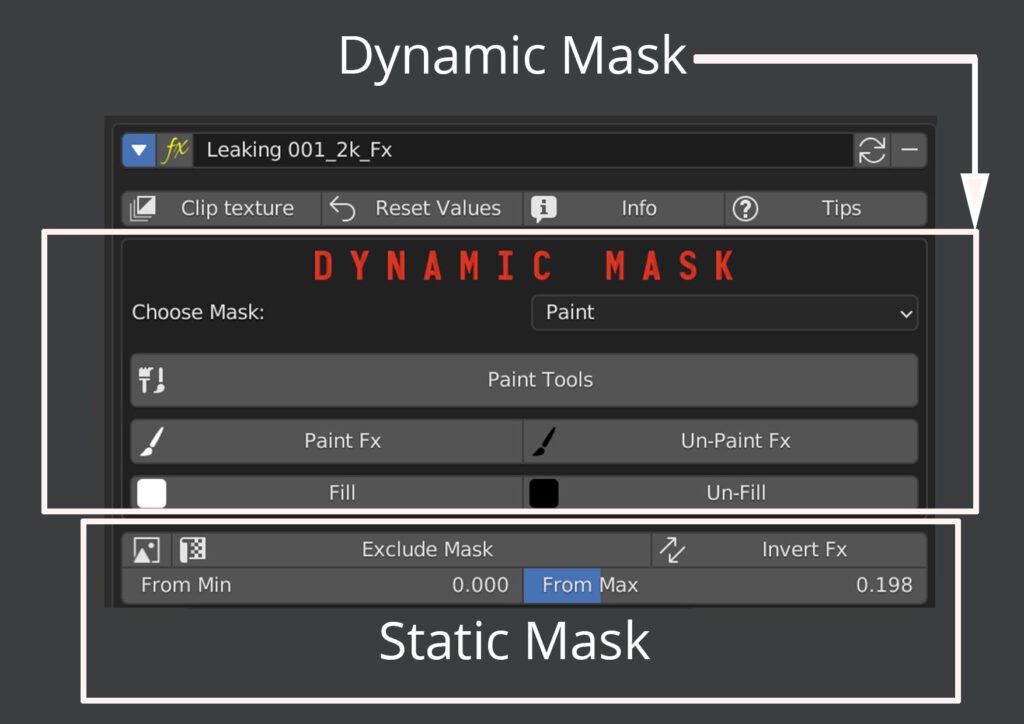
By default the dynamic mask is set to Dynamic Paint, and the Fx is painted over the entire material.
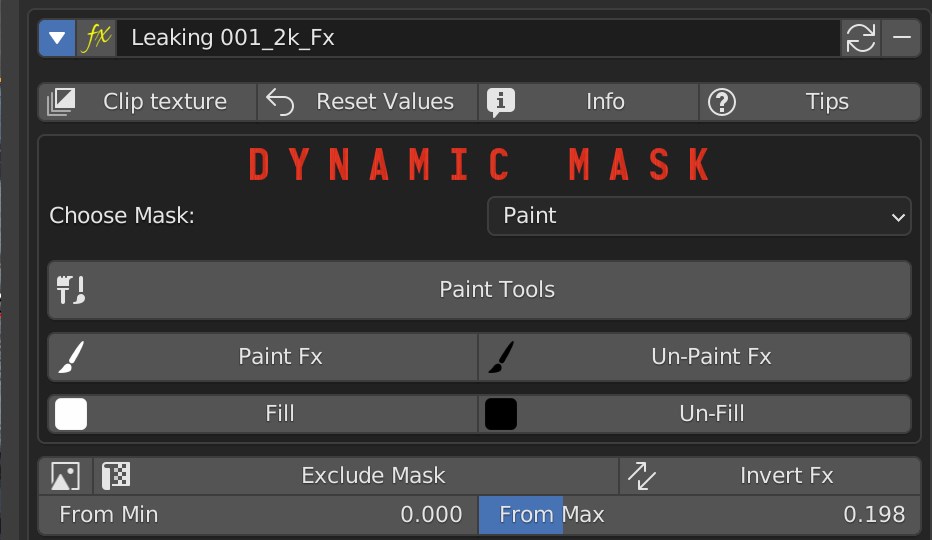
At this point click on the “Paint Fx” button to paint the effect, use “Un-Paint Fx” to delete, “Fill” to distribute the effect on the entire material, “Unfill” to remove it completely.
Clicking on the “Paint tools” button opens the brush preferences page.
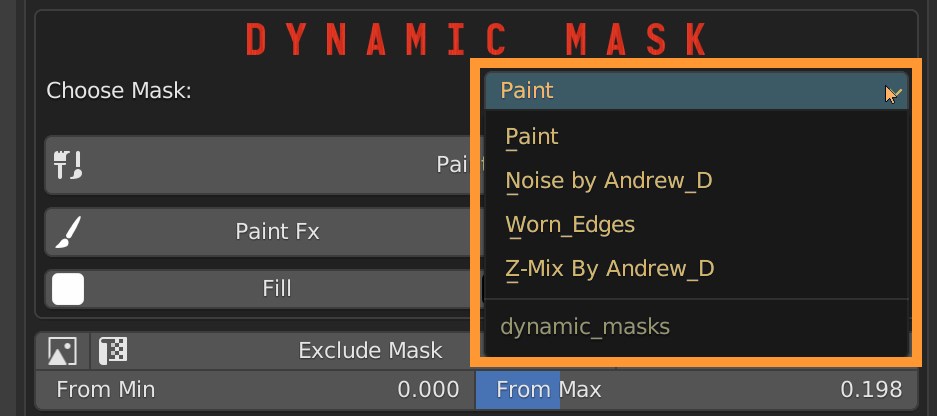
8.2 Fx Layer – Mask Types
It is possible to add more than one effect layer, the only limitation is 24 different textures in Eevee for each single material.
The other 3 dynamic mask options are: Noise, Worn edges and Z-Mix.
8.3 Fx Layer – Noise Mask
Noise applies a mask useful for randomly distributing the effect.
It is possible to adjust the smoothing of the edges with the parameter “Detailed Deadlift”. You can invert the mask.
With “Roughness” and “Details” you control the amount and scale of details along the edges of the islands.
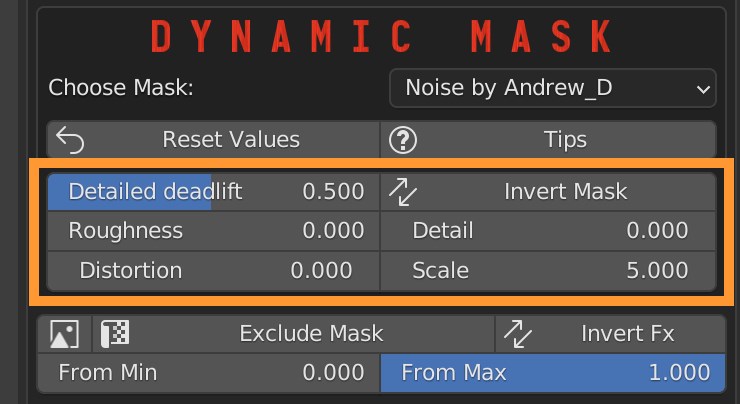
You can adjust the distortion and scale of the mask texture.
On top there are buttons for resetting this section values and show tips buttons.
8.4 Fx Layer – Worn Edges
Press the “Make worn_edges” button to pre-render a mask around the edges of the mesh.
“Make Noise Worn_Edges” adds random noise to the edges mask.
You can then adjust the expansion of the affected area and its strength.
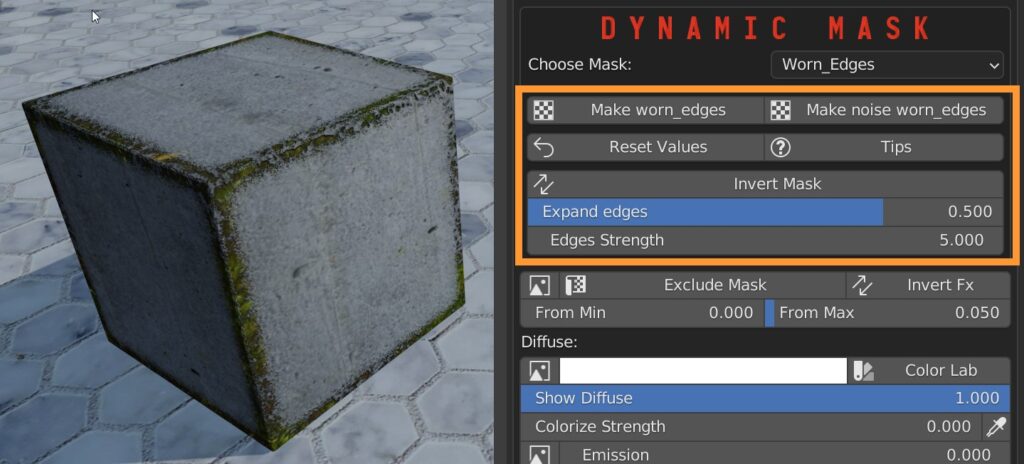
It is possible to invert the mask, reset the set values and enable help hints.
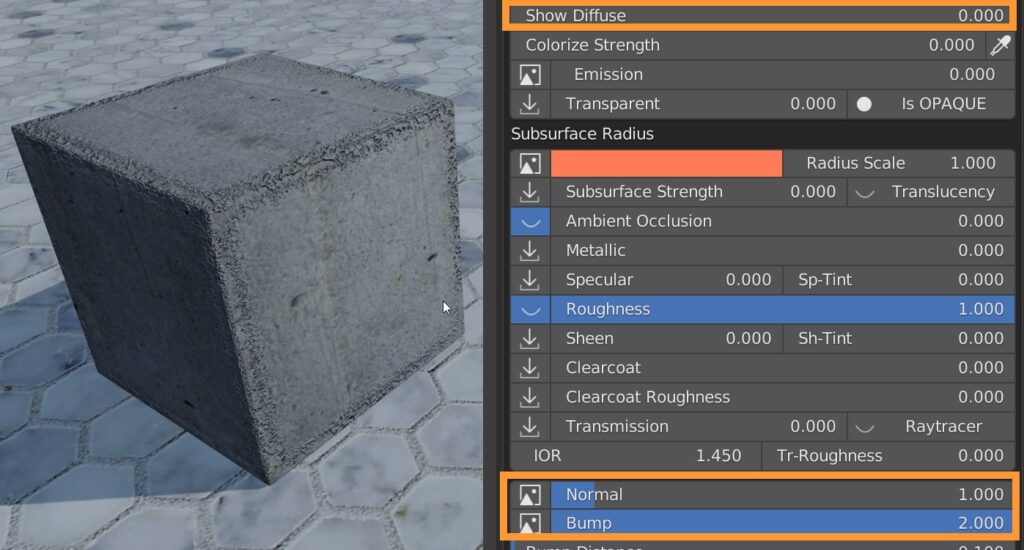
A useful trick is to set the Diffuse parameter to zero, so that the edges are only affected with normals and bumps.
8.5 Fx Layer – Z-Mix
Z-Mix allows you to set a height beyond which the effect ceases.
It is possible to adjust the stretch of the edges, the level of detail, the blur (deadlift), the amount of detail (Roughness) and the Distortion.
You can set the general Scale of the mask, and Switch its direction.
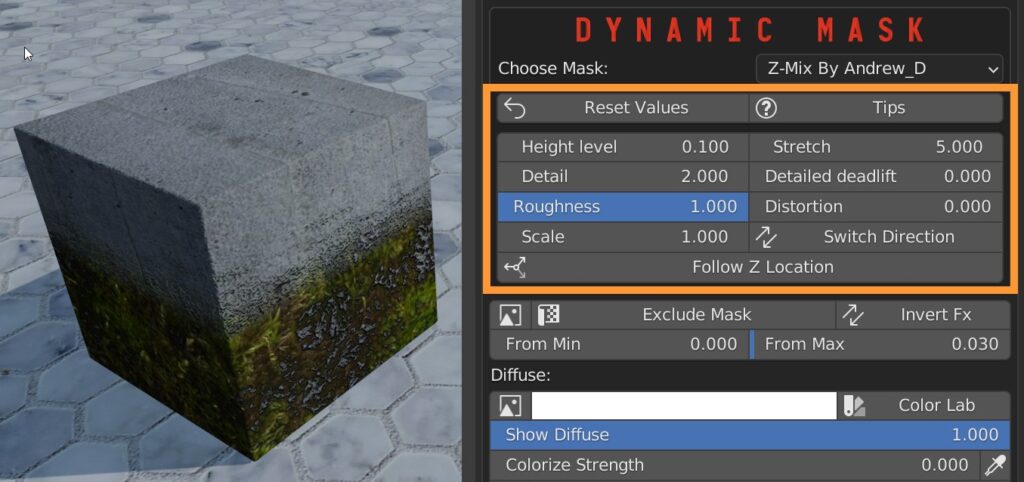
The “Follow Z Location” button takes into account the coordinates of the world instead of those of the object, thus allowing to automatically generate terrains with different aspects depending on the altitude.
8.6 Fx Layer – General settings
The blue arrow allows you to collapse or expand the panel, the yellow fx key allows you to select an effect from all those loaded in the project, by clicking on the name it is possible to rename the effect.
The two round arrows load the selected material from the library into the effect.
The dash allows you to deletete the effect.
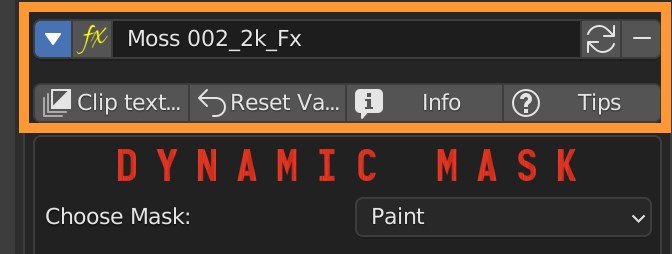
Pressing the “Clip Textures” button avoids the repetition of textures in tiles, useful for stencils or special effects.
It is possible to reset the panel values, obtain information and show usage Tips buttons.
Below the specific controls of the effect there is a control panel for textures and attributes of the material equal to the standard one.
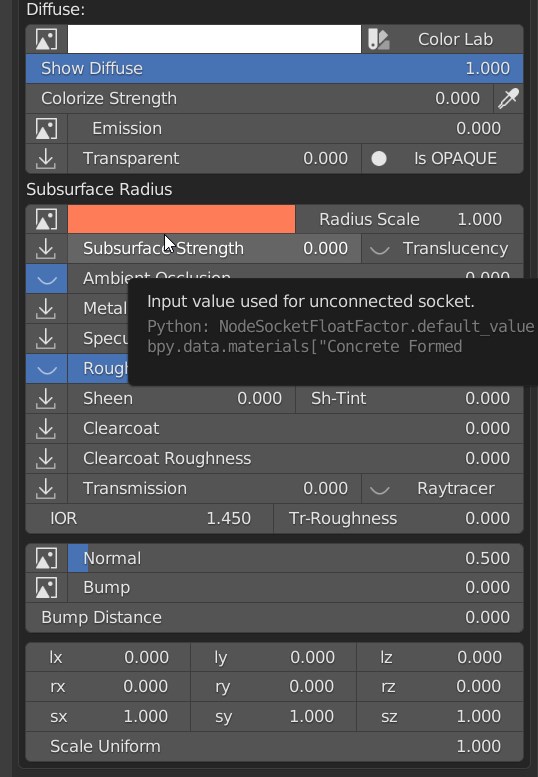
Check Texture Manager and sections below for further infos.
9.1 Options
At the bottom of the addon panel is the Options button.
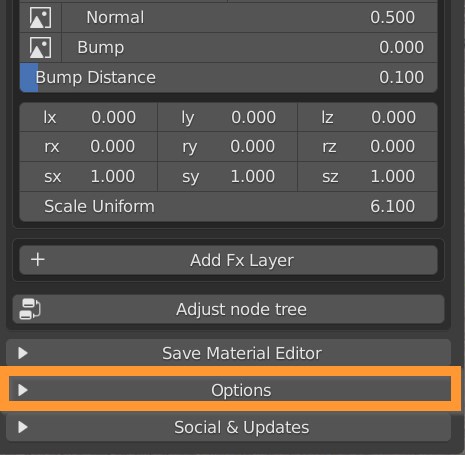
Click it to open the preferences window and set some general parameters.
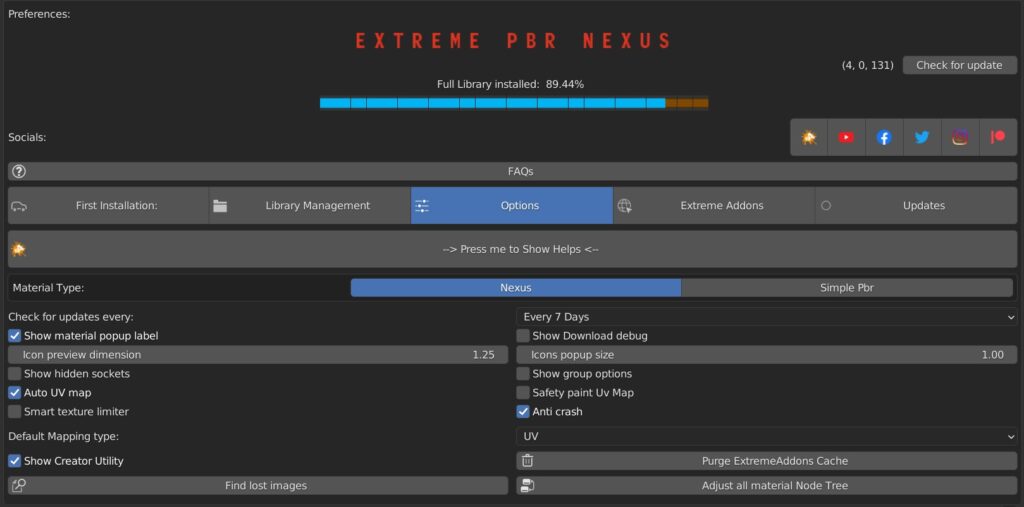
It is possible to choose the type of material: Nexus or simple PBR.
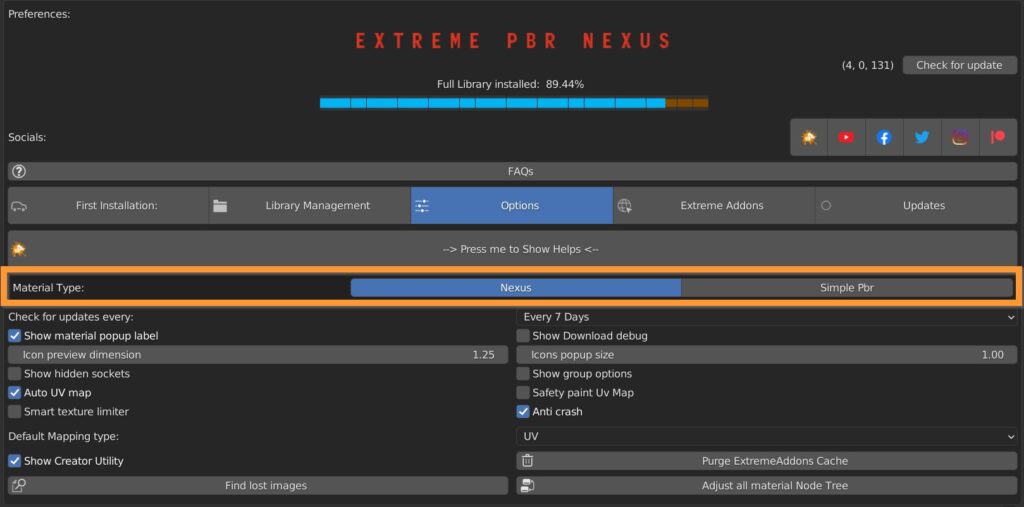
Nexus type builds a complicated setup of nodes that allows all the advanced functions of the addon.
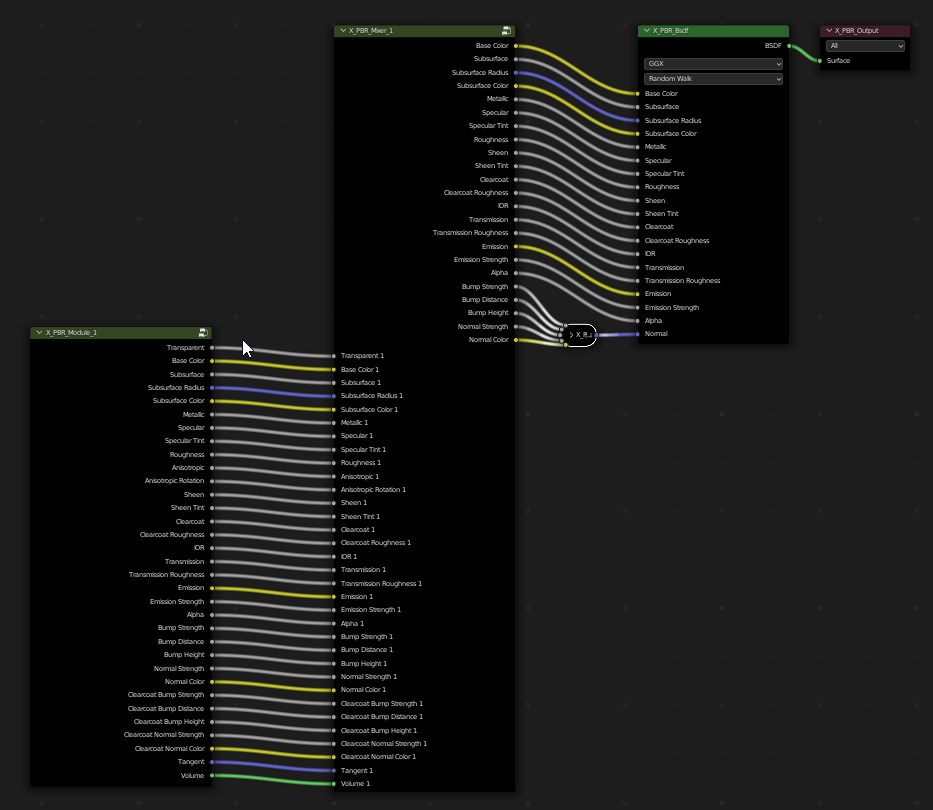
Simple type, on the other hand, has a basic node structure, which is easier to decipher and modify at will.
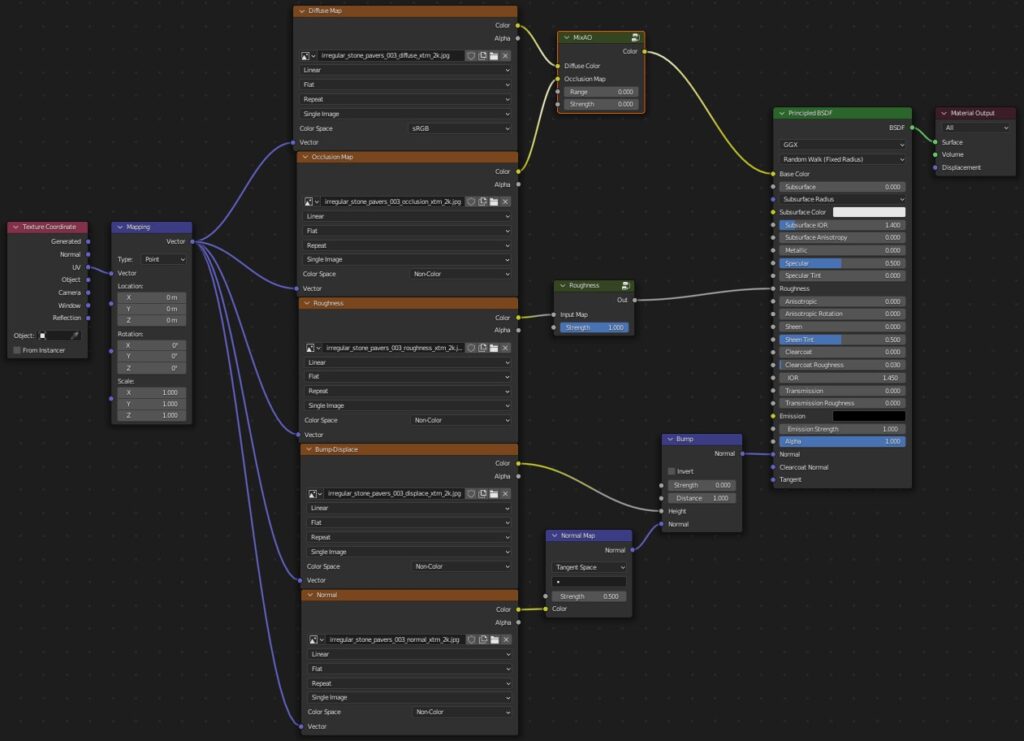
Both node trees can coexist, even in the same object.
9.2 Options – 2
You can choose how often to check for updates (every 1 – 3 – 7 days).
You can set the size of preview and popup icons.
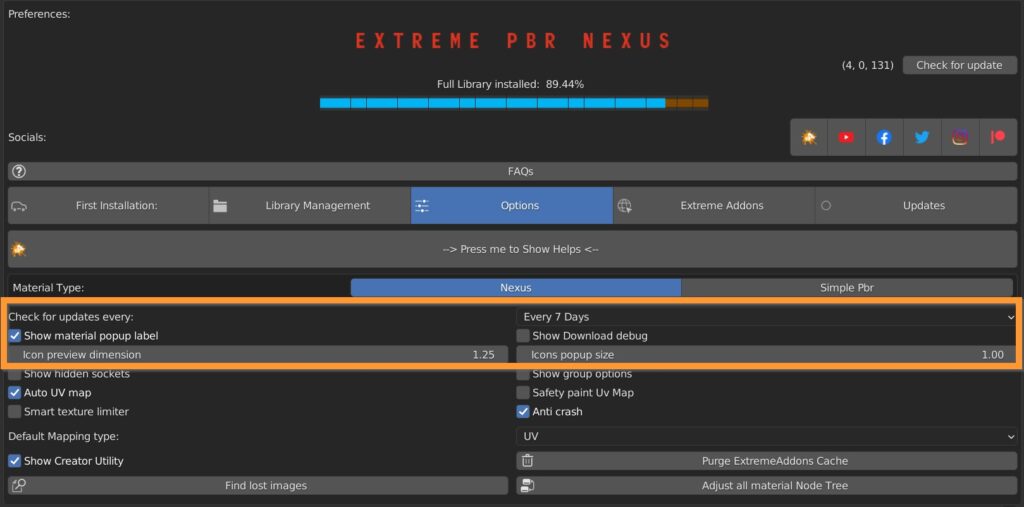
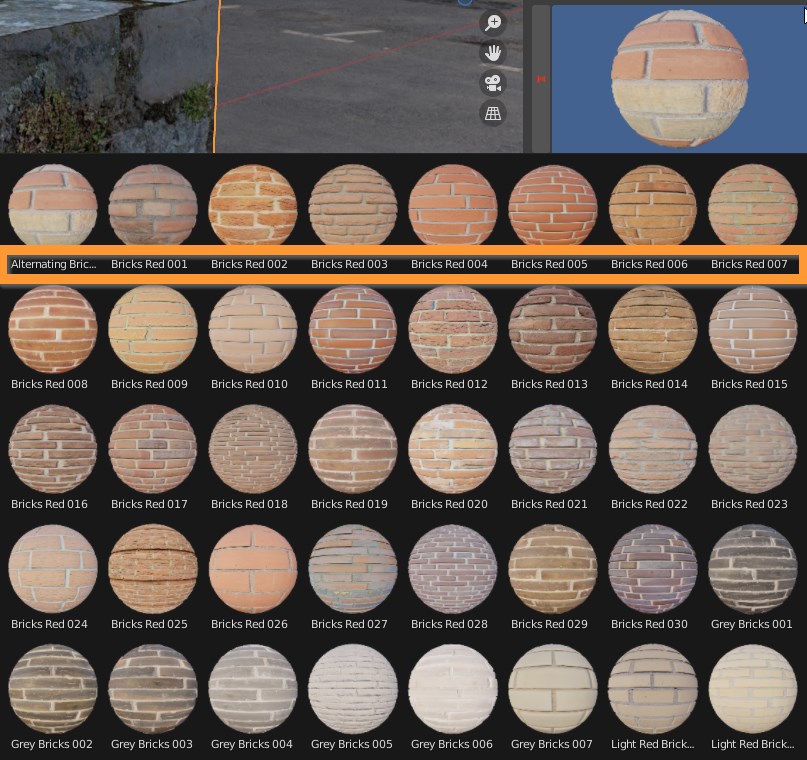
Show material popup label lets you have the material name under popup icons.
Show Download debug gives you additional informations during materials download.
Show Hidden sockets lets you reveal all hidden sockets of the node tree in the shader editor.
Auto UV map creates an UV Map when the object doesn’t already have one.
Smart texture limiter takes Eevee limitation of 24 textures per material into account, and it eliminates the excess textures, starting from the FX layers, down to the modules.
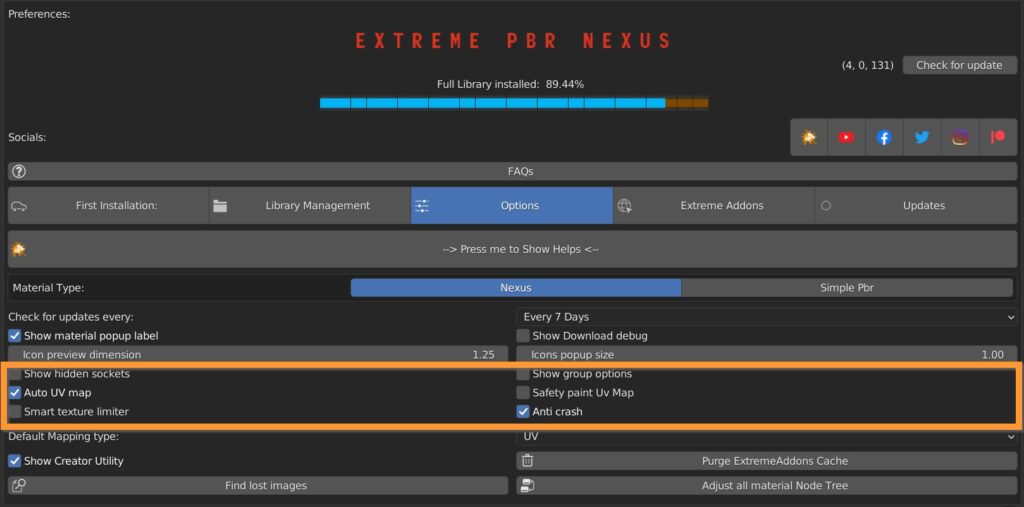
Show group options adds a dropdown menu on the shader node tree.

Safety paint UV Map prevents the UV layer of the texture paint from being selected if you’re not in Texture Paint mode.
Anti Crash On some computers there is an abnormal crash when adding a material.
The bug has been reported to the Blender Foundation; until the cause is understood, keep this active if you encounter any abnormal crash applying the materials.
9.3 Options – 3
You can choose Default Mapping type (UV, Box, Sphere, Tube).
Show Creator Utility turns on some extra panels in the shader editor, useful for material library creators (keep it off if you’re not creating new libraries, as it could damage existing materials if misused).
Purge ExtremeAddons Cache Removes stored data about Library path, User data.
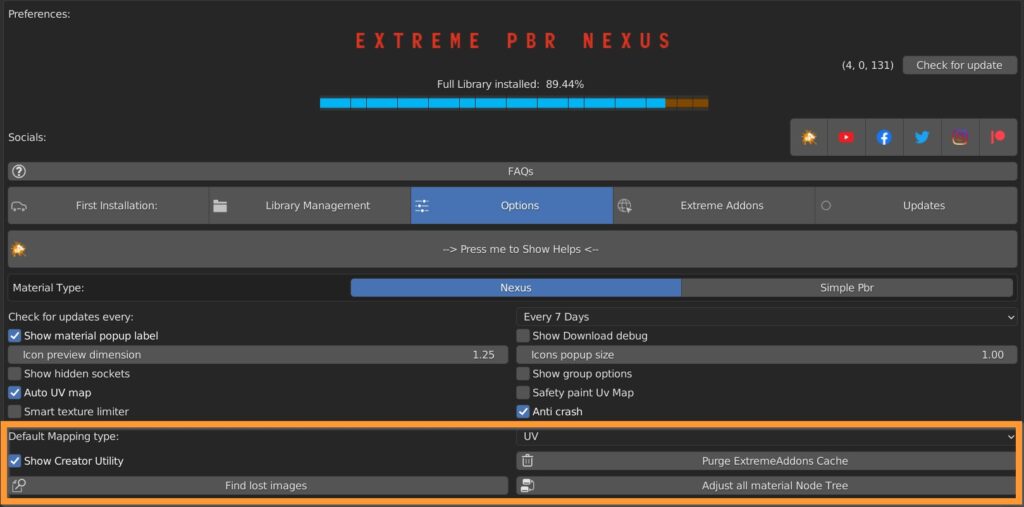
Find lost images tries to find all lost images through targeted research.
Adjust all material Node Tree tries to adjust broken/unlink node tree or update on all data materials.
10.1 Social & Updates – Updates
When a new version is available, there will be a notification at the top of the addon.
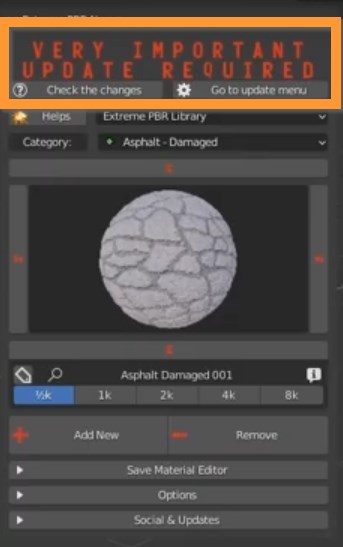
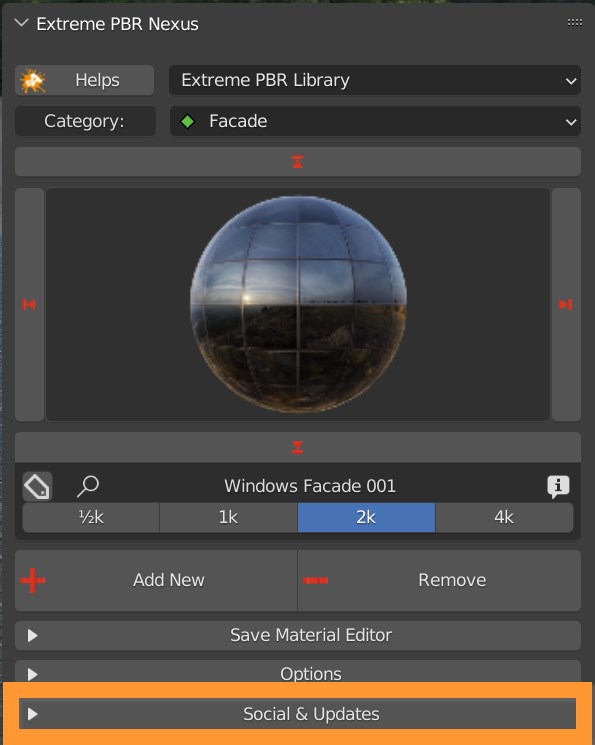
Press the Update & Social Button to open the preferences window.
You can manually check for a new version.
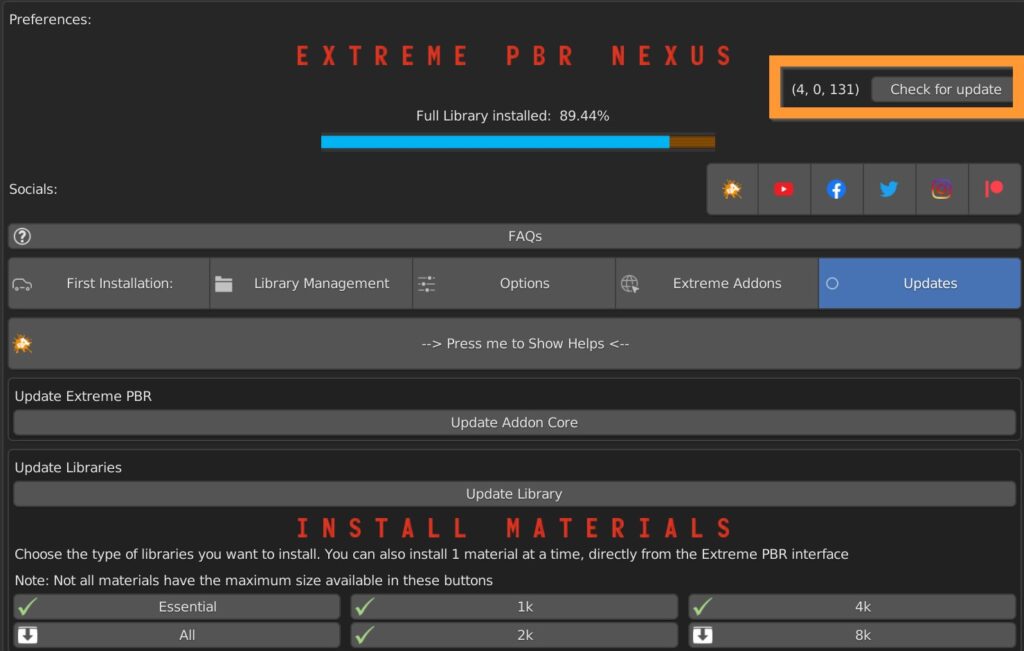
10.2 Social & Updates – Core
To be able to install it you will need to log in to the ExtremeAddon site and have the license activated on your computer.
At this point, just press the Update Addon core button and follow the procedure.
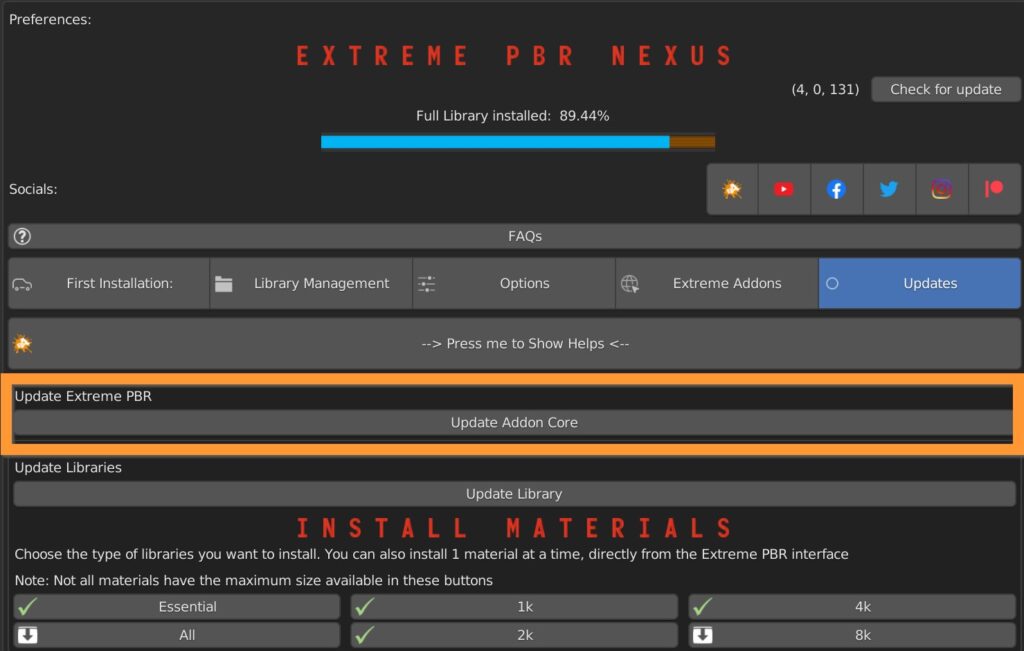
It is also possible to update the library and add textures not yet downloaded.

10.3 Social & Updates – Social
The social buttons panel allows you to quickly reach the Extreme Adons site, the YouTube channel, the Facebook, Twitter, Instagram and Patreon pages.
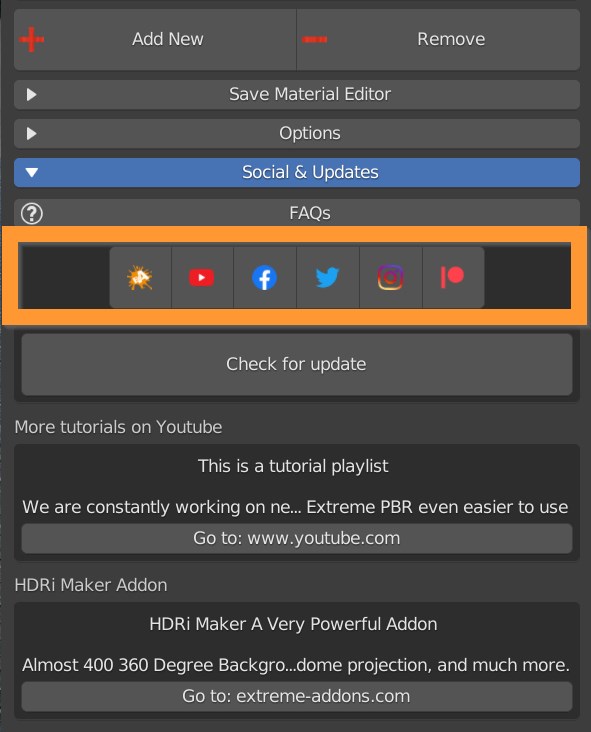
The lower area indicates any news present on the social channels.
11.0 Displace – Modifier
Displace Quick tutorial:
How To apply Displace with different material:
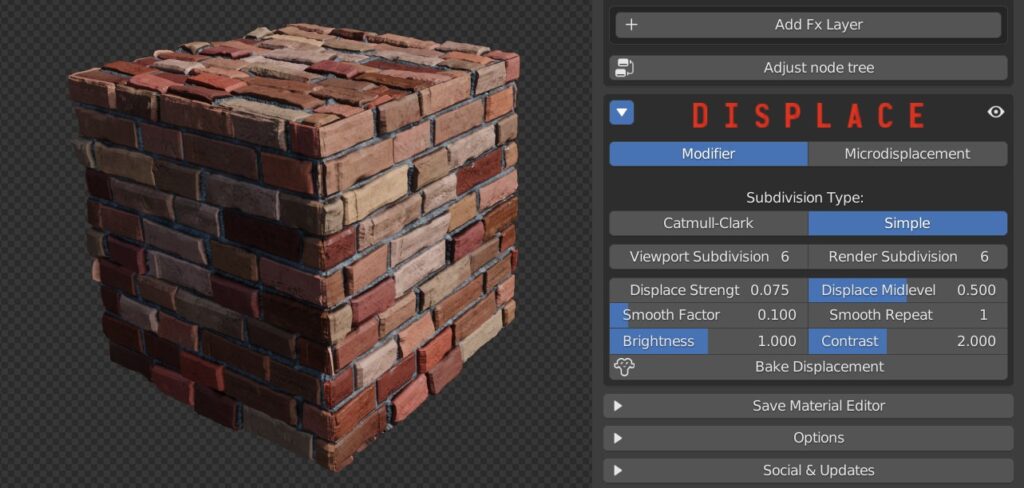
Press this icon to access a displacement function, if the material is compatible.
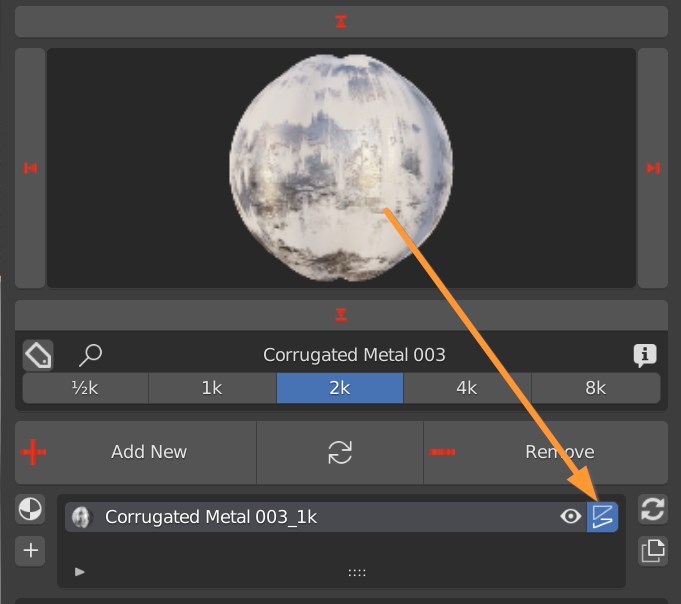
A Displacement Panel appears at the bottom of the Addon.
Materials can have two types of displacement: Modifier and Microdisplacement. Modifier is the default one.
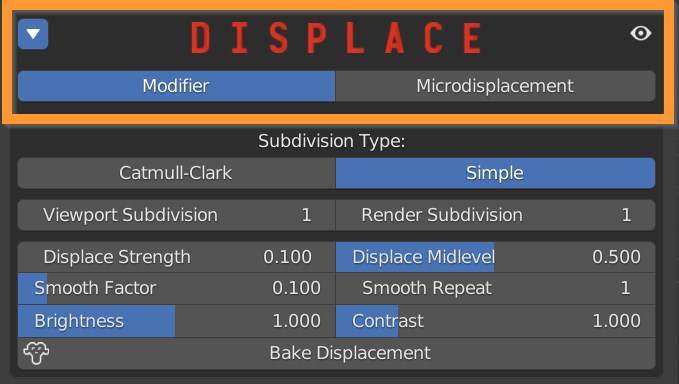
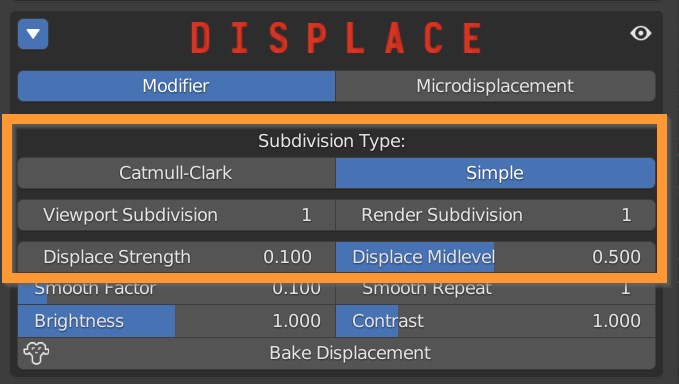
Choose between Catmull-Clark subdivision, which subdivides and smoothes surfaces, and Simple, which only subdivides.
The number of subdivisions can be set for the viewport, so as not to burden the work in realtime, and render, for the actual final rendering.
Attention: the subdivision count has a negative impact on performances and render time.
Displace strenght: Set the amount of displacement. Positive numbers expand the object outward, negative numbers contract the object inward.
Displace Midlevel: adjusts the starting point of the displacement, corresponding to the 0.5 midgray on the texture.
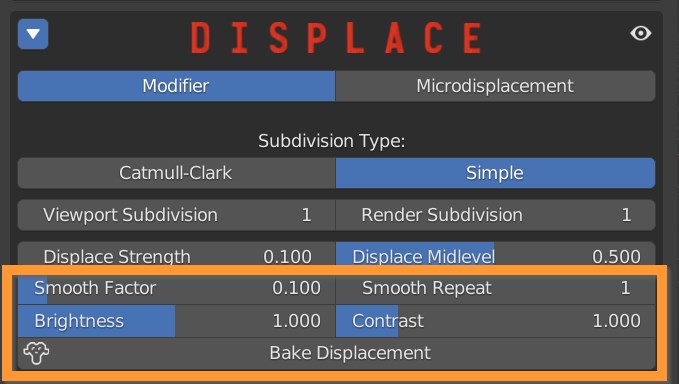
A Smoothing can be applied to the displaced vertices, controlled by a Smooth Factor and a Smooth repeat function.
Brightness and Contrast sliders add some additional control to the effect.
Bake Displacement applies the modifiers, resulting in effective geometry that can be further manipulated and exported.
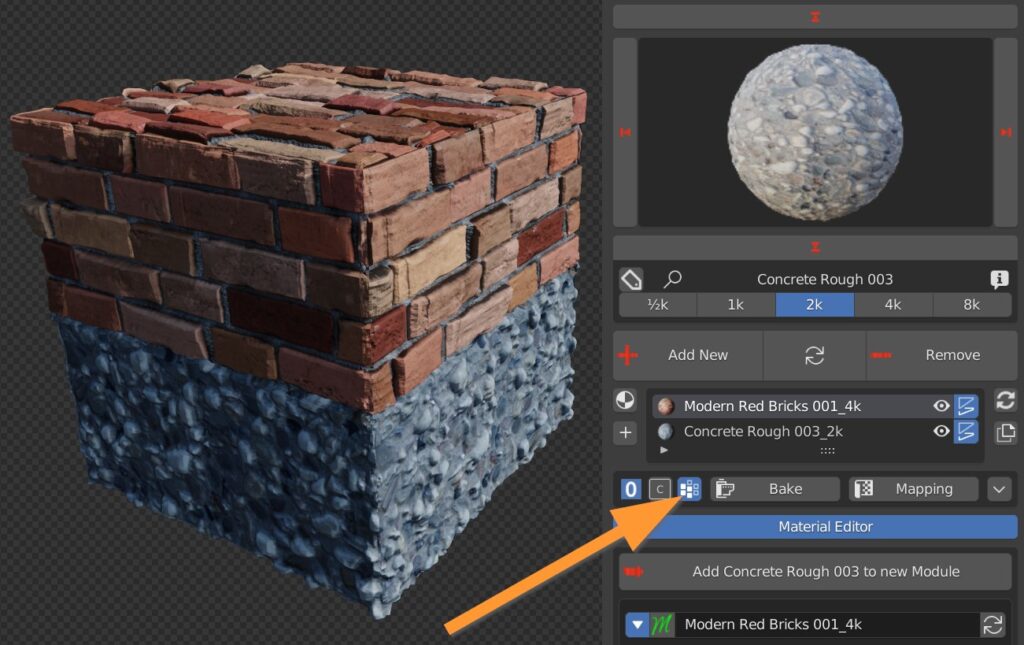
If you have more than one material assigned to the object, press this button to create vertex groups, so to delimit the displacement effect to the respective zone of influence of each material.
11.1 Displace- Mircodisplacement
In favor of the Microdisplacement:
By painting multiple materials on the same object, unlike the Displace “Modifier” this will have a real effect on the object even with multiple materials.
Attention:
Mircodisplacement only works by setting the Cycles render engine, and you need to be in Render mode to see the effect.
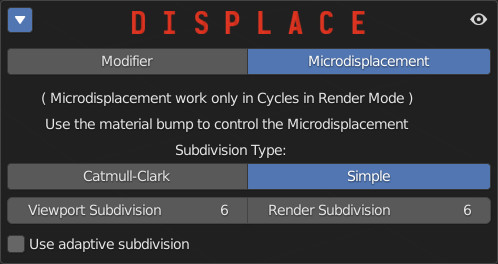
Note:
To adjust the strength of the microdisplacement, use the “Bump” properties from the relevant material module:
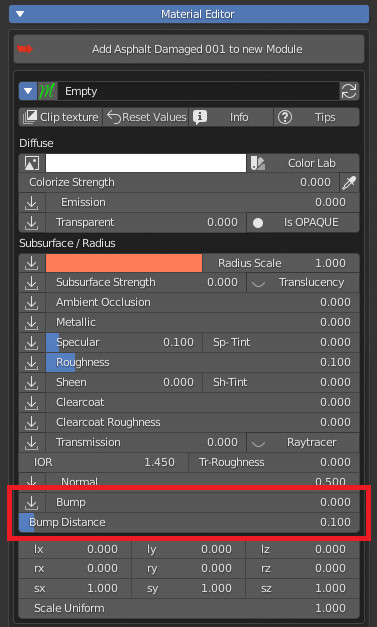
12.0 Save Material Editor – Panel
This panel is dedicated to save your materials in a “User Library”, you can create your own libraries with your categories.
- Render Engine: Choose the engine to render the preview of the material to be saved
- Device: Choose to render with CPU or GPU
- Render Quality: Set the render quality, the higher the more it will take time
- Save Material: Save the entire material, including all nodes.
- Save Module: Save only the selected “Module” (The saved Modules will be indicated in the preview with a small spherical icon at the bottom right)
- User Category List: Choose the User category, where to save the material.
- Add Cat: Add a new category (Fill in the field on the right first with the name of the category you want to create)
- Icon Type: Choose what type of object to render the material on, it will become a preview icon.
- Background: Choose the type of Background to render, it will not be visible, but different lights will be projected, based on HDR maps
- Uv-R: Choose the UV Rotation on the render icon object
- Uv-S: Choose the UV Scale on the render icon object
- Delete Category: Delete the category and all the materials contained in it.
- Delete Material: Delete only the current User Library Material.
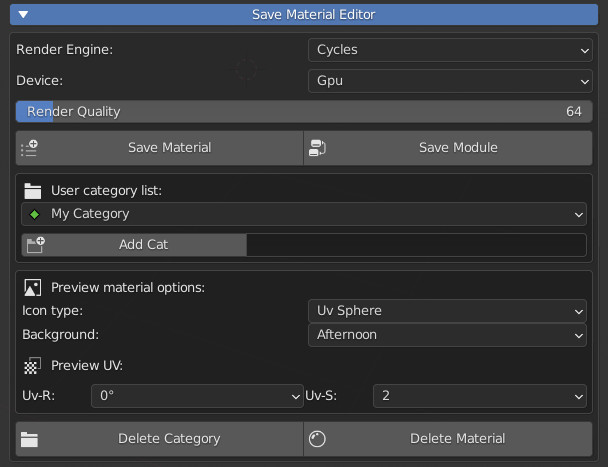
12.1 Save Material Editor – Save Material
- Preview With Displace: If it exists, use displacement on the preview object.
- Displace Strength: Displace Strength on the preview object.
- Preview With Bloom: Adds a Bloom (Compositing) effect to the render of the icon
- Bloom Strength: Set the bloom strength on the preview icon
- Bloom Size: Set bloom size on the preview icon
- Material Name: Here you can enter the name of the material on the fly (By default it is the exact one itself)
- Material Info: Here if you want you can enter your data
- Author: You can enter your name
- Website Name: You can enter your website name
- Author Website: If you fill in this field with a valid URL, a button will be shown on “Material Info” with a button that will send to your site / social
- License: Here you should enter the license type if you want to sell or distribute your materials. The end user will want to know under what license the material.
- License Link: If you want to use Creative Commons, knowing the license type link is always useful.
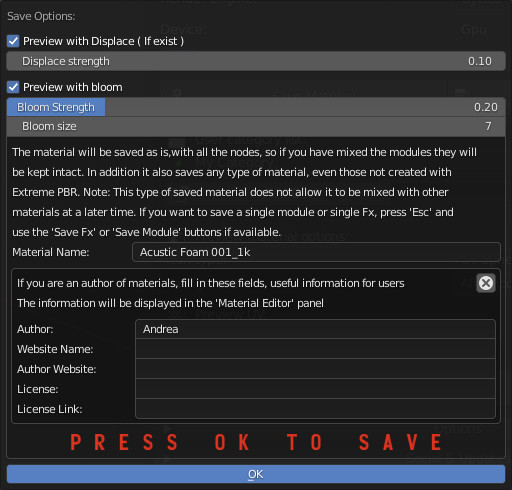
12.2 Save Material Editor – Save Module
- Preview With Displace: If it exists, use displacement on the preview object.
- Displace Strength: Displace Strength on the preview object.
- Preview With Bloom: Adds a Bloom (Compositing) effect to the render of the icon
- Bloom Strength: Set the bloom strength on the preview icon
- Bloom Size: Set bloom size on the preview icon
- Module List:
- Module Name: Here you can enter the name of the material on the fly (By default it is the exact one itself)
- Material Info: Here if you want you can enter your data
- Author: You can enter your name
- Website Name: You can enter your website name
- Author Website: If you fill in this field with a valid URL, a button will be shown on “Material Info” with a button that will send to your site / social
- License: Here you should enter the license type if you want to sell or distribute your materials. The end user will want to know under what license the material.
- License Link: If you want to use Creative Commons, knowing the license type link is always useful.
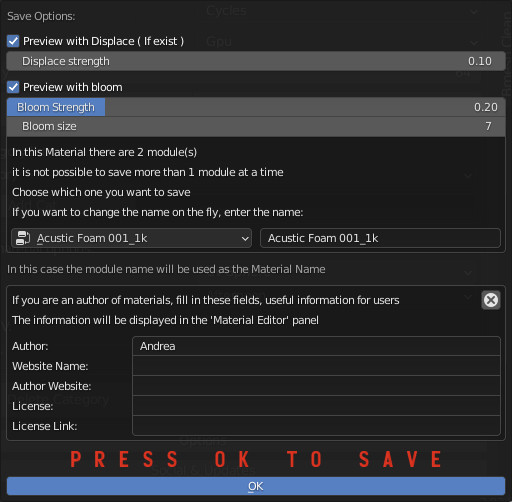
13.0 Shader Maker – Video Ctrl

Shader Maker Video, is a material that allows you to import a video, and make it easily animable.
- Smart Video Start: Automatically sets the video to play immediately.
- Play (Icon): Starts the Blender timeline
- Scene Start: Enter the frame from which the animation should start.
- Scene Stop: Enter the frame where the animation should stop..
- Previus Step (Icon): Go to Scene start with the timeline
- Timeline: Shows the frame where the timeline is located.
- Next Step: Go to Scene stop with the timeline
- Video Start: You can set the starting frame of the video.
- Video Stop: You can set the stop frame of the video.
- Video Loop: If activated, the video will be played in a loop
- Preview Animated: If activated, the video will be animated
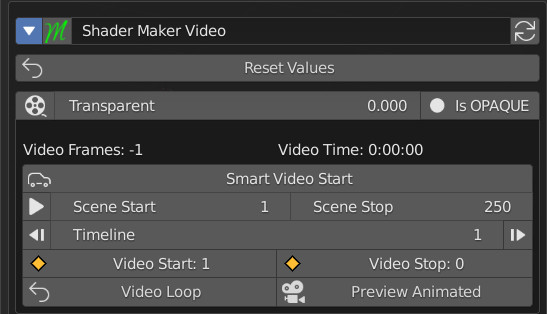
13.1 Shader Maker – Auto PBR
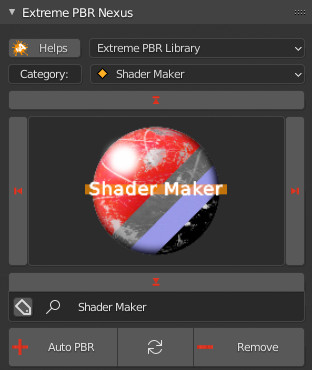
This Special Material allows you to Import Texture maps, downloaded on websites or created by you.
Once you have chosen this material from the library, the “Auto PBR” button will appear instead of the “ADD” button, pressing on it will open a File Browser window, you can select multiple or single image files.
Once you have selected the desired textures, press the “Import” button at the bottom right
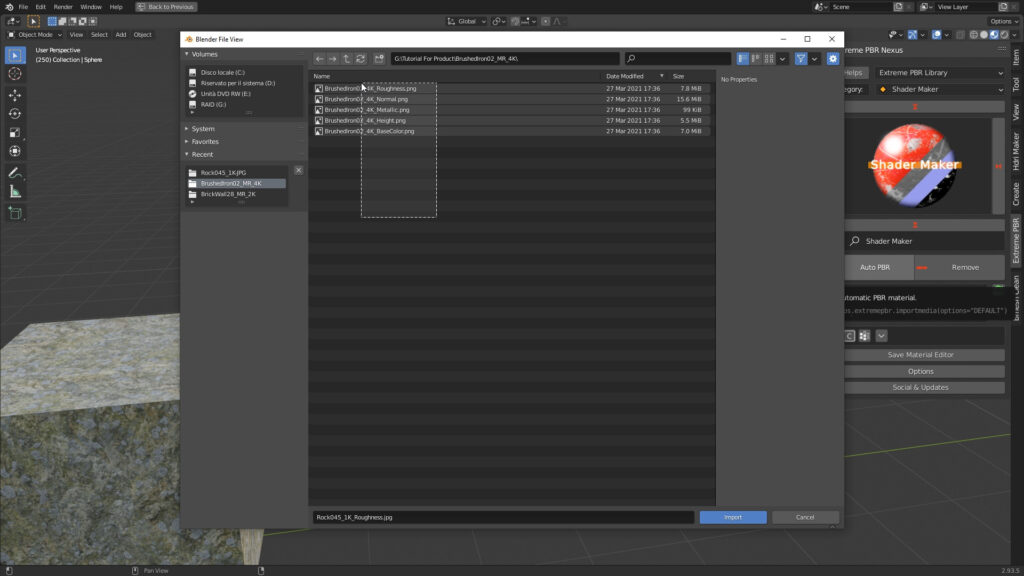
Texture Nomenclature:
The textures you want to import must have this Enough standard nomenclature to be automatically recognized by Extreme PBR.
- Diffuse:
- _diffuse_xtm, _albedo, _basecolor, _base_color, _diffuse, _color, _diff, _dif, _col, diffuse
- Emission:
- _emission_xtm, _emission, _emissive, _emiss, _emis, _emi
- Occlusion:
- _occlusion_xtm, _ambient_occlusion, _ambientocclusion, _occlusion, _ao, ao
- Subsurface:
- _sss_xtm, _subsurface, _sss, _scattering, _scatter
- Subsurface Strength:
- _sss_strength_xtm
- Metal:
- _metal_xtm, _metalness, _metal, _metallic, metal, metallic
- Specular:
- _specular, _reflection, _mirror, _reflective, _reflex, _spec, specular
- Rougness:
- _roughness_xtm, _roughness, _glossy, _rough, _gloss, _rgh, roughness
- Transmission:
- _transmission_xtm, _transmission, _glass
- Mask:
- _mask_xtm
- Alpha:
- _alpha_xtm, _transparent, _alpha
- Normal:
- _normal_xtm, _normal_map, _normal, _norm, _nrm, normal
- Bump:
- _bump_xtm, _bump_map, _bumpmap, _bump, bump, height
- Displace:
- _displace_xtm, _displace, _height, _disp, displace
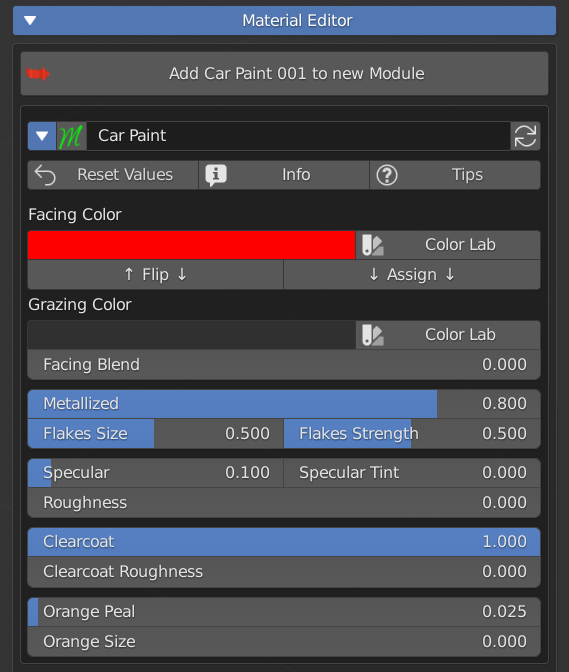
14.00 Procedural Materials – Car Paint
15.0 Bake basic usage
BAKE BASIC USAGE
To export a textured model you have to bake its textures, in order to end up with a standard PBR Material.
Save the Project, select the Object, click on the Bake button.
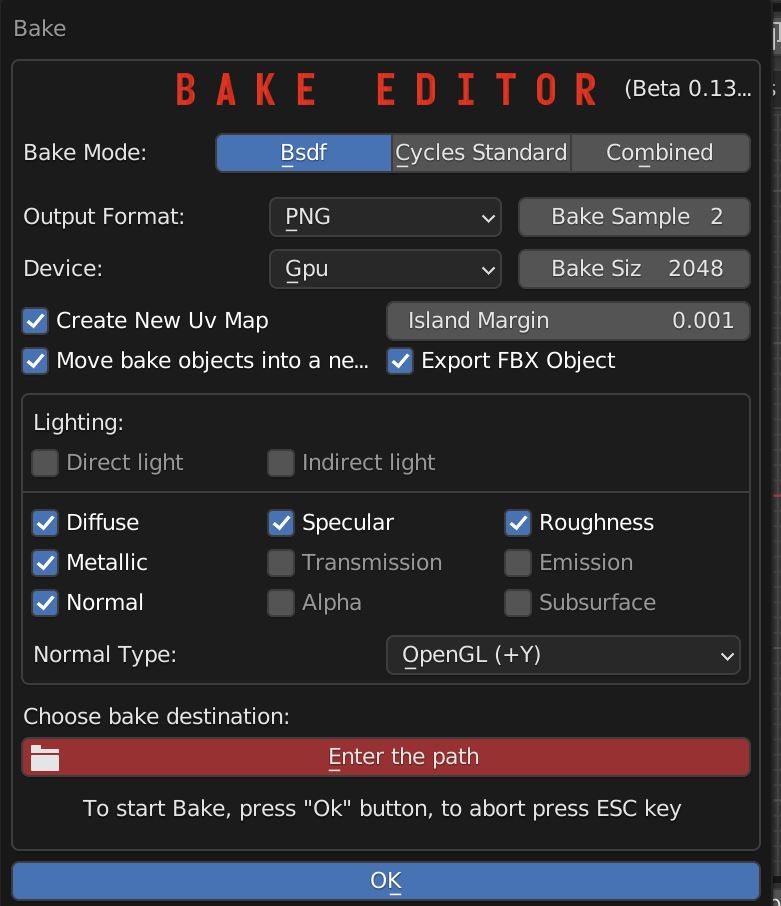
Enable all the textures you want to bake, in this example Diffuse, Specular, Roughness, Normal. Set the desired Bake size.
Choose a path on your computer where to save the Baked textures. Click OK to start the baking process, or Esc to abort.
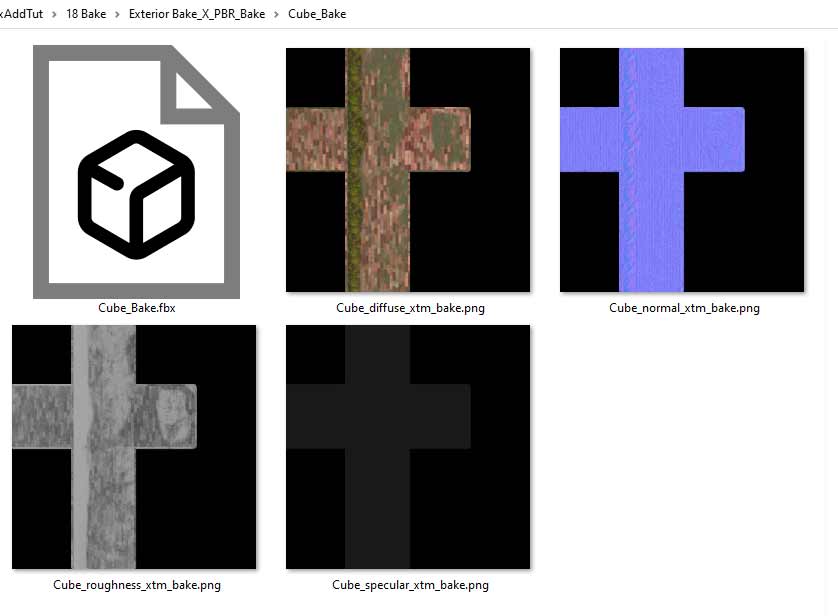
At the end of the process, next to the .blend file, you will find a new folder, containing all your baked textures and your model saved as Fbx, ready to import into another file or another software
In the Blend file a new scene is created, containing a copy of the model with a new simple PBR Material and a new UV Layout.
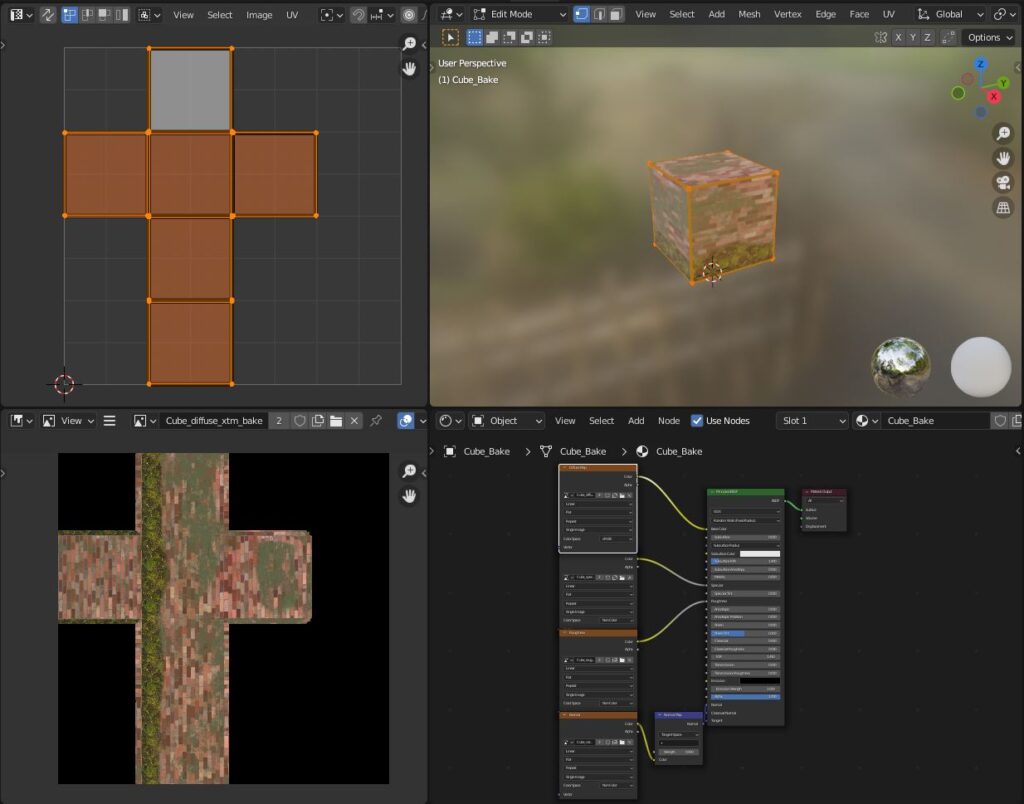
15.1 Bake Modes
There are 3 Bake Modes
Default Bsdf bakes the texture informations as they are presented at Bsdf Shader inputs in the Nexus nodes shader
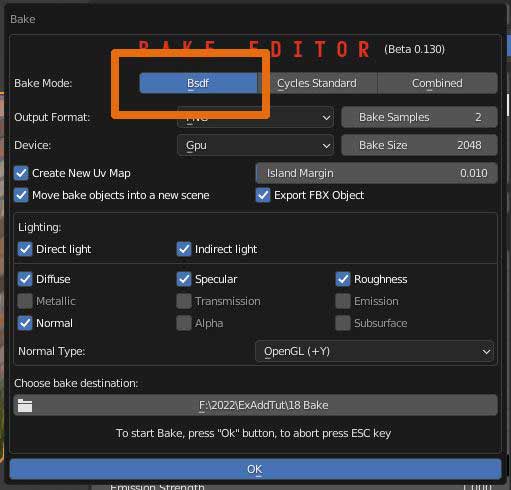
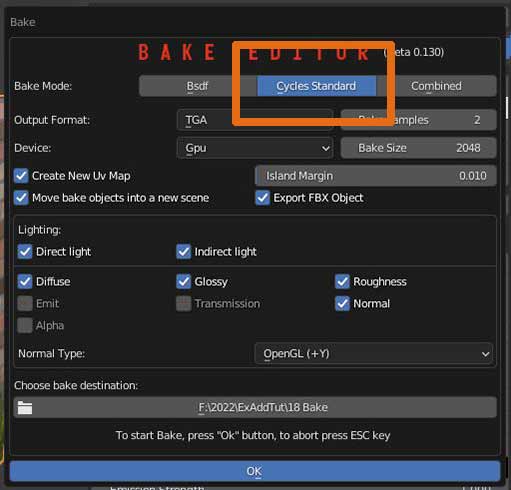
Cycles standard is a direct transposition of the panel you can find in the properties, bake tab, when switching to Cycles
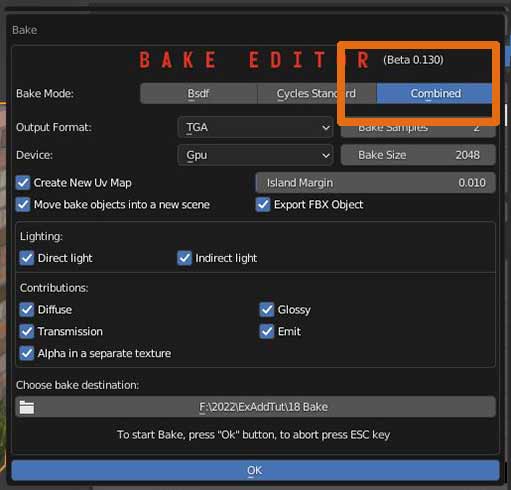
Combined only works when you want to bake your lights setup into the textures
15.2 Bake parameters
BAKE PARAMETERS
You can set the file format between PNG, JPEG, EXR,TIFF and TGA. Bake samples have to be increased if the calculation involves lights (increases baking time).
Bake size sets how big the square images will be.
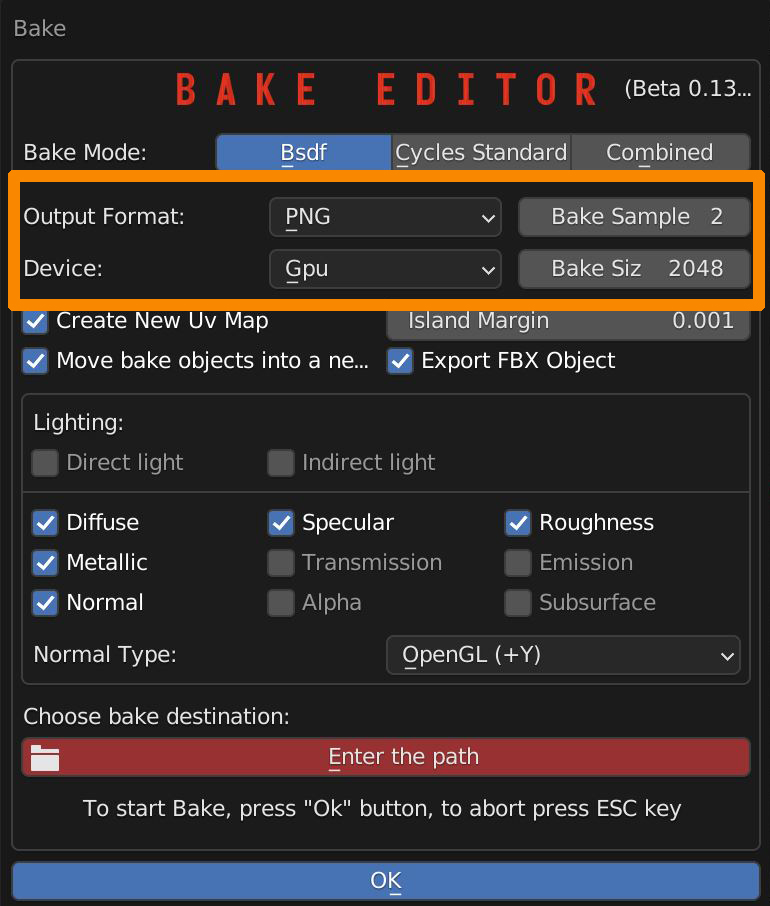
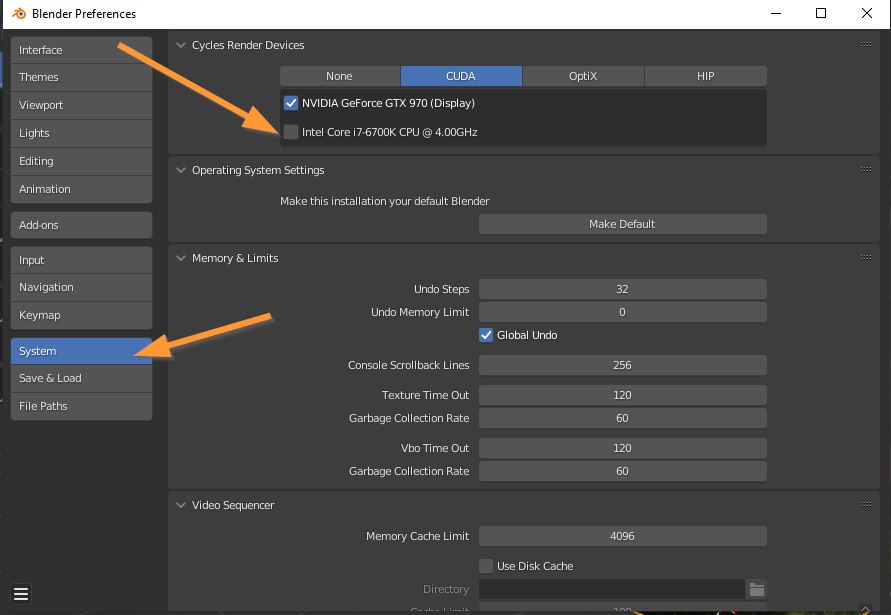
You can switch between Gpu and Cpu Device (if you experience a fail, switch to Cpu or disable parallel processing of Cpu and Gpu in your Blender Preferences).
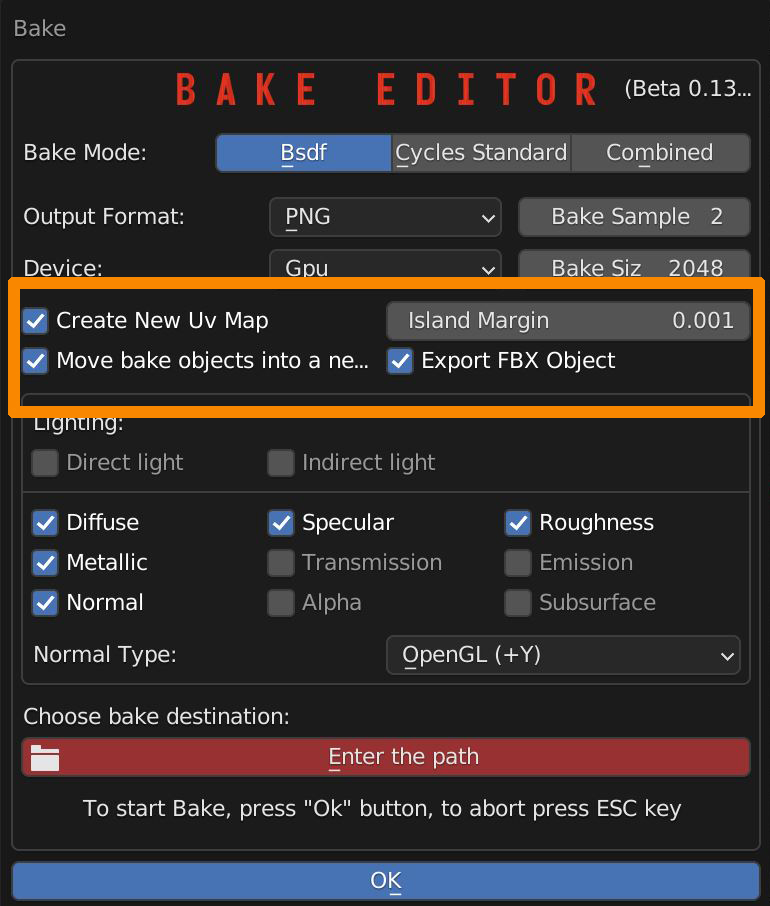
There are options for creating a new UV Map (recommended), Set the margin between UV Islands.
Move the baked objects into a new scene (recommended). Add an FBX Version of the object in the baked textures folder.
The main panel lets you choose which texture to bake and whether or not to take lights into account.
Normal Type can invert green channel if negative Y standard is needed (like Unreal Engine case).
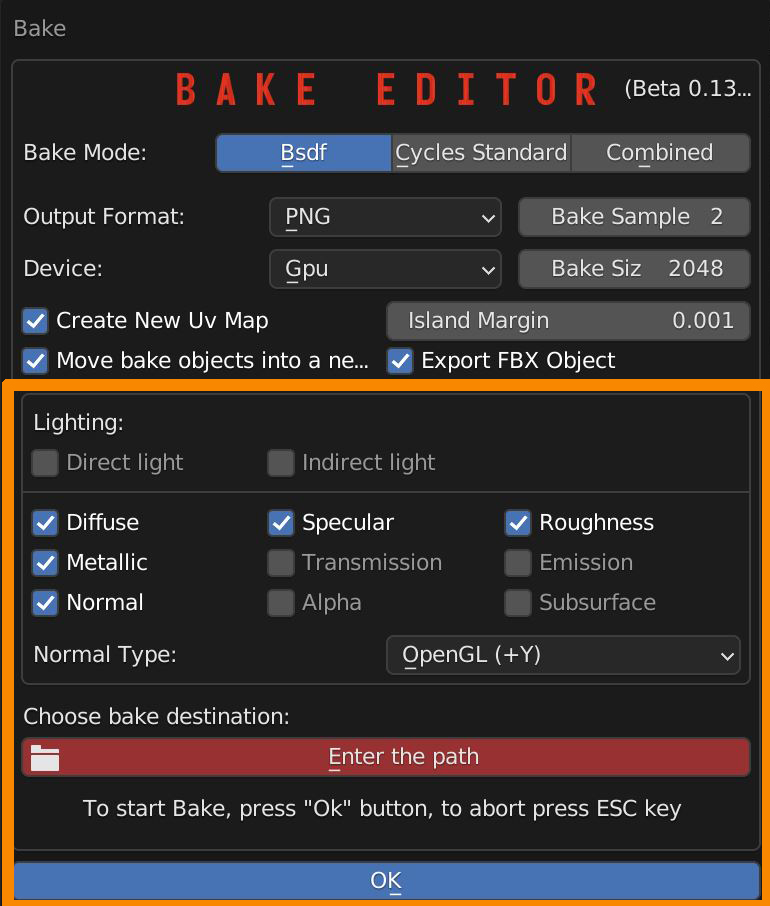
File path selector is used to select destination folder. Press OK button to start baking, press Esc to abort.
16.0 Shader Overlay
Shader Overlay (Currently experimental)
It is used to add to all the materials of the selected objects, a small group node (Identical for all materials) manageable from the “Shader Overlay” menu
The idea is to manage the overlap of the material through a Mix node that acts as a gradient.
Note:
This technique is very expensive in terms of resources, it is advisable to apply to as few models as possible (Especially for the amount of different materials you want to apply it to) in order to manage it more easily
Shader Overlay Menu Example:
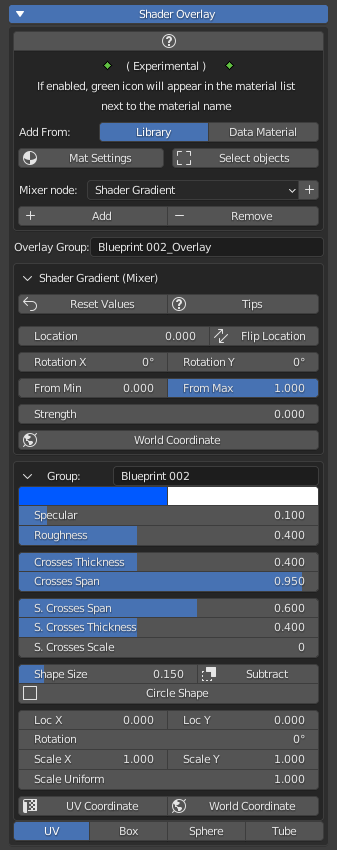
Quick look at the functions:
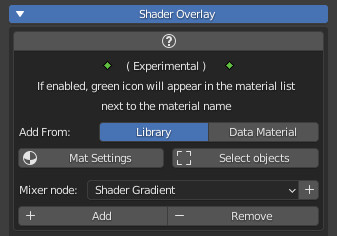
- Add From:
Library: To add material from the Extreme PBR library
Data Material: To add the material from the material list present in the current Blender project
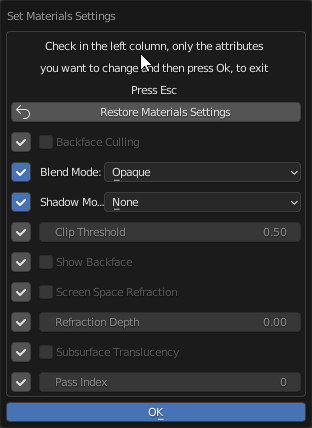
- Mat Settings (Popup Menu):
Useful in Eevee render engine to set the same material properties in one go, on all materials that have the Shader Overlay inside
You will need to check the properties you want to modify, modify them, and press the Ok button:
- Select Objects:
By pressing this button, it will select all objects containing the same Shader Overlay group. This makes it very easy to eventually delete shader overlays, which is useful as you can apply different Shader Overlays in your project - Mixer Node:
Choose the type of Mixer you want to use from the list. It is simply the group node that will be used to blend your base material with the shader overlay. - Add:
Adds/Replaces the shader overlay to all selected objects, according to the “Add From” chosen - Remove:
Removes the shader overlay to all selected objects.
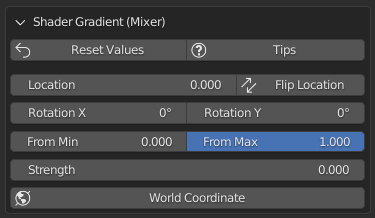
Shader Gradient (Mixer)
This is the Mixer for adjusting the mixing between the Base material and that of the shader overlay:
Press the Tips button to show all function explanations:
16.1 Material Override:
Material Override makes use of the new Geometry Nodes, it allows you to overwrite for temporary visuals on the fly all the selected objects (which have a material) with the chosen material.
Material Override Panel:
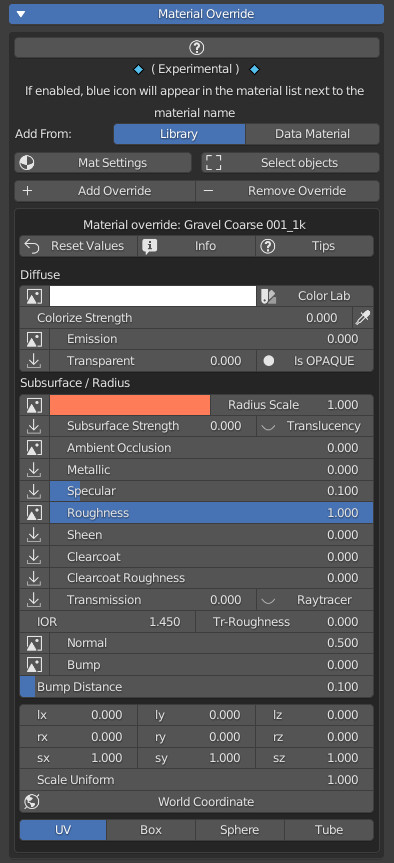
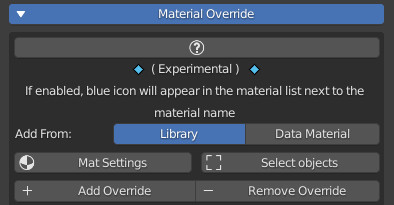
- Mat Settings (Popup Menu):
Useful in Eevee render engine to set the same material properties in one go, on all materials that have the Material Override applied
You will need to check the properties you want to modify, modify them, and press the Ok button:

- Select Objects:
By pressing this button, it will select all objects containing the same Material Override Geometry Nodes. This makes it very easy to eventually delete Material Override, which is useful as you can apply different Material Override in your project - Add Override:
Adds/Replaces the Material Override to all selected objects, according to the “Add From” chosen - Remove Override:
Removes the Material Override to all selected objects.
CU 1.0 Introduction
Attention, you should use this section only if you are interested in creating Materials to sell, or to create your own personal library. It is not recommended for use by end users, as it may damage the Extreme PBR Base library
To display this menu in the node “Shader Editor” window GoTo: ExtrmePBR Options–>Show Creator Utility
This section is to facilitate the creation of a custom library of Extreme PBR, you can also sell this package as an additional library for Extreme PBR.
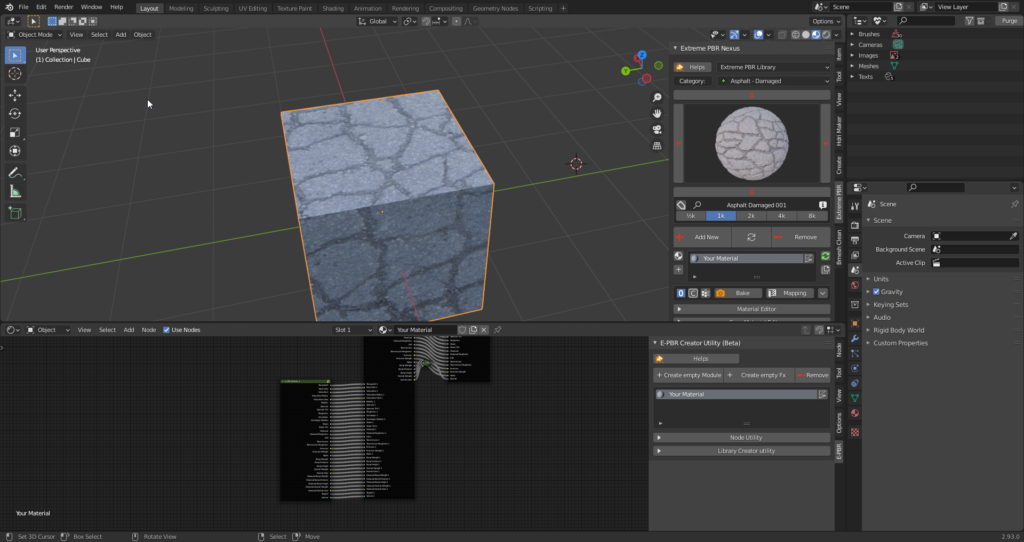
Creator Utility Interface, Minimized:
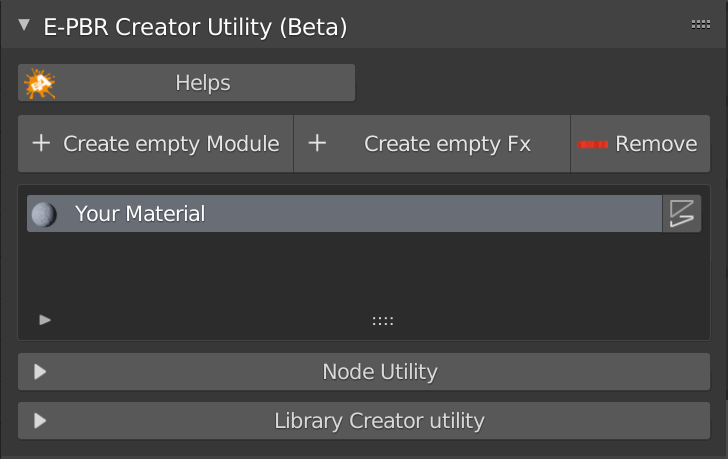
CU 1.1 ADD Empty Module
This Operator creates a material with a Basic module of Extreme PBR inside from which you can start working on your material. This is done to facilitate the work of creating your library to be published.

Once you have added an “Empty Module”, in the Shader Editor, you will have a standard Extreme PBR module available to work on.
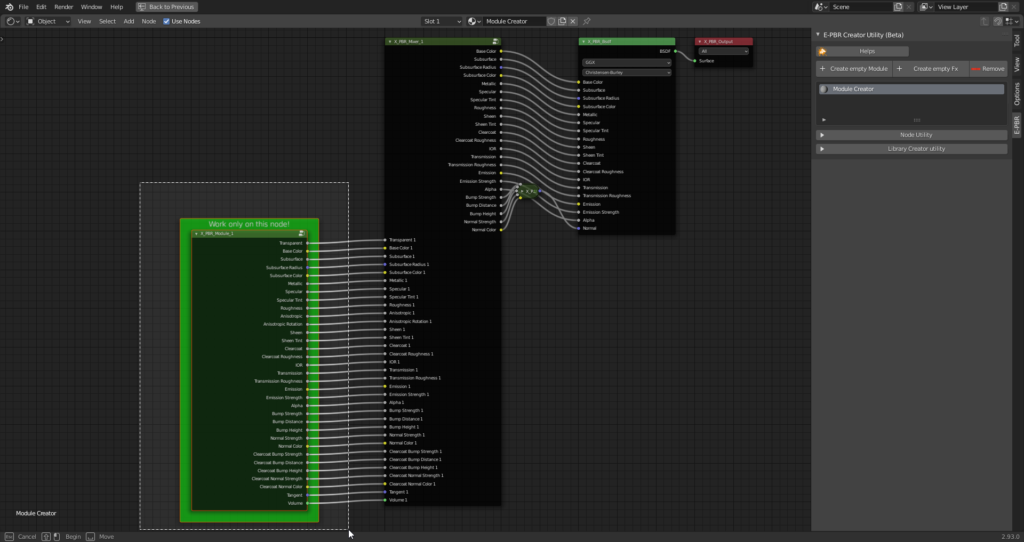
CU 1.2 ADD Empty Fx
This Operator creates a material with a Basic FX Module of Extreme PBR inside from which you can start working on your material. This is done to facilitate the work of creating your library to be published.

Once you have added an “Empty Fx”, in the Shader Editor, you will have a standard Extreme PBR module available to work on.
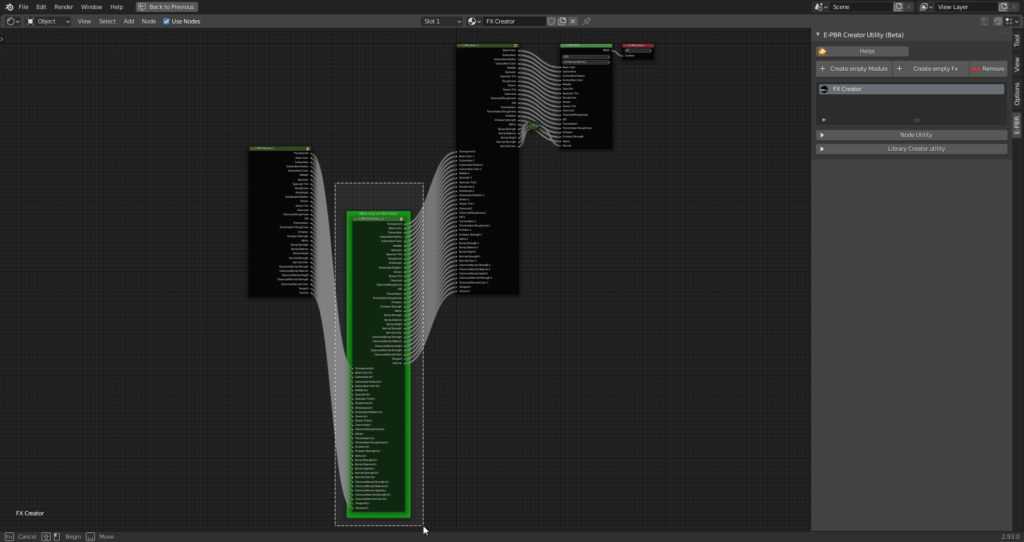
CU 1.3 Remove
This button, is the equivalent of the one present in the main interface of Extreme PBR, is used to remove the active material, that is the one currently selected in the material list.

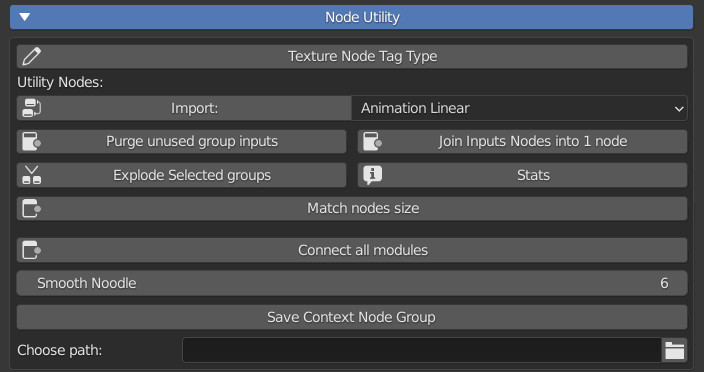
CU 2.0 Node Utility introduction
A quick look at the open “Node Utility” menu panel.
Note, this panel will only be shown if a material is active or selected.
CU 2.1 Node Tag Type

Attention, this button works ONLY in this case:
- Being inside an active material created with Extreme PBR.
- Be inside an Extreme PBR Module, or FX Module.
- Have a node selected and active.
Once this button is pressed, a popup will appear:

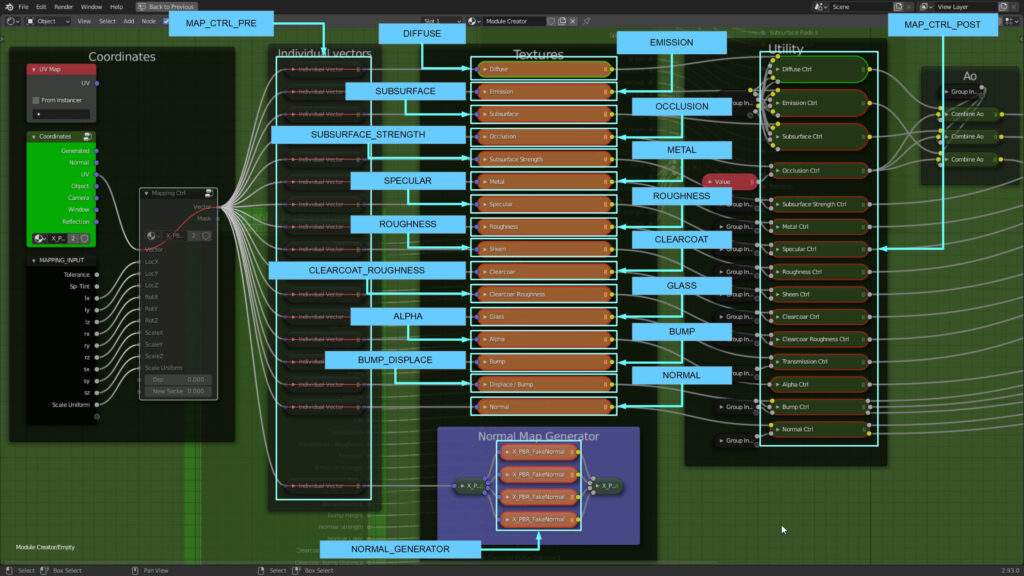
From the Popup Panel it is possible to assign the TAG to the selected Texture Type node (Choose the tag and press OK).
Note: It is not necessary to use TAGs to create new Material Modules, but it is useful if you want to keep the operation of Essential Functions of the standard Extreme PBR Texture-based materials.
This Nodes example is a classic Texture Based Material from Extreme PBR with related TAGs:
To Remove the TAG, press the empty button from the popup panel and Press Ok.

CU 2.2 Import Utility Nodes
This tool is used to facilitate the creation of Modules with Extreme PBR standard group nodes. Note well, the Groups of nodes present in this small library, are the ones with which Extreme PBR was made, so you will find it useful if you are looking for some useful group nodes, for example “Linear Animation” is a nude that has an animable output, this is the most striking example.
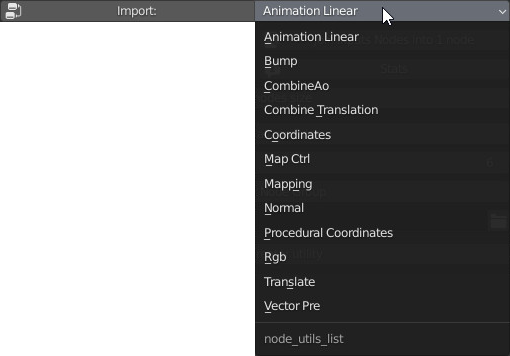
Here are some Group Nodes ready to be imported and used:
Animation Linear:
This node is pre-animated
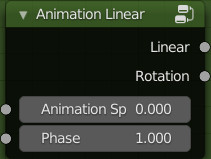
Inputs:
- Animation Speed: Adjust the speed of the animation
- Phase: Move the stage of the animation, useful if you use the same node over and over again.
Outputs:
- Linear: Normal Speed
- Rotation: Reduced speed
Bump:
This node group hooks perfectly to the outputs of the Extreme PBR standard modules
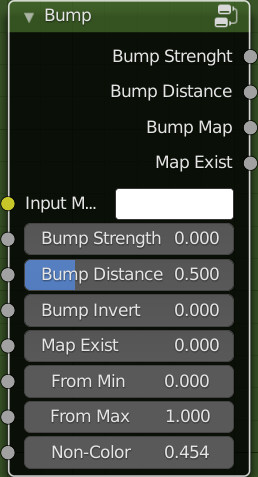
Inputs:
- Bump Strengh: Strength of the bump mapping effect, interpolating between no bump mapping and full bump mapping.
- Bump Distance: Multiplier for the height value to control the overall distance for bump mapping.
- Bump Invert: Produces a negative of the input
- Map Exist: This is recognized by Extreme PBR, so it will be handled automatically by it. Do not connect this input
- From Min: The lower bound of the range to remap from.
- From Max: The higher bound of the range to remap from.
- Non-Color: Non-Color, exactly simulates the color space of the texture image. This is to prevent some images with different color spaces from being replaced and confused. The color space will be simulated automatically. With this criterion: Non-Color Image, the button will switch to standard mode. sRGB image or other types, the button will simulate Non-Color.
Outputs:
- Bump Strength/Bump Distance/Bump Map/Map Exist: To be connected to the Extreme PBR module outputs, the addon takes care of the rest to connect the module to the mixer.
- Map Exist: It is not necessary to use it, but if needed, it gives exactly the result 0-1 depending directly on the input of the same name
Combine AO
This group is used to blend and simulate an ambient occlusion.
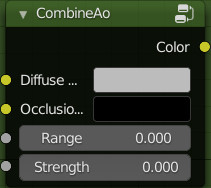
Inputs:
- Diffuse: This input is for the Diffuse / Albedo map
- Occlusion: This input is for a pre-computed ambient occlusion map.
- Range: Adjusts the range of ambient occlusion
- Strength: Adjusts the intensity of the ambient occlusion map
Outputs:
- Color: Result obtained
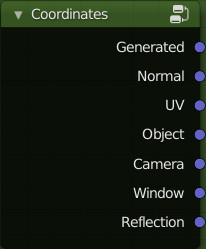
Coordinates:
This group is the exact reproduction of the Coordinates node present in Blender, but it is recognized by Extreme PBR for the Mapping Editor tool
Map Ctrl:
This group is used to adjust the Black & White type map immediately after. It is recognized by Extreme PBR and provides automatisms from the Extreme PBR panel interface.
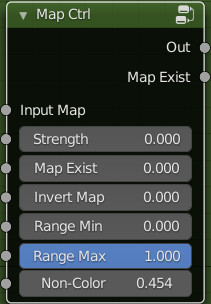
Inputs:
- Input Map: Input of a grayscale map
- Strength: Adjust the intensity of the map
- Map Exist: This is recognized by Extreme PBR, so it will be handled automatically by it. Do not connect this input
- Invert Map: Invert the map, this happens automatically via the button if this node will be tagged with the “Node Tag Type” system
- Range Min: The lower bound of the range to remap from.
- Range Max: The higher bound of the range to remap from.
- Non-Color: Non-Color, exactly simulates the color space of the texture image. This is to prevent some images with different color spaces from being replaced and confused. The color space will be simulated automatically. With this criterion: Non-Color Image, the button will switch to standard mode. sRGB image or other types, the button will simulate Non-Color.
Outputs:
- Out: Output of the result
- Map Exist: It is not necessary to use it, but if needed, it gives exactly the result 0-1 depending directly on the input of the same name
Mapping:
This group is very similar to Blender’s Standard Mapping node. With the difference that the 3 sockets of
the X / Y / Z vectors have been separated, and the scale has an input to scale uniformly.
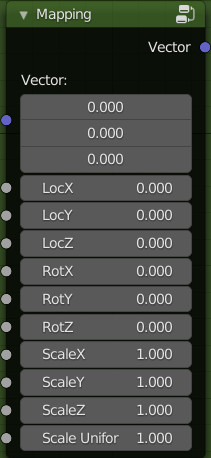
Inputs:
- Vector: Coordinate input
- Loc X, Y, Z: Adjust the locations
- Rot X, Y, Z: Adjust the ratations
- Scale X, Y, Z: Adjust the scales
- Scale Uniform: Adjust the uniform scale
Outputs:
- Vector: The input vector after transformation.
Normal:
This node connects directly to the Extreme PBR module outputs, it is used to connect the Normal maps.
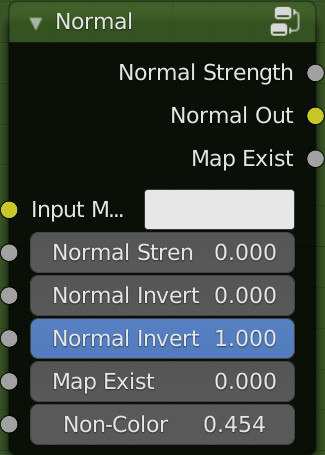
Inputs:
- Input Map: RGB color that encodes the normal map in the specified space.
- Normal Strength: Strength of the normal mapping effect.
- Normal Invert X: Invert the Red channel of the normal map
- Normal Invert Y: Invert the Green channel of the normal map
- Map Exist: This is recognized by Extreme PBR, so it will be handled automatically by it. Do not connect this input
- Non-Color: Non-Color, exactly simulates the color space of the texture image. This is to prevent some images with different color spaces from being replaced and confused. The color space will be simulated automatically. With this criterion: Non-Color Image, the button will switch to standard mode. sRGB image or other types, the button will simulate Non-Color.
Outputs:
- Normal Strength / Normal Out: Connect directly to the socket of the same name in the outputs of the Extreme PBR module
- Map Exist: It is not necessary to use it, but if needed, it gives exactly the result 0-1 depending directly on the input of the same name
Procedural Coordinates:
This node is similar to the Coordinates node of Blender, with a big difference, it basically serves to create the Coordinates, in a procedural way, therefore very useful to use for the creation of procedural materials. This node, if used correctly, will be able to change the links dynamically with the use directly in the Extreme PBR panel of the functions present in the Mapping Editor
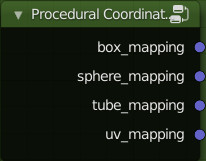
Outputs:
- box_mapping: Produces a Box-type mapping
- sphere_mapping: Produces a Sphere-type mapping
- tube_mapping: Produces a Tube-type mapping
- uv_mapping: Produces a UV-type mapping (Requires active UV mapping on the object)
Rgb:
This Group is useful for controlling the Diffuse, some inputs are controllable through the Extreme PBR “Texture Manager” panel.
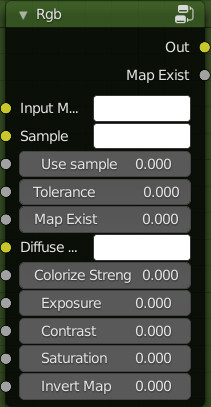
Inputs:
- Input Map: Here you can connect your Diffuse surface color
- Sample: This is the sample color to decide which color to “Colorize”, it works as a sampler, and makes only the chosen color be colorized. (Needs to use Colorize Strength to see a result)
- Use Sample: If 0 will have no effect, if 1 Use Sample will be active, it is recommended to create a Boolean as an input.
- Tollerance: Based on the adjustment, it is decided how much shade of the sampled color should be Colorized.
- Map Exist: This is recognized by Extreme PBR, so it will be handled automatically by it. Do not connect this input
- Diffuse Color: In this case Diffuse color, it is used for colorization, so the chosen color will be used for colorization (Use colorize strength to see the effect)
- Colorize Strength: Adjust the colorization strength.
- Exposure: Adjust the Exposure (Leave unplugged for use with “Texture Manager” button)
- Contrast: Adjust the contrast (Leave unplugged for use with “Texture Manager” button)
- Saturation: Adjust the Saturation (Leave unplugged for use with “Texture Manager” button)
- Invert Map: Invert the Input Map colors (Leave unplugged for use with “Texture Manager” button)
Outputs:
- Out: Result
- Map Exist: It is not necessary to use it, but if needed, it gives exactly the result 0-1 depending directly on the input of the same name
Vector Pre:
This Group is almost identical to the Mapping group, but with the difference that it can be connected directly behind a Texture Image node, making it possible through the Extreme PBR panel to show / activate / adjust the Mapping of each individual Texture Image node.
Remember to Use the “Tag Node Type” on it and on the Texture Image node to make this active in the Extreme PBR panel
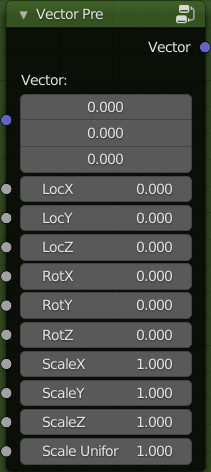
Inputs:
- Vector: Coordinate input
- Loc X, Y, Z: Adjust the locations
- Rot X, Y, Z: Adjust the ratations
- Scale X, Y, Z: Adjust the scales
- Scale Uniform: Adjust the uniform scale
Outputs:
- Vector: The input vector after transformation.
Translate / Combine Translation:
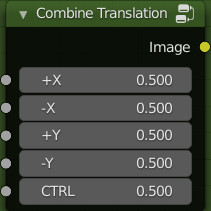
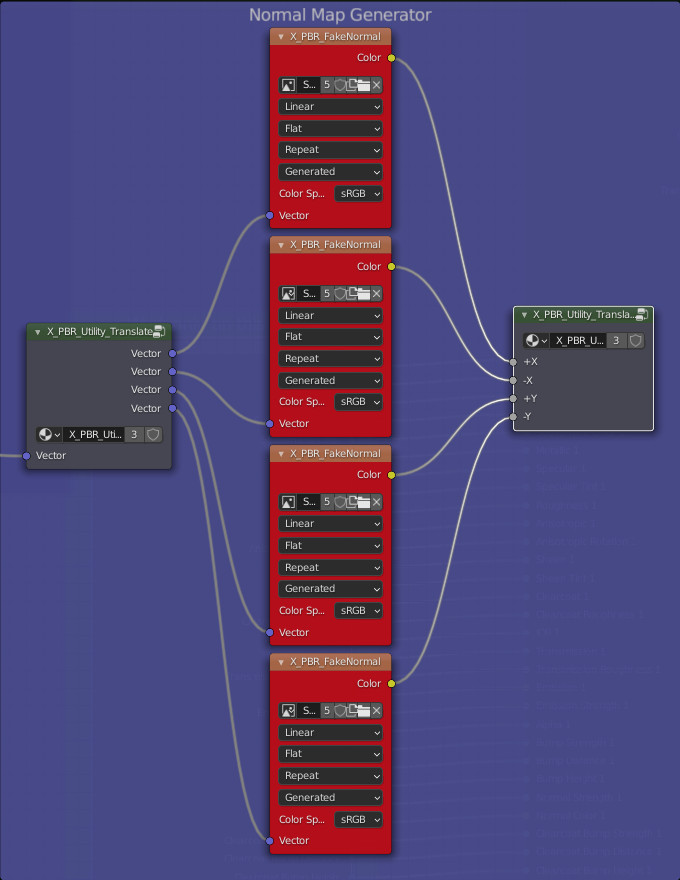
These 2 Groups are to be used in pairs to produce a simulated Normal map, it needs 4 Texture image nodes (Dupplicati linked) with the same image inside. Remember to tag the “Texture Image” node with the tag “NORMAL_GENERATOR” to make the switch between Normal & Normal Generated usable directly from the Extreme PBR panel
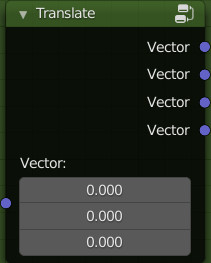
Connection example with 4 Texture image nodes with the same Image inside:
CU 2.3 Purge Unused Group Inputs

This Button is used to remove the socket inputs of the Extreme PBR Module that have remained not-connected within the group.
On Fx type modules the input connection sockets marked with (in) will not be eliminated, as they are an integral part of the Extreme PBR system
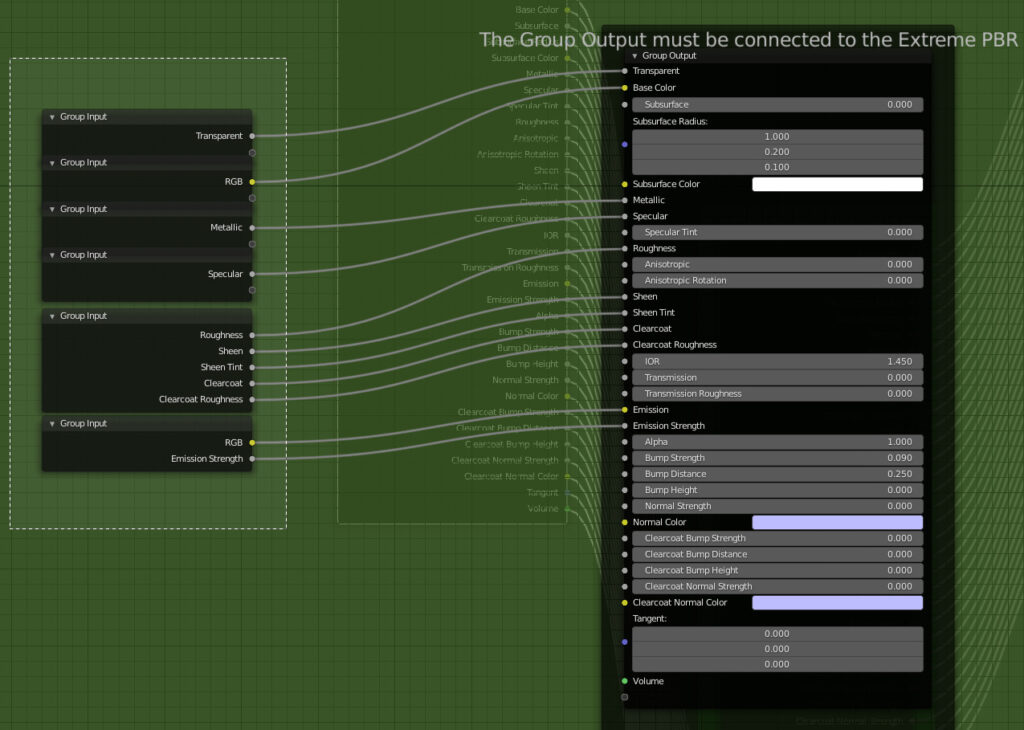
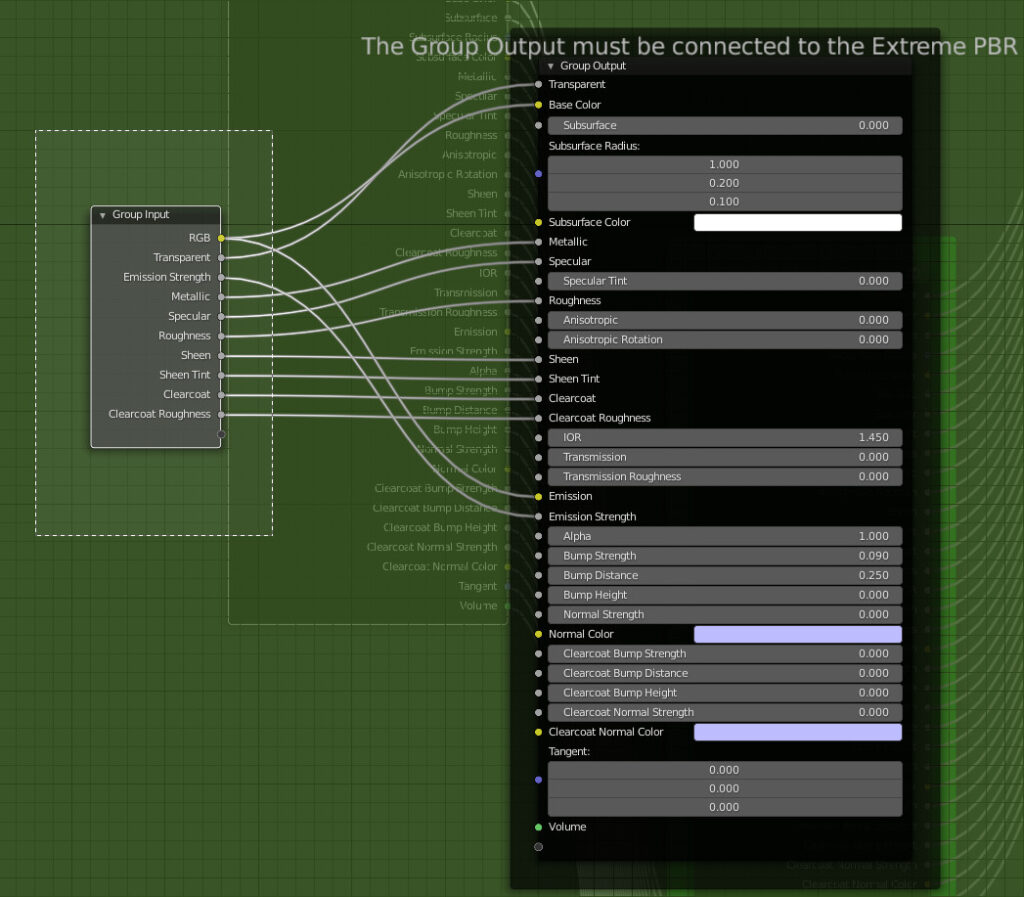
CU 2.4 Join Inputs Nodes into 1 node

It is used to join the Inputs nodes of the Extreme PBR modules into a single inputs node.
Example Before:
The inputs node is divided into several nodes
Example After:
The nodes are Jointed into only 1 inputs node
CU 2.5 Explode Selected Groups
This button is used to “Explode” the selected “node group”, it also works on multiple selections.
Once the group is exploded, the nodes inside will in turn be selected, consequently if there are other subgroups of nodes, pressing several times will explode all the group nodes also inside.

CU 2.6 Stats
The Stats button, is used to see the statistics of the Material (node_tree) on which you are working.

Once the button is pressed a popup will be shown with the Node Tree statistics:

CU 2.7 Match Nodes Size
Match node size button it is used to make all selected nodes the same size.
Then: Select the nodes you want to resize and make the node of the desired size active, all the selected nodes will take the same size as the active node.

CU 2.8 Connect all modules
This button is used to connect / arrange / reposition the nodes present in the Extreme PBR Material, therefore all the modules / mixers / etc. they will be organized correctly.

Example Before:

Example After:

CU 2.9 Smooth Noodle
It is used to smooth and round the links between nodes, this property is already present in Blender, but we have decided to make it easily accessible in this menu.

Example with Value 0:
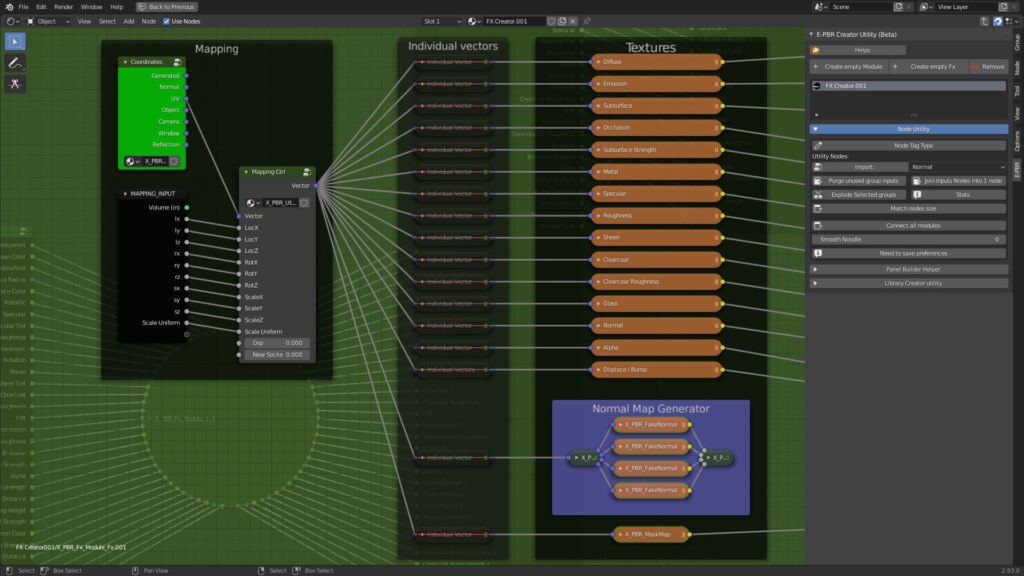
Example with Value 6:

CU 2.91 Save context node group
Save active group node on the fly, in the specified path, this creates a “file.blend” with the saved group node inside.

CU 3.0 Open Material Folder
Open Material Folder opens the folder that contains the material that is active in the Manager Interface, that is the material of the preview of the main panel of Extreme PBR

CU 3.1 Start Batch Previews
Warning, do not use this tool on the Extreme PBR native library, you could damage the library irreparably!
This instrument is very delicate and must be fully learned as regards its real function.
It was really used to facilitate the actual creation of Extreme PBR Preview, we felt it appropriate to leave this tool for use by the end user as well, especially for creators of materials and new libraries.
Basically it serves to replace the preview of the library.
When we at Extreme Addons created the previews of the library, at the beginning we had some white “Fake” previews, from then on we did a “Start batch previews” and we created the current previews present in the main Extreme PBR library.
The previews can be rewritten if, for example, the quality level does not meet your needs.

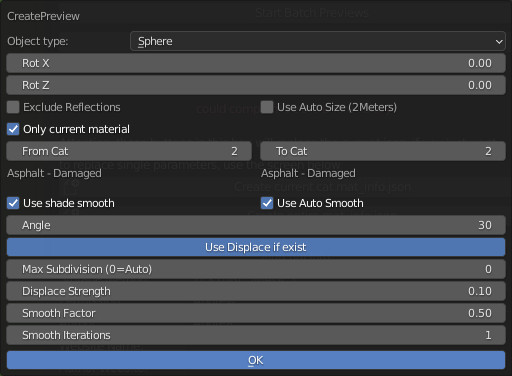
Start Batch Previews popup panel:
- Object Type: Enum in [‘Sphere’, ‘Plane’] Decide which type of preview to use, the “Plane” is useful for materials with Alpha Channel.
- Rot X, Rot Y: The rotation of the preview object
- Exclude Reflections: Excludes reflection to the material in the preview
- Use auto Size: Automatically positions the camera if activating the displace, it goes beyond the limits of the camera.
- Only Current Material: If Active Create the preview only on the material that has been selected from the library from the preview of the main panel of Extreme PBR
- From Cat / To Cat: It decides from which category to which category to execute the Batch Render of the previews. To start from the first Category set “0” in “From Cat”, while in “To Cat” it is the numerical limit of the list of categories. Note that the list starts at 0, so the first category in your library will be number 0.
- Use Shade Smooth: If active Using interpolated vertex normals, the mesh faces will blur at the edges and appear smooth.
- Use Auto Smooth: If active the edges where an angle between the faces is smaller than specified in the Angle field will be smoothed, when shading of these parts of the mesh is set to smooth. This is an easier way to combine smooth and sharp edges.
- Angle: The angle of the Auto Smooth
- Use displace if Exist: If active and if there is a displace map in the material, it can be displayed in the preview.
- Max Subdivision: Subdivision of the object of the preview, the higher it is and the more the displacement will be aesthetically better. The rendering time is affected a lot, the higher it is the more time it takes to render. Leave at 0 To have a displacement with a render in the shortest possible time.
- Displace Strength: Adjust the amount of displacement
- Smooth Factor: Smooths sharp edges derived from displacement
- Smooth Iterations: The number of smoothing iterations, equivalent to executing the Smooth tool multiple times.
CU 3.2 Change Material File Name
Warning, do not use in the Extreme PBR library, use only for creating new libraries!

This is to change the names of the selected material in the library via the Extreme PBR Main panel.
This will change the name of the following names:
- Folder Material
- Image Preview
- Textures Name (Keeps the suffixes of Extreme PBR type _diffuse_xtm intact)
- .blend file of any procedural materials
- material names in json files
Once this button is pressed, a popup will appear where you can enter the name, once chosen, press “OK” or press “Esc” to cancel.

CU 4.0 Create Current Cat mat_info.json
Create the json file needed to show the “Material info” in the Extreme PBR main panel of the single and current material in the preview. Display the menu

CU 4.1 Create entire mat_info.json
Create mat_info.json files for all materials in the library, attention, use only if you want to create a custom library to distribute for Extreme PBR

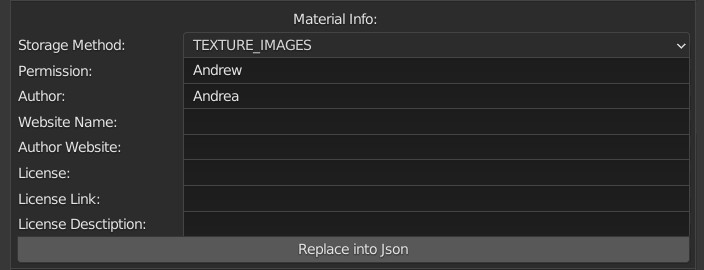
CU 5.0 Mat info Fields
These fields to be filled in are used to show the following properties in the Extreme PBR panel once registered:
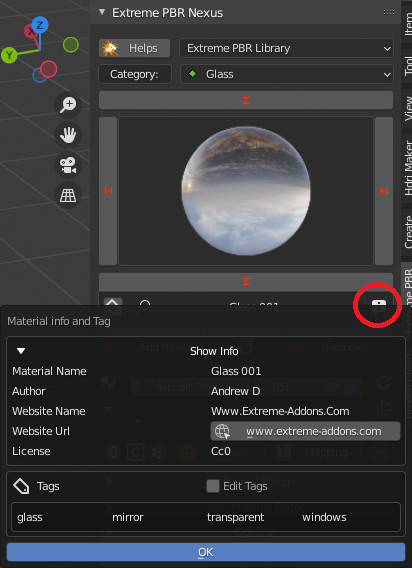
- Storage method: (This is essential to make Extreme PBR recognize what type of material it is, consequently facilitating the import into the normal workflow of the end user.)
- TEXTURE_IMAGE: If your material is full Texture based (Like Extreme PBR texture library)
- SAVE_MODULE: If you have built your own procedural module, then not a texture type.
- SAVE_MATERIAL: If you want to save the entire material (Not recommended)
- Permission: This is a kind of password to avoid damaging your library by the end user. For example our library has a special permission, which can be easily traced, but the basic task is not to allow the end user to damage the libraries by mistake. For example, if you enter the name “Your name” as permission, to further modify this json file, you will need to remember the previous name “Your name” to be able to modify it. (The json file is in the material folder in case you forgot “Your name”)
- Author: If you want you can enter your name, or that of your company, it will be shown as in the example of the image above.
- Website Name: If you have a site or something like that, even a social media page, you should enter its name here.
- Author Website: Here if you want you can enter the exact url to the Web page that you want to show the end user, then as in the upper image, a button will appear, clicking it will take you to your chosen internet page.
- License: Here you should enter what type of license to enter, this is essential for the end user, to make them understand what they can or cannot do with your materials
- License Link: If you have a link to the license, here you should enter a URL, a button will be shown that once clicked will take the end user to better read the license you have decided to use.
- License Description: Here if you want you can enter a brief description of what it can do and what it cannot do, so that the end user is clear about what he can and what he cannot do with this material.
- Replace into Json: This button will only replace the information entered in the fields above, it will leave the rest of the json file unchanged.
Important licensing note!
Pay close attention to the license you have chosen to use, we invite you not to violate the laws and possibly inform yourself on these useful links in order to deepen these types of licenses:
https://creativecommons.org/share-your-work/
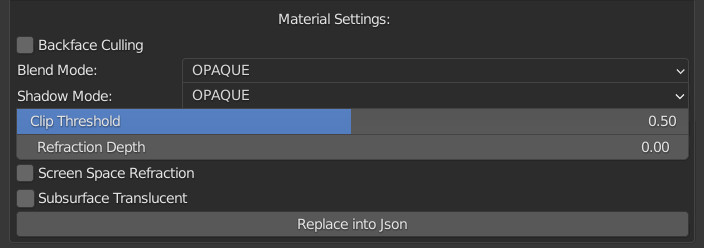
CU 6.0 Material Settings Menu
Warning, do not use in the Extreme PBR library, use only for creating new libraries!
This menu is used to enter the properties of the material to be saved, these items will be stored in the json mat_info.json file, this allows you to automatically set those properties when the user adds to the scene, it will be set with these properties
- Backface Culling: Use backface culling to hide backsides of faces.
- Blend Mode:
- Opaque: The previous color will be overwritten by the surface color. The alpha component is ignored. This is the fastest option.
- Alpha Clip: The previous color will be overwritten by the surface color, but only if the alpha value is above the clip threshold.
- Alpha Hashed: The previous color will be overwritten by the surface color, but only if the alpha value is above a random clip threshold. This statistical approach is noisy but is able to approximate alpha blending without any sorting problem. Increasing the sample count in the render settings will reduce the resulting noise.
- Alpha Blending: Use alpha blending to overlay the surface color on top of the previous color.
- Shadow Mode:
- None: The surface will not cast any shadow.
- Opaque: The surface will cast shadows like an opaque surface.
- Clip: The surface will cast shadows like an opaque surface, but only areas where the alpha value is above the clip threshold.
- Hashed: The surface will cast shadows like an opaque surface, but only areas where the alpha value is above a random threshold.
- Clip Threshold: A pixel is rendered only if its alphavalue is above this threshold
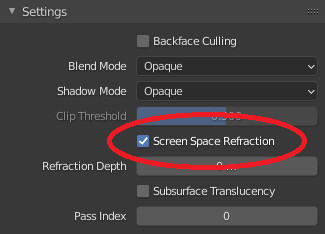
- Screen Space Refraction: Use raytraced screen space refraction.
- Subsurface Translucent: If active Subsurface traslucent will be stored in the material
- Replace into Json: You will only be able to replace these properties if you don’t want to change the whole mat_info.json file
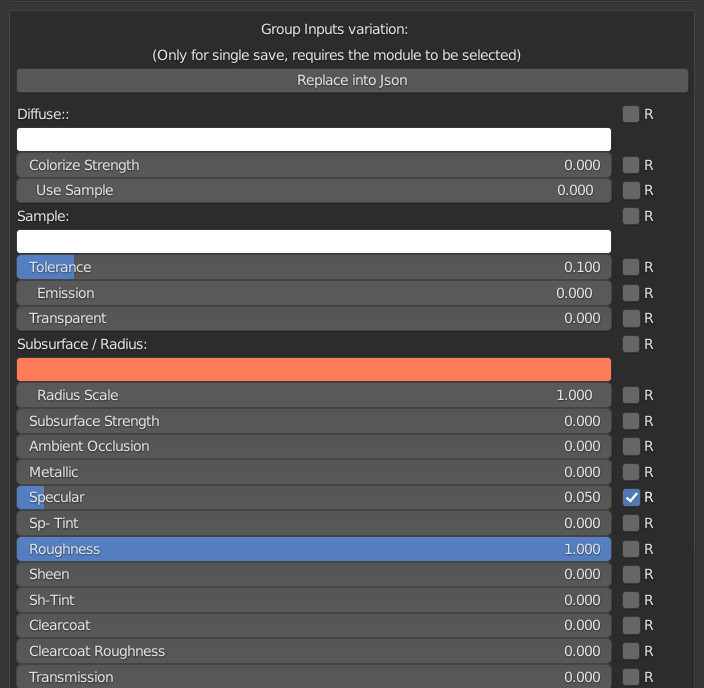
CU 7.0 Group Inputs Json
This menu is used to save the material properties.
Example:
You want the Metallic material you created with the textures to be set with a Specular of 0.05, just check the box next to the Roughness set to your liking and press the Replace into json button.
Note: To show this Menu, you must be in the Main Node Tree of an Extreme PBR material, you must have selected 1 Module / Fx, to view the properties to be stored.
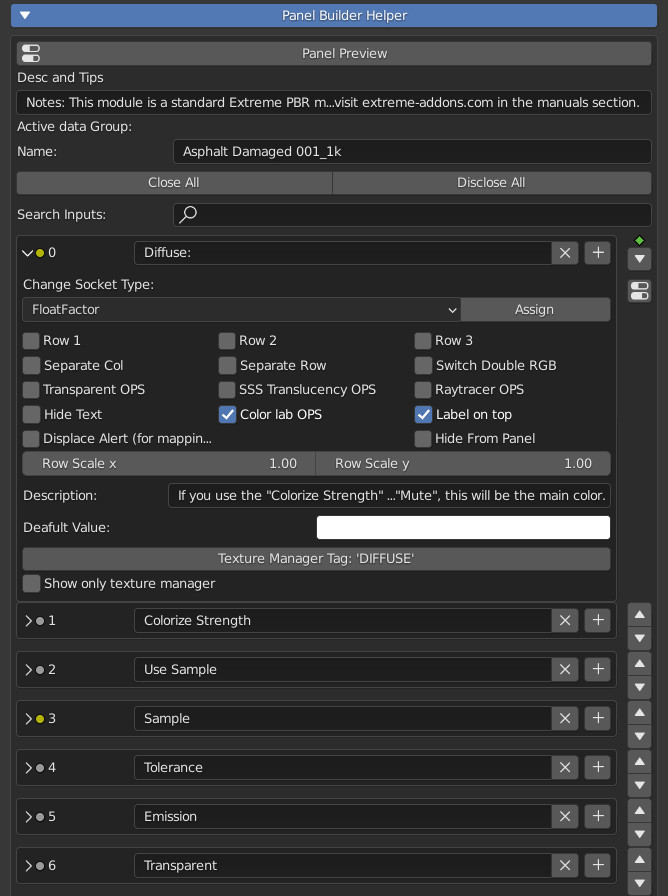
CU 8.0 Overview
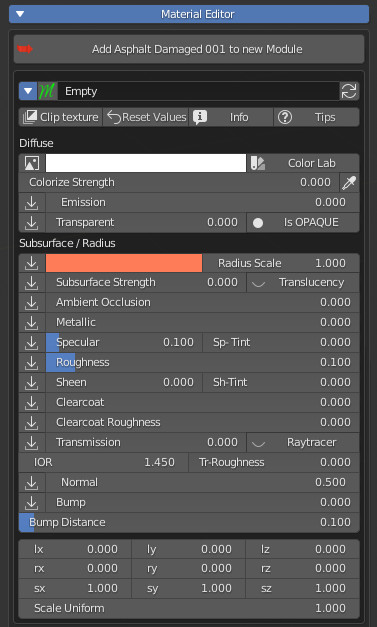
This menu is dedicated to creating the interface of the “Material Editor” panel in the main interface of Extreme PBR.
So everything that will be modified through this menu will have Technical and Graphic effects in the Extreme PBR panel:
Here you create and design your panel:

Here you will see the result of your composition
Desc and Tips:
Enter a description if you want, a button will be shown to show it in a popup. Useful to help the user. Enter a minimum of 10 characters to show the description
Name:
The name of the “Node Group” that is the name of the “Module” of Extreme PBR, This is officially the name of the “Name” property of the Blender Groups.
Close/Disclose All:
These two buttons open or close ALL the Sockets Below.
Search Inputs:
Search for inputs Sockets by their name, only sockets containing the searched keyword will be shown.

CU 9.0 Edit Socket Intro:
This is where you set up the graphics and function of each single input socket of Extreme PBR’s “Module” / “Fx” group node
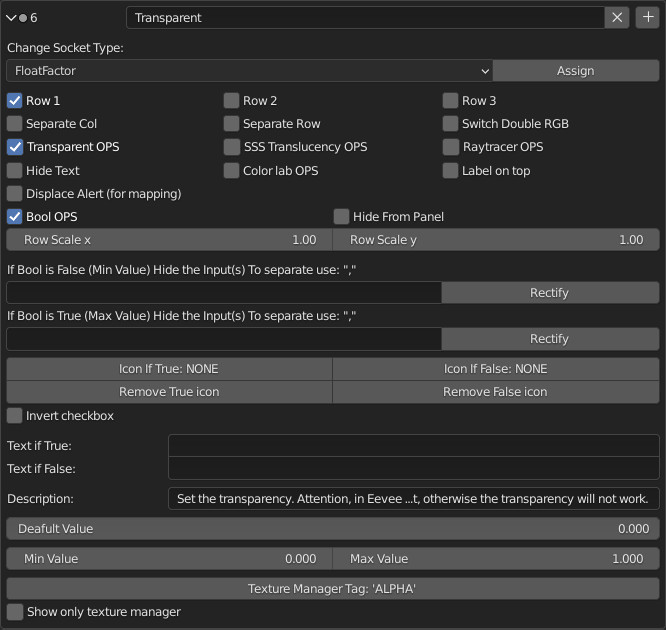
CU 9.1 Change socket type
This property is used to change the type of Socket, the socket will remain in the same place, connected to any links within the module.
This is very useful for changing the type of Socket, so it will change the type of controls associated with it.
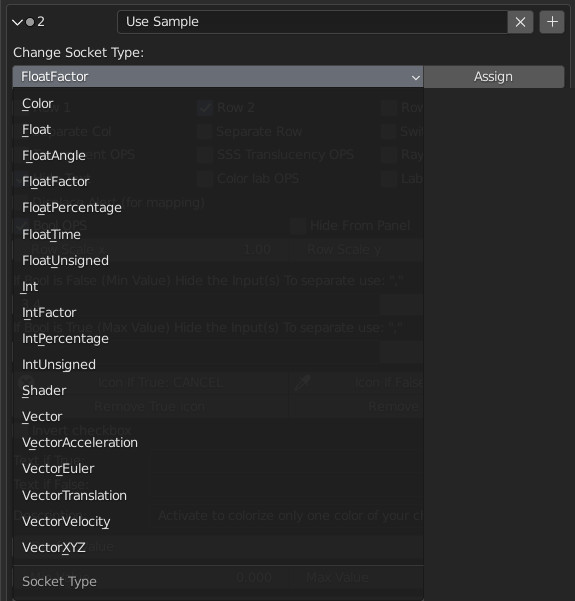
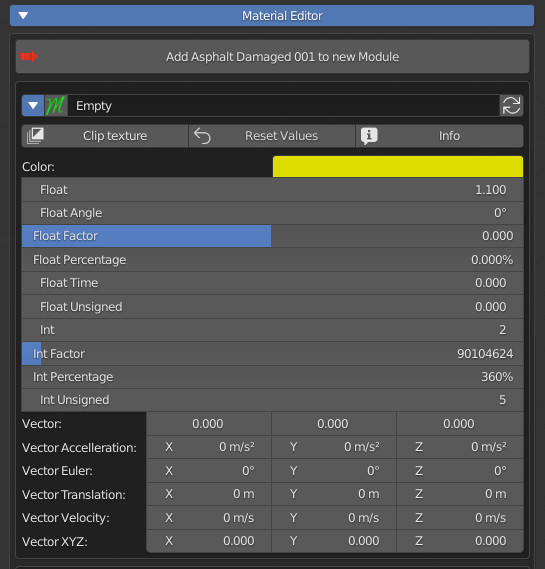
Below we have an example of the types of Sockets that can be used, they are practically all those available in Blender, some of them are not needed by Extreme PBR, we have left them, in the case of suggestions from users who can tell us what they think.
We suggest testing directly to find the best type of Properties to create your own custom panels.
- Color
- Float
- Float Angle
- Float Percentage
- Float Time
- Float Unsigned
- Int
- IntFactor
- IntPercentage
- IntUnsigned
- Vector
- Vector Accelleration
- Vector Translation
- Vector Velocity
- Vector XYZ
CU 9.2 Row Checkboxs

Row Cheboxs:
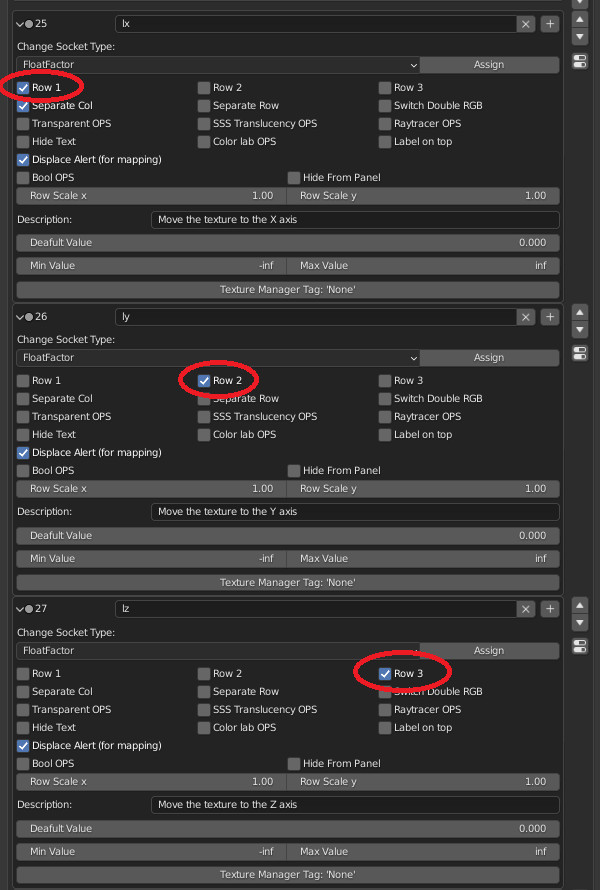
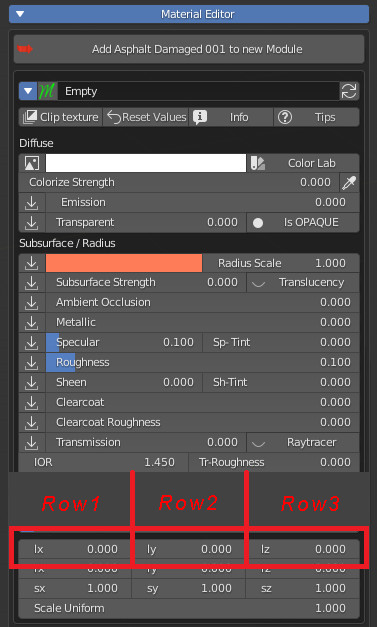
Row 1: If you want to start with a sequence of Properties on the same line, you will need to check Row1, so you will know that that property is the first to be placed in line.
Row 2: This will be the second property on the same line, it will only work if the previous socket (i.e. the one just above) is checked.
Row 3: This will be the third property on the same line, it will only work if the previous socket (i.e. the one just above) is checked, and the one even earlier.
We have chosen to put a maximum of 3 Row, in order not to make the interface potentially unreadable for the end user.
Example:

CU 9.3 Separate Row / Column
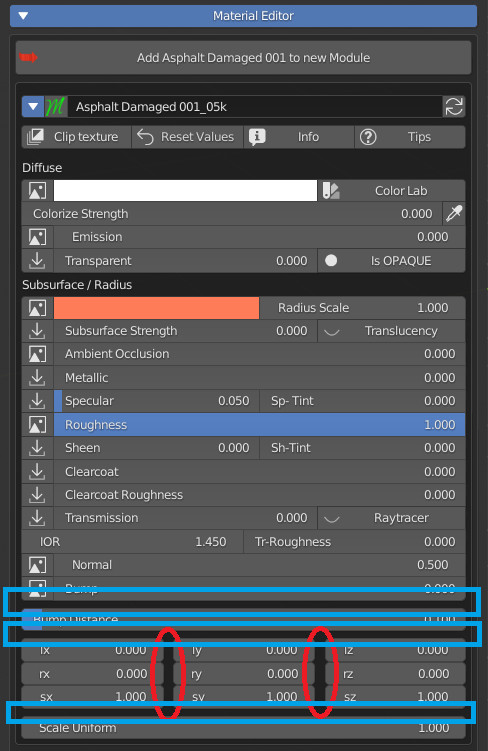
These two properties, if activated, will be separated from the previous property

Example:
Separate col (Blue)
Separate the column from the previous one.
Seprate Row (Red)
Separate the row from the previous one.
CU 9.4 Switch Double Rgb
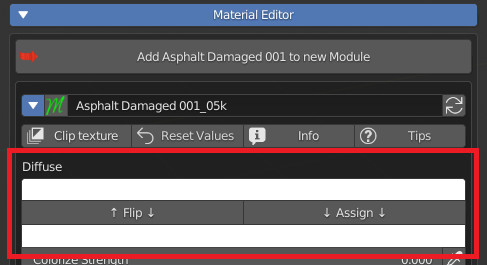
This property requires 2 consecutive “Color” Sockets, as it is used to show 2 buttons (Flip, Assign) which are useful for switching the 2 colors upside down or for assigning the upper color to the lower one.

Example:
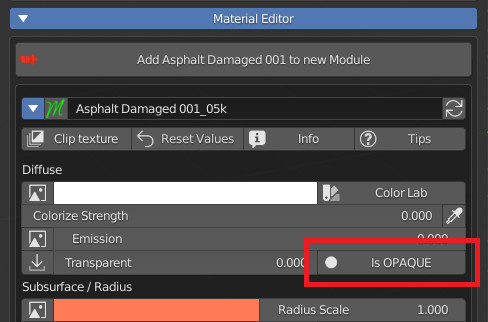
CU 9.5 Transparent OPS

Note: This is useful in regards to using the Eevee render engine.
If activated, it will show next to the property in the panel, a button, which pressed several times, will activate in sequence these material settings in Blender:
- Is Opaque:
- Blend Mode = Opaque
- Shadow Mode = Opaque
- Is Blend:
- Blend Mode = Alpha Blend
- Shadow Mode = Alpha Hashed
- Is Hashed:
- Blend Mode = Alpha Hashed
- Shadow Mode = Alpha Hashed
- Is Clip:
- Blend Mode = Alpha Clip
- Shadow Mode = Alpha Clip
Substantially, the properties of the “Settings” material will be changed, in order to make it easy for the end user to choose the best configuration.
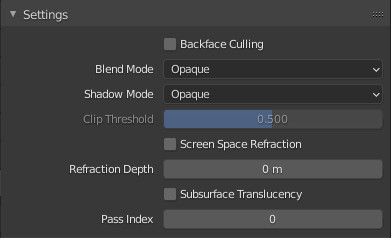
Transparent OPS in the panel:
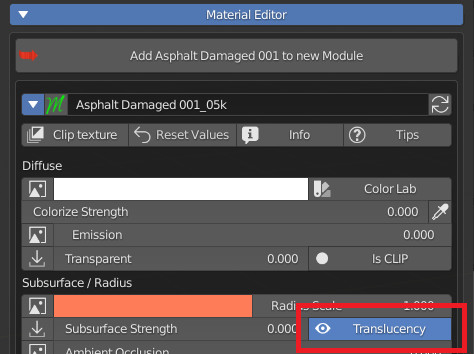
CU 9.6 SSS Translucency OPS

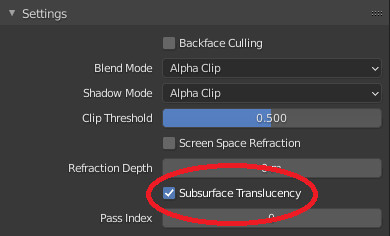
If activated, it will show in the panel a button next to the property where you can give the possibility to reach the Translucency
This button will also resolve conflicts with “Screen space Refraction”, in fact if it should be active, it will be deactivated once the button is pressed.
Basically this is a Boolean (On Off) button which is the native property of blender to enable or disable Blender’s native “Subsurface Translucency”.

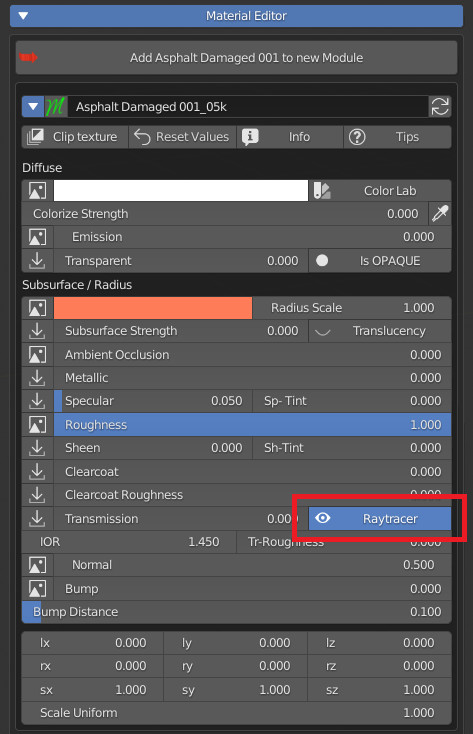
CU 9.7 Raytracer OPS
If activated, it will show next to the property in the Extreme PBR panel, a Boolean On / Off button, to activate the Screen Space Refraction, this is useful if you work with Eevee, and makes it much easier for the end user to activate or deactivate it. property.
Note: If “Subsurface Translucency” is active, this button will deactivate it.

Example:
CU 9.8 Hide Text
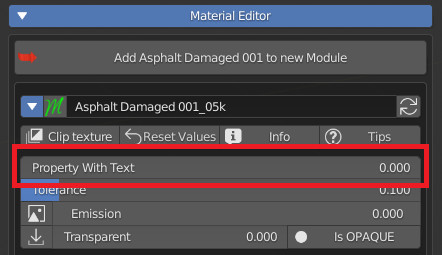
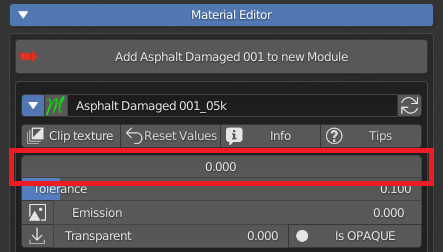
If activated, it will hide the Socket name in the Extreme PBR panel

Example:
Property Without “Hide Text”

Property With “Hide Text”
CU 9.9 Color Lab OPS
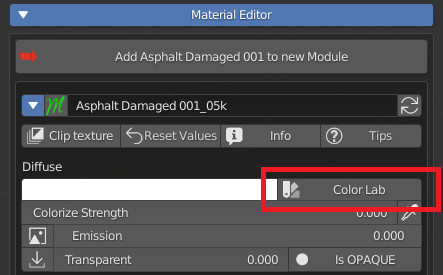
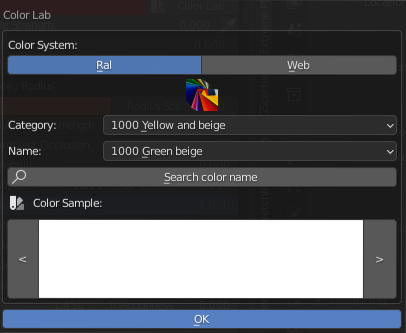
This can activate a very useful tool for the end user, namely the “Color Lab” operator. A button next to this Color property, this is used to open a Popup Panel that contains the tools that contain 2 Color Systems (Ral, Web).
This panel is useful for finding the desired colors among those in the color list.

Color Lab Button:
Color Lab Popup Panel:
CU 9.91 Label On Top
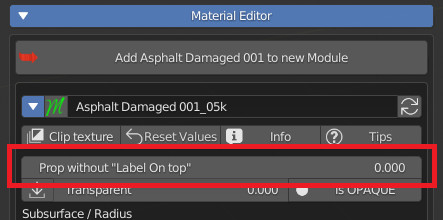
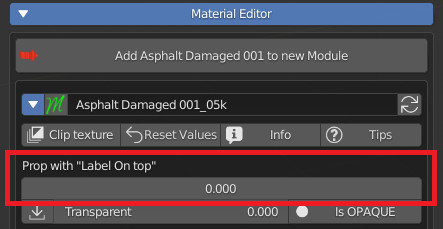
“Label on Top” is useful for moving text above the property.
This is very useful for “Decorating” the panel, making the design of it much more “Clean”.

Example:
Property without “Label On Top”
Property With Label On Top
CU 9.92 Displace Alert
If displace is active, and this value is not the default value, Show the alert button next to the button displaced in the object’s materials panel. If the Displacement is in modifier mode. User alert useful for not breaking the displacement view.

Why this?
Because as in the case in the example, if the Vector properties are modified, the displace map will not be moved, so this will cause an inconsistency between “The UV displacement mapping” and the Mapping Procedurally modified by moving the vectors mapping of the material.
In fact, in the Extreme PBR panel we also have a panel to modify the UV mapping (Loc, Rot, Scale) which avoids this problem
Example:
If the Displace is set to “Modifier”
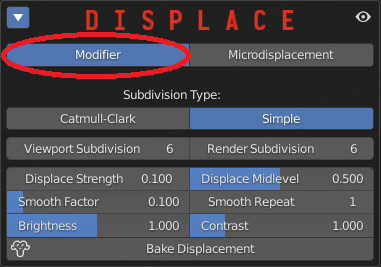
In this example, all the properties (Vector X, Y, Z) of the Extreme PBR panel have the “Displace Alert” property active, so if these values are changed, an alert button will be shown, as in the example here. right
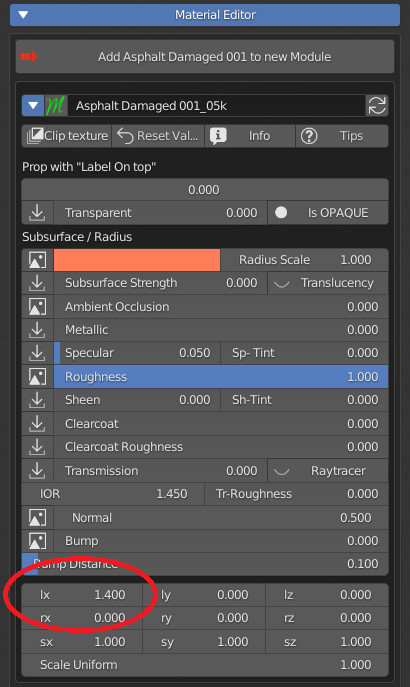
Below is an example of the “Displace Alert” button, if pressed, it will restore all the properties with the “Displace Alert” active, to the default values.
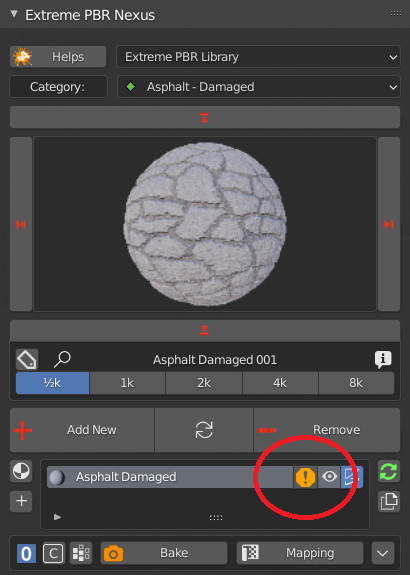
CU 9.93 Hide From Panel

If enabled, this will not be shown in the Extreme PBR panel.
CU 9.94 Bool OPS
Only for sockets other than “Color” and “Vector”.

If activated, this will replace the slider, with a Boolean Button, in the Extreme PBR panel.
Example:
Without Bool OPS (Slider)
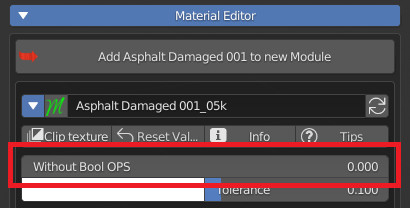
With Bool OPS (Button)
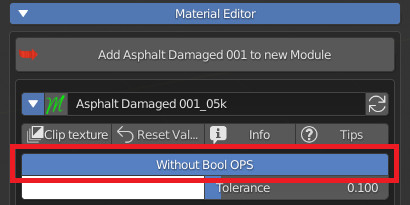
Invert CheckBox:

If Bool OPS is active, a further Property will be shown, ie “Invert Checkbox”, this is used to invert True False, then the Boolean button will turn on if False and it will turn off if True.
How to setup:
Keep in mind that a turned off Boolean will assume the “Min Value” value, while a turned on Boolean will assume the “Max Value” value.
So if you use Bool OPS, with a “Min Value” of 0 and a “Max Value” of 2, the Boolean Button will assume the value 0 from “False” and the value 2 from True.
Remember to set the default value to one of the two values you set as “Min Value” or “Max Value” do not use intermediate or different values, as it will not work very well and could create problems for end users.
Default Value/ Min Value/ Max Value:

Once Bool OPS is activated, New Properties will appear in the Socket Menu:
Text If True/False:
Here you can set 2 alternate texts if the Boolean prop is True or False.

Icon If True/False:
If you want to put icons on the Boolean button, you can choose which icons (Blender native ones), and you can choose both for Boolean True False, then 2 different icons for the two stages of the Boolean button
True/False, Remove
To remove icons from the button, press “Remove” under True / False respectively

Icon Manager Panel:
Here you can choose your icons to apply to the Boolean Button
Bool Exclusion:
Pay close attention. Here you can enter 2 lists of Sockets to exclude.
The first list will hide the properties from the user panel, if the button is True (i.e. active)
The second list will hide the property from the user panel if the button is False.
Separate numbers with commas (“,”)
This is useful to exclude Slider or other, if in the case the Boolean button must exclude some controls that in a given situation are not useful.
Rectify: This button is used to fix any formatting errors in the list, this is to make sure that the list has been compiled correctly.
The socket to be hidden must be different from itself.

To identify the socket number to exclude, you will be able to look at the socket number directly from this panel
(If you change the order of the sockets, you will need to double check the numeric list and update it.)
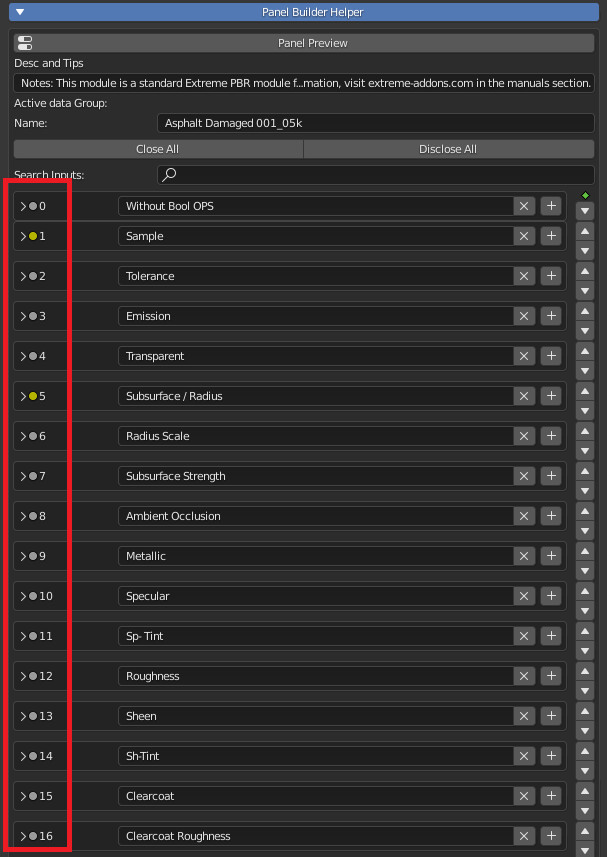
CU 9.95 Descriptions
If you fill in this field, the end user pressing the “TIps” button from the Extreme PBR panel will show some buttons at each property (Only if a description is not empty)

Example:
In this example, you can see that activating the Tips button will show small buttons with a circled question mark.
If the user presses these buttons, he will have access to your description into popup.
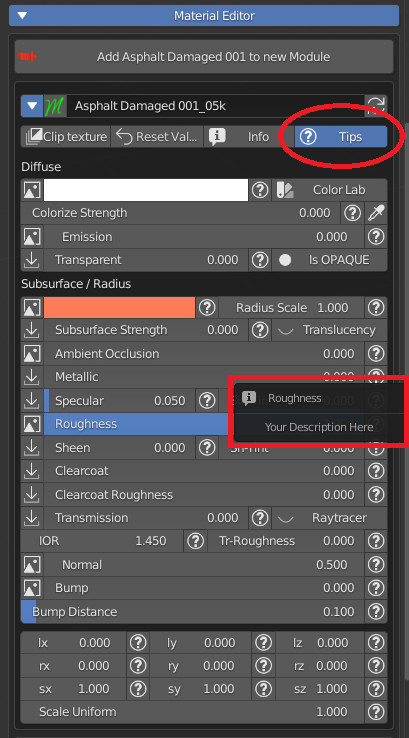
CU 9.96 Texture Manager Tag

“Texture Manager Tag” is used to show a button in the Exreme PBR panel to bring up the Texture Manager.
Note: This is needed if you use this sequence of nodes in the Module:
Example Whit Roughness With “ROUGHNESS” Tag into Node Image.

Now the “Roughness” Tag will also be set on the Socket:
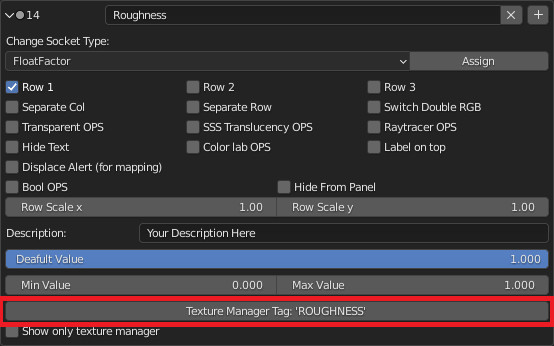
Now a button will be shown in the main panel of Extreme PBR:
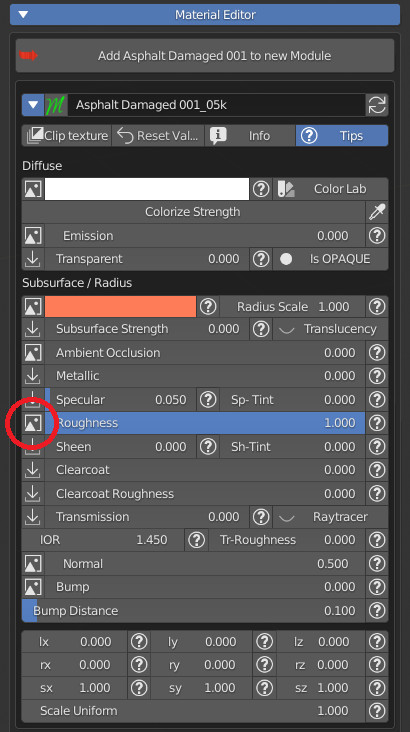
This button once pressed the user will have access to the Texture Manager:
To show this button, remember that you need to have an Image Type Tagged node with the same Tag as the socket.
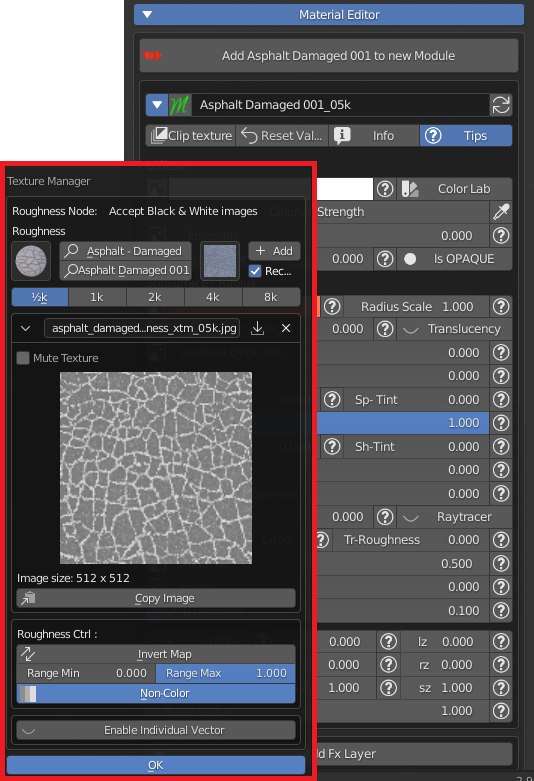
CU 9.97 Show Only Texture Manager:

If activated it will only show the “Texture Manager” button on the property in the main Blender panel:
Example:
Without “Show Only Texture Manager”:
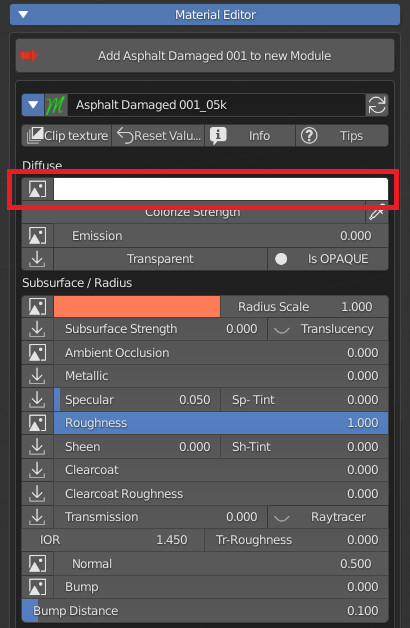
With “Show Only Texture Manager”:
